December 13, 2012

Finn the Human Earflap Beanie

By Janet Carrillo "damn it Janet, let's crochet!"
Beanie being model off by my son.

SIZE/MEASUREMENTS
Child (20" - 21.5" head circumference) nice stretchy fit
This same pattern fits a teen and adult with a small head (it fit me, nice snug fit)

MATERIALS
*Crochet hook size: 5.0mm (H)
*Worsted weight yarn: White (90yds), Light Blue (55yds) & Beige (6yds)
*Stitch Markers to mark your rounds
*Felt: Beige, White, Red & Pink
*2 black buttons with a diameter of 2cm
*Tapestry needle
*Matching Thread
*Hot glue

GAUGE
At the end of round 8, laying flat = 6.75 inches in diameter.
Don’t forget to check your gauge.

PATTERN NOTES
  Numbers in ( ) at the end of each round/row indicate the total number of stitches.
  Always use stitch markers to mark your rounds.
  The ch2, at the beginning of each round DOES NOT count as an hdc.
  You slip stitch on the first hdc, not on top of the ch 2.


BEANIE starting with white
  Rnd 1: 8hdc in magic ring, sl st into 1st st (8)
  Rnd 2: ch2, hdc in same st you sl st, *2hdc in next st* repeat from * to * around, sl st on top of ch2 (16)
  Rnd 3: ch2, hdc in same st you sl st, hdc in next st, *2hdc in next st, hdc in next st* repeat from * to * around, sl st on top of ch2 (24)
  Rnd 4: ch2, hdc in same st you sl st, hdc in next 2 sts, *2hdc in next st, hdc in next 2 sts* repeat from * to * around, sl st on top of ch2 (32)
  Rnd 5: ch2, hdc in same st you sl st, hdc in next 3 sts, *2hdc in next st, hdc in next 3 sts* repeat from * to * around, sl st on top of ch2 (40)
  Rnd 6: ch2, hdc in same st you sl st, hdc in next 4 sts, *2hdc in next st, hdc in next 4 sts* repeat from * to * around, sl st on top of ch2 (48)
  Rnd 7: ch2, hdc in same st you sl st, hdc in next 5 sts, *2hdc in next st, hdc in next 5 sts* repeat from * to * around, sl st on top of ch2 (56)
  Rnd 8: ch2, hdc in same st you sl st, hdc in next 6 sts, *2hdc in next st, hdc in next 6 sts* repeat from * to * around, sl st on top of ch2 (64)
  Rnd 9: ch2, hdc in same st you sl st, hdc in next 7 sts, *2hdc in next st, hdc in next 7 sts* repeat from * to * around, sl st on top of ch2 (72)
  Rnd 10-16: ch2, hdc in each st around, in the last st of rnd 16 change to light blue, sl st on top of ch 2 (72)
  Rnd 17- 20: ch2, hdc in each st around, sl st on top of ch2 (72)
Don’t F/O. Continue to make the first earflap.

1st Earflap with light blue
  Row 1: ch 1, sc in next 12 sts, ch 1, turn (12)
  Row 2-3: sc in each st across, ch 1, turn (12)
  Row 4: sc2tog, sc in next 8 sts, sc2tog, ch 1, turn (10)
  Row 5: sc in each st across, ch 1, turn (10)
  Row 6: sc2tog, sc in next 6 sts, sc2tog, ch 1, turn (8)
  Row 7: sc in each st across, ch 1, turn (8)
  Row 8: sc2tog, sc in next 4 sts, sc2tog, ch 1, turn (6)
  Row 9: sc2tog, sc in next 2 sts, sc2tog, ch 1, turn (4)
  Row 10: sc2tog, sc2tog (2)
F/O, secure and weave in the ends.

2nd Earflap with light blue
Count to the right 23 sts (that’s including the 12 sts from the 1st earflap). Attach to the 24th st.Repeat rows 1-10 from 1st earflap.
Don’t F/O. Continue to make the edging.

EDGING with light blue
ch 1, turn, sc in each st around; working evenly around each earflap. Remember to mark your round with a stitch marker. Do another round of sc around the entire beanie. Join with a sl st into the 1st sc to give it an even finish.F/O, secure and weave in the ends.

EARS with white; make 2
  Rnd 1: 8hdc in magic ring (8)
  Rnd 2: sc in next st, 2sc in next st around (12)
  Rnd 3-7: hdc in each st around, sl st into 1st st (12)
F/O, secure and weave in the ends.

BRAIDS
Cut 18 pieces of yarn (9 for each earflap) about 30 inches long. Fold each bunch in half and push the folded end through an opening in the bottom of each earflap. Pull the unfolded ends through the loop and pull tight. Braid the strands and tie a knot to secure the braid. Complete the second braid the same way. I use 3 strands of each in light blue, white and beige color; you can use just one color or whatever combination you like.

ASSEMBLE
     I recommend pinning the pieces in place before sewing them to make sure you have them in the position you like best before sewing. (Most people like to use the yarn in the end from the finish pieces to sew them in place but I personally like to use matching thread).
     EARS...stuff the ears very lightly so the stuffing won’t show through. Sew the ears between round 5 and 7.
  For the face I will be sharing with you my sketch I made before I started cutting up the felt. I use this sketch to get my parts looking perfectly. Just cut the pieces and trace them into the felt. Follow the template below for the colors you need to use. You can either glue them in place with hot glue or sew them.
     EYES...you will need 2 black buttons with a diameter of 2cm. As you can see in the above template I wrote down where to place them in the face. Follow the guide.

This beanie will go great with the Adventure Time Pillows.
You can purchase these individually or as a combo pack in
any of my shops (Ravelry, Etsy or Craftsy) for a very low price.

GLOSSARY:
ch/s:chain/s || sc: single crochet || hdc: half double crochet || sl st: slip stitch
sc2tog: single crochet 2 stitches together || st/s: stitch/es || rnd: round || f/o: finish off


Don't forget to like this blog facebook fan page.
Or to follow our Instagram page. :)

Have a nice crochet time!
- Janet

Finn the Human and Adventure Time are copyright by Cartoon Network.
This pattern is an original pattern by Janet Carrillo "damn it Janet, let's crochet!" (December 2012). Please do not claim this pattern as your own. If you wish to share this pattern, you may link to this pattern but please do not reprint/repost it on your site. You may print and keep a copy for your own personal use. Please do not resell or distribute it.

October 31, 2012

Mickey Mouse Earflap Beanie (teen - adult size)

By Janet Carrillo "damn it Janet, let's crochet!"

SIZE/MEASUREMENTS
Teen - Adult (21" - 23" head circumference)

MATERIALS
*Crochet hook size: 5.5mm (I)
*Worsted weight yarn: Black (110yds), Red (55yds) & Yellow (25yds)
*2 oval white buttons
*Stitch Markers to mark your rounds
*Tapestry Needle

GAUGE
At the end of round 8, laying flat = 7 inches in diameter.
Don’t forget to check your gauge.

PATTERN NOTES
  Numbers in ( ) at the end of each round/row indicate the total number of stitches.
  Always use stitch markers to mark your rounds.
  There's no need to slip stitch and/or chain when going to the next round unless stated to do so.
  The ch 2 at the beginning of each round counts as 1 hdc.


BEANIE starting with yellow
  Rnd 1: 8hdc in magic ring, sl st into 1st st (8)
  Rnd 2: ch2, hdc in same st you sl st, *2hdc in next st* repeat from * to * around, sl st on top of ch 2 (16)
  Rnd 3: ch2, hdc in same st you sl st, hdc in next st, *2hdc in next st, hdc in next st* repeat from * to * around, sl st on top of ch 2 (24)
  Rnd 4: ch2, hdc in same st you sl st, hdc in next 2 sts, *2hdc in next st, hdc in next 2 sts* repeat from * to * around, sl st on top of ch 2 (32)
  Rnd 5: ch2, hdc in same st you sl st, hdc in next 3 sts, *2hdc in next st, hdc in next 3 sts* repeat from * to * around, sl st on top of ch 2 (40)
  Rnd 6: ch2, hdc in same st you sl st, hdc in next 4 sts, *2hdc in next st, hdc in next 4 sts* repeat from * to * around, sl st on top of ch 2 (48)
  Rnd 7: ch2, hdc in same st you sl st, hdc in next 5 sts, *2hdc in next st, hdc in next 5 sts* repeat from * to * around, sl st on top of ch 2 (56)
  Rnd 8: ch2, hdc in same st you sl st, hdc in next 6 sts, *2hdc in next st, hdc in next 6 sts* repeat from * to * around, sl st on top of ch 2 (64)
  Rnd 9-14: ch2, hdc in each st around, in last st change to red, sl st on top of ch 2 (64)
  Rnd 15-20: ch2, hdc in each st around, sl st on top of ch 2 (64)
Don’t F/O, continue to make the first earflap.

1st EARFLAP with red
  Row 1: ch1, sc in next 12 sts, ch1, turn (12)
  Row 2-3: sc in each st across, ch1, turn (12)
  Row 4: sc2tog, sc in next 8 sts, sc2tog, ch1, turn (10)
  Row 5: sc in each st across, ch1, turn (10)
  Row 6: sc2tog, sc in next 6 sts, sc2tog, ch1, turn (8)
  Row 7: sc in each sc across, ch 1, turn (8)
  Row 8: sc2tog, sc in next 4 sts, sc2tog, ch1, turn (6)
  Row 9: sc2tog, sc in next 2 sts, sc2tog, ch1, turn (4)
  Row 10: sc2tog, sc2tog (2)
F/O, secure and weave in the ends.

2nd EARFLAP with red
Count to the right 23 sts. Attach the yarn on 24th st, ch1, sc in next 12 sts, ch1, turn. Continue with rows 2-10 just like from the 1st earflap.
F/O, secure and weave in the ends.

EDGING with yellow
Attach yarn in any stitch and ch1, sc in each st around; working evenly around each earflap. Remember to mark your round with a stitch marker. Join with a sl st in the first sc to give it a nice even finish.
F/O, secure and weave in the ends.

EARS with black; make 2
  Rnd 1: 6sc in magic ring (6)
  Rnd 2: 2sc in each st around (12)
  Rnd 3: sc in next st, 2sc in next st around (18)
  Rnd 4: sc in next 2 sts, 2sc in next st around (24)
  Rnd 5: sc in next 7 sts, 2sc in next st around (27)
  Rnd 6-9: sc in each st aroud (27)
  Rnd 10: sc in next 7 sts, sc2tog around (24)
  Rnd 11: sc in next 2 sts, sc2tog around (18)
  Rnd 12: sc in next st, sc2tog around (12)
 F/O, secure and weave in the ends.

BRAIDS
Cut 18 pieces of yarn (9 for each earflap) about 36 inches long. Fold each bunch in half and push the folded end through an opening in the bottom of each earflap. Pull the unfolded ends through the loop and pull tight. Braid the strands and tie a knot to secure the braid. Complete the second braid the same way.

ASSEMBLE
     All that is left to do is adding the 2 oval buttons just like in the picture and sewing the ears on top of the beanie. There's no need in stuffing the ears just flatten them out.

You can easily turn the beanie into Minnie Mouse. If you need any help at all in making Minnie, don't hesitate to contact me.
Idea on how to make a
Minnie Mouse Earflap Beanie
This beanie will go great with the Mickey Mouse Pillow.
You can purchase this pattern in any of my shops (Ravelry, Etsy or Craftsy)
for a very low price.

GLOSSARY:
ch/s:chain/s || sc: single crochet || hdc: half double crochet || sl st: slip stitch
sc2tog: single crochet 2 stitches together || st/s: stitch/es || rnd:round || f/o: finish off


Don't forget to like this blog facebook fan page.
Or to follow our Instagram page. :)

Have a nice crochet time!
- Janet

Mickey Mouse is copyright by Disney.
This pattern is an original pattern by Janet Carrillo "damn it Janet, let's crochet!" (October 2012). Please do not claim this pattern as your own. If you wish to share this pattern, you may link to this pattern but please do not reprint/repost it on your site. You may print and keep a copy for your own personal use. Please do not resell or distribute it.

October 17, 2012

Thomas beanie and amigurumi

  Finish one of the Christmas presents for my nephew. I just know that he's going to love them. :)
  The Thomas beanie is a free pattern courtesy of Kristine Mullen; link to pattern. I had this beanie pattern save for awhile now waiting for someone to make it for. I wanted to make it for son but...
Son: "I don't like Thomas anymore that's for babies."
Me: "Then why do you still play with your Thomas trains and with the Thomas houses?"
Son: ..speechless..
Me: ..laughs..
  Now my youngest nephew whose a year old loves Thomas. I'm glad I save the pattern. :) I did add googly eyes instead of crocheting them. I love the way it turn out. Every little boy should own this beanie. It's absolutely adorable. :)
  Thomas amigurumi, ins't it adorable? :) A year ago I seen this amazingly well detail Thomas that was knitted but unfortunately it was publish on a pamphlet that contain 4 different patterns. I search for the pamphlet on eBay and I did find it but the asking price was ridiculously high. A few days ago, I decide to search on google and found a free crochet pattern but I wasn't too convince in making him that I decide to continue my search on etsy and found a cute pattern. I immediately purchased it. When I receive it I went over the pattern and notice that theirs sooo many pieces to make and keep track of. I was like "omg...Janet this is a lot of work". As I finish a piece I will pinned them in the place they where suppose to go so I wouldn't forget where it needed to go.
  Overall the pattern is amazingly well written. The last few pages it contains many illustrations on how to work the stitches required to know to make this plushie. :) This Thomas amigurumi is a pay pattern from getfun on etsy.

  If you haven't decide what to give to your grandkids/kids/nephews/niece you should consider this cute little set. :)

Don't forget to like this blog facebook fan page. :)

Have a nice crochet time!
- Janet

October 8, 2012

My pattern has been feature in AllFreeCrochet

  Today I got an email saying that my Owl Booties where feature in AllFreeCrochet.com. YAY!!! I never been feature in anything. So loving this moment. 。◕‿◕。
So come grab a drink! A glass of Champagne maybe?
Or perhaps you'd prefer a cup of tea? 
And let's all celebrate together!!! 

- Janet

September 24, 2012

Baby Soccer Ball Beanie

By JC Designs
This cute little beanie was requested by a friend. :)

SIZE/MEASUREMENTS
newborn - 3months (13" - 15" head circumference)

MATERIALS
*Crochet hook size: 4.0mm & 6.0mm
*Worsted weight yarn: White & Black
*Stitch Markers

GAUGE
  At the end of round 5, laying flat = 4 inches in diameter. Don’t forget to check your gauge. :)

PATTERN NOTES
  There's no need to slip stitch and/or chain when going to the next round unless stated to do so.
  Numbers in ( ) at the end of each round or row indicate the total number of stitches for that round or row.
  Always use stitch markers to mark your rounds. :)


BEANIE in white with 6.0mm
  Rnd 1: 12 hdc in magic ring (12)
  Rnd 2: hdc in next hdc, 2 hdc in next hdc around (18)
  Rnd 3: hdc in next 2 hdc, 2 hdc in next hdc around (24)
  Rnd 4: hdc in next 3 hdc, 2 hdc in next hdc around (30)
  Rnd 5: hdc in next 4 hdc, 2 hdc in next hdc around (36)
  Rnd 6: hdc in next 7 hdc, 2hdc in next hdc around, hdc in last 4 hdc (40)
  Rnd 7-14: hdc in each hdc around, sl st into the first st of previous rnd (40)
F/O and weave in ends. Attach black yarn where you sl st in previous round.
  Rnd 15: sc in each hdc around (40)
F/O and weave in ends. 

PENTAGON in black with 4.0mm, make 5
  Rnd 1: 10 sc in magic ring (10)
  Rnd 2: sc in next sc, 3sc in next sc around (20)
  Rnd 3: sc in next 3sc, 3sc in next sc around (30)
  Rnd 4: sc in next 5sc, 3sc in next sc around (40)
  Rnd 5: sl st into the next 3sts to give it a even look
F/O and weave in ends.


ASSEMBLY
   I recommend pinning the pieces in place before sewing them to make sure you have them in the position you like best.
  Place one of the pentagons on top. The other 4 pentagons space them out evenly around the beanie above the third round from the bottom. Sew them in place. I personally like to sew my pieces with matching thread instead of the left over yarn.


Don't forget to like this blog facebook fan page. :)

Have a nice crochet time!
- Janet

This pattern is an original pattern by Janet Carrillo "JC Designs" (September 2012). Please do not claim this pattern as your own. If you wish to share this pattern, you may link to this pattern but please do not reprint/repost it on your site. You may print and keep a copy for your own personal use but you may not sell or distribute it, or sell items may from this pattern.

September 18, 2012

DIY - googly eyes

  I was on instagram and saw this really cool idea from _iCrochet_ and I wanted to share it with you. Let's say you're making a small amigurumi but you ran out of googly eyes. No worry you can make your own with items in your home.

MATERIALS
*Small white piece of construction paper or just plain white paper
*2 tiny black beads or black paper
*Round plastic tray from pills

INSTRUCTIONS
Make sure you clean the tray so that there's no medicine residue in it.
Cut the little round tray.
Make some small black round pieces for the eyes or use beads.
Apply some glue around the tray.
Glue the tray onto a piece of white construction paper. Don't forget to put the black bead or piece of paper in there.
Let the glue dry and cut around the white paper.

There....you have your easy, zero cost, recycled GOOGLY EYES!!!

Don't forget to like this blog facebook fan page. :)

- Janet

September 7, 2012

Panda Zippered Wristlet

By JC Designs
This cute little panda wristlet was a request from one of my cousins. :)

SIZE/MEASUREMENTS
Horizontally 7.5" and 4.5" vertically but can vary based on yarn and hook size.

MATERIALS
*Crochet hook size 3.5mm
*Worsted weight yarn: White & Black
*Zipper 18cm length
*2 2cm black buttons
*Felt: White & Black
*Fabric of choice
*Stitch Marker to mark your rounds
*Tapestry Needle
*Thread
*Hot Glue

PATTERN NOTES
  Numbers in ( ) at the end of each round or row indicate the total number of stitches for that round or row.

WRISTLET with white
  Rnd 1: ch 31, hdc in 2nd ch from hook, hdc in the next 28chs, 3hdc in next ch, hdc in next 28chs, 2hdc in last ch, sl st into the first st (62)
  Rnd 2-12: ch 1, hdc in the same stitch you sl st, hdc around, sl st into the first st of previous rnd (62)
  Rnd 13-14: ch1, sc in the same stitch you sl st, sc around, sl st into the first st of previous rnd (62)
  Rnd 15: ch1, 3hdc in the same stitch you sl st, *sl st in next sc, 3hdc in next sc* repeat from * to * all the way around
F/O and weave in ends.

EYES make 2 with black
  Rnd 1: 8sc in magic ring (8)
  Rnd 2: 2hdc in each sc around (16)
  Rnd 3: sc in next st, hdc in next st, 2dc in the next 3sts, sc in next 10sts (19)
  Rnd 4: sl st into the next 2sts to give it an even look
F/O and weave in ends.

STRAP with white
  ch 53 (or chain to desire length), sc in 2nd ch from hook and across (52)
F/O and leave a tail to sew the strap unto the wristlet. When folded is measures 6".


ASSEMBLY
   I recommend pinning the pieces in place before sewing them to make sure you have it in the position you like best before sewing.
  The eyes you want to sew them between row 6 and 11. Place them 1.5" apart from each other. They gotta be slightly tilted and keep the part with the dc's facing down.
  With the white felt cut a slightly bigger circle then the buttons. Glue it in place. Then sew the buttons on top of the white circles.
Click on image to enlarge. :)
  With black felt cut a small triangle and glue it in place between row 4 and 5.
  Now you can pin the zipper and fabric in place to begin sewing them. This took me awhile cause I'm a perfectionist plus cause I had to sew it by hand since I don't own a sewing machine. But this would keep your items from falling out.
  Sew the strap on wristlet.
Don't forget to like this blog facebook fan page. :)

Have a nice crochet time!
- Janet

This pattern is an original pattern by Janet Carrillo "JC Designs" (September 2012). Please do not claim this pattern as your own. If you wish to share this pattern, you may link to this pattern but please do not reprint/repost it on your site. You may print and keep a copy for your own personal use but you may not sell or distribute it, or sell items may from this pattern.

August 20, 2012

Baby Owl Booties (newborn - 3 months old)

By Janet Carrillo "damn it Janet, let's crochet!"
These were inspired by several owl booties I saw while searching through Google.
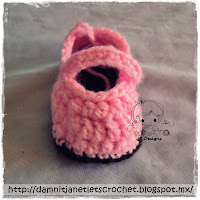
Aren't they adorable? A must have for your newborn.
SIZE/MEASUREMENTS
newborn - 3 months old (3.5" sole)

MATERIALS
*Crochet hook size: 4.0mm (G)
*Worsted Weight Yarn: Brown (15yds), Pink (22yds), White (6yds) & Orange (3yds) or any color of choice
*Stitch Markers to mark your rounds
*2 - 12mm pink buttons for straps
*4 - 10mm black buttons for eyes
*2 small flowers
*Tapestry Needle
*Matching Thread
*Hot Glue

PATTERN NOTES - must read...
 Numbers in ( ) at the end of each round/row indicate the total number of stitches.
 Always use stitch markers to mark your rounds.
 There's no need to sl st and/or ch when going to the next round unless stated to do so.
 Always do the 1st stitch where you slip stitch from the previous round.
 The chain, in the beginning, does NOT count as one stitch unless stated otherwise.
 You slip stitch on the first sc, not on top of the chain 1.

SPECIAL STITCHES
Other side of the foundation chains - this VIDEO explains how to do this technique.
Invisible join - this VIDEO explains how to do this technique.


SOLE with brown
  Rnd 1: ch11, 2sc in 2nd ch from hook, sc in next 2 chs, hdc in next 3 chs, dc in next 3 chs, 6dc in last ch, other side of the foundation chains dc in next 3 chs, hdc in next 3 chs, sc in next 2 chs, sc in last ch, sl st into 1st st (25)
  Rnd 2: ch1, 2sc in the same st you sl st, sc in next 9 sts, 2sc in next 2 sts, sc in next 2 sts, 2sc in next 2 sts, sc in next 9 sts, sl st into 1st st (30)
  Rnd 3: ch1, sc in the same st you sl st, sc in next st, 2sc in next st, sc in next 10 sts, 2hdc in next 2 sts, sc in next 2 sts, 2hdc in next 2 sts, sc in next 10 sts, 2sc in last st, sl st into 1st st (36)
F/O, secure and weave in the ends. Attach the pink yarn where you sl st from previous round.

UPPER PART with pink
  Rnd 4: working in back loops for this round only ch1, sc in the same st you sl st and sc in each st around, sl st into 1st st (36)
  Rnd 5: ch1, sc in the same st you sl st, sc in next 14 sts, hdc2tog, hdc in next 5 sts, hdc2tog, sc in next 12 sts, sl st into 1st st (34)
  Rnd 6: ch1, sc in the same st you sl st, sc in next 2 sts, sc2tog, sc in next 6 sts, hdc2tog, hdc in next 2 sts, dc in next 8 sts, hdc in next 2 sts, hdc2tog, sc in next 3 sts, sc2tog, sc in next 2 sts, sl st into 1st st (30)
  Rnd 7: ch1, sc in the same st you sl st, sc in next 9 sts, hdc2tog, hdc2tog, hdc2tog, hdc in next 2 sts, hdc2tog, hdc2tog, hdc2tog, sc in next 6 sts, sl st into 1st st (24)
  Rnd 8: (LEFT bootie) ch1, sl st in the same st you sl st and ch1, sl st in next 18 sts, ch12, sc in the 7th ch from hook and in next 5 chs, continue to sl st around the bootie,  join to 1st st with the invisible join
  Rnd 8: (RIGHT bootie) ch1, sl st in the same st you sl st and ch1, sl st in next 8 sts, ch12, sc in the 7th ch from hook and in next 5 chs, continue to sl st around the bootie, join to 1st st with the invisible join
F/O, secure and weave in the ends.

EYES with white; make 4
  Rnd 1: 8hdc in magic ring, join to 1st st with the invisible join
F/O, secure and weave in the ends.

NOSE with orange; make 2
  Row 1: ch4, sl st in 2nd ch from hook, hdc in next ch, dc in last ch (3)
F/O, secure and weave in the ends.


ASSEMBLE
     I recommend pinning the pieces in place before sewing them to make sure you have them in the position you like best before sewing. (Most people like to use the yarn at the end of the finished pieces to sew them in place, but I personally like to use matching thread).
     Sew the 12mm buttons for the straps.
     EYES...you want to place the eyes close to each other on the very top center of the booties. Sew the 10mm buttons on top of the white part of the eye.
     PEAK...I place them a little under the eye and sew it in place.
     The little flowers I found them at my local yarn store. I use hot glue to place them in the booties.
Moster Lene kindly translated the pattern in Danish. If you would like the pattern in Danish it can be found here.


GLOSSARY:
ch/s:chain/s || sc: single crochet || hdc: half double crochet || dc: double crochet || sl st: slip stitch || st/s: stitch/es
sc2tog: single crochet 2 stitches together || hdc2tog: half double crochet 2 stitches together
rnd: round || f/o: finish off


Don't forget to like this blog facebook fan page.
Or to follow our Instagram page. :)

Have a nice crochet time!
- Janet

This pattern is an original pattern by Janet Carrillo "damn it Janet, let's crochet!" (August 2012). Please do not claim this pattern as your own. If you wish to share this pattern, you may link to this pattern but please do not reprint/repost it on your site. You may print and keep a copy for your own personal use. Please do not resell or distribute it.

July 26, 2012

Koopa Paratroopa

He's cute. Isn't he?
  My son had been asking me for awhile to make him the red Koopa with wings; Koopa Paratroopa. I finally got some time to make him and he turn out perfect. The pattern I use for the Koopa was a free pattern courtesy of Lupita Suarez; link to pattern. I just change the parts that where green to red. It's a very well written pattern. :) For the wings I use Melissa Mall pattern; The Golden Snitch. I use a 4.5mm hook for the wings and it turn out to be a perfect size for the Koopa. I love the way it turn out and so does my son. :)
Don't forget to like this blog facebook fan page. :)

Have a nice crochet time!
- Janet

June 22, 2012

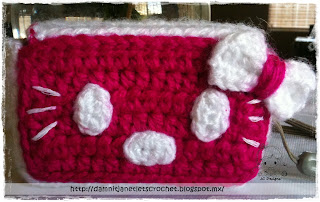
Hello Kitty Camera Cozy

By JC Designs
SIZE/MEASUREMENTS
To fit a Sony Cyber-shot [3.5" x 2" x .75"] but this same pattern could also be adjusted to fit any other camera out there. You could change the color of the cozy to white, eyes black and nose yellow to make it look like the classic Hello Kitty look.

MATERIALS
*Crochet hook size: 2.5mm & 3.5mm
*Worsted weight yarn: Fuchsia (20yds) & White (18yds)
*Tapestry Needle
*Fuchsia & White Thread
*Sewing Needle
*Snap Fastener

PATTERN NOTES
  Numbers in ( ) at the end of each round or row indicate the total number of stitches for that round or row.

FRONT with fuchsia, 3.5mm hook
  Row 1: ch 17, hdc in 2nd ch from hook and hdc in each ch across, ch 2, turn (15)
  Row 2-5 : hdc in next hdc across, ch 2, turn (15)
  Row 6: hdc in next hdc across, ch 1, turn (15)
  Row 7: (front loops for the top part ONLY) sl st all the way around
F/O, secure and weave in ends.

FRONT TOP with white, 3.5mm hook
  Row 1: On the back loops left unworked, attach the white yarn and hdc across, ch 1, turn (15)
My Hello Kitty pj's. :)
  Row 2-3: hdc in next hdc across, ch 2, turn (15)
  Row 4: dec over the next 2hdc, hdc in next 11hdc, dec over the next 2hdc, ch 2, turn (13)
  Row 5: dec over the next 2hdc, hdc in next 9hdc, dec over the next 2hdc, ch 2, turn (11)
  Row 6: dec over the next 2hdc, hdc in next 7hdc, dec over the next 2hdc, ch 2, turn (9)
F/O, secure and weave in ends.
  Row 7: Attach white yarn in any corner and sl st all the way to the next corner.
F/O, secure and weave in ends.
On the sl st side, embroidery pink yarn. I did mine 2chs length. You can make yours smaller or larger.

BACK with fuchsia, 3.5mm hook
  Row 1: ch 17, hdc in 2nd ch from hook and hdc in each ch across, ch 2, turn (15)
  Row 2-5: hdc in next hdc across, ch 2, turn (15)
  Row 6: hdc in next hdc across, ch 1, turn (15)
  Row 7: sl st all the way around
F/O, secure and weave in ends.

SIDE with white, 3.5mm hook
  Row 1: ch 5, hdc in 2nd ch from hook and hdc in each ch across, ch 2, turn (3)
  Row 2-22: hdc in next hdc across, ch 2, turn (3)
  Row 23: ch 2, hdc in the 3rd st, ch 2, turn [NOTE: This little gap we made here is so you can pull the strap from your camera through. If you don't have a strap in your camera then there's no need to make the gap.]
  Row 24: hdc in next hdc, hdc in next 2chs, ch 2, turn (3)
  Row 25: hdc in next hdc across (3)
F/O, secure and weave in ends.

EYES/NOSE make 3, white yarn, 2.5mm hook
  Rnd 1: ch4, sc in 2nd ch from hook and in the next ch, 3sc in next ch, other side of the chs sc in next ch, 2sc in last ch (8)
  Rnd 2: sl st in only the first st to give it a even look
F/O and weave in ends.

BOW white yarn, 2.5mm hook
  Row 1: ch 9, hdc in 2nd ch from hook and hdc in each ch across, ch 2, turn (7)
  Row 2-3: hdc in next hdc across, ch 2, turn (7)
F/O, secure and weave in ends. With a strand of fuchsia yarn, tie it in the middle of the bow and keep wrapping it in the center. Then weave in that strand of yarn in the back.

ASSEMBLY
   I recommend pinning the pieces in place before sewing them to make sure you have it in the position you like best before sewing.
  Sew the back piece and the side piece together. The slip stich side will be the outside part. Then sew on the front piece. I use the whip stitch technique with fuchsia thread.
  The eyes are placed 1.25" apart between row 3 and 5. Sew them in place with white thread. The nose is sewn with white thread in row 2. Sew the bow on the upper right hand side. Embroidery the whiskers with white thread.
  Tip: you can also use felt for the eyes/nose/whiskers.
  Finally sew on the snap fastener in place. :)
Don't forget to like this blog facebook fan page. :)

Have a nice crochet time!
- Janet

Hello Kitty is copyright Sanrio.
This pattern is an original pattern by Janet Carrillo "JC Designs" (June 2012). Please do not claim this pattern as your own. If you wish to share this pattern, you may link to this pattern but please do not reprint/repost it on your site. You may print and keep a copy for your own personal use but you may not sell or distribute it, or sell items may from this pattern.

June 14, 2012

Hedgehog Applique

By Janet Carrillo "damn it Janet, let's crochet!"
Ideas on how to use this appliques...
*These would be great to apply to any project.
*You can add them to beach towels,
*turn them into a keychain or fridge magnet.
*You can also make several and make a garland.
*Attach a ribbon to make them into bookmarks.

SIZE/MEASUREMENTS
approx. 2"height x 2.5"length
...but they can vary based on yarn and hook size.

MATERIALS
*Crochet hook size: 3.5mm (E)
*Worsted weight yarn: Brown (4yds) & Beige (2yds)
*Stitch Marker to mark your rounds 
*Tapestry Needle
*Embroidery Floss: Black

PATTERN NOTES
 Numbers in ( ) at the end of each round/row indicate the total number of stitches.
 Always use stitch markers to mark your rounds.
 There's no need to sl st and/or ch when going to the next round unless stated to do so.
 Always do the 1st stitch where you slip stitch from the previous round.
 The chain, in the beginning, does NOT count as one stitch unless stated otherwise.
 You slip stitch on the first sc not on top of the chain 1.

SPECIAL STITCHES
Picot Stitch - ch3, insert hook into the 3rd chain from hook, y/o & draw up the yarn through all the loops.

BODY/HEAD starting with light brown
  Rnd 1: 6sc in magic ring, sl st into 1st st, ch1 (6)
  Rnd 2: 2hdc in each st around, sl st into 1st st, ch1 (12)
  Rnd 3: sc in next 2 sts, 2sc in next st around, sl st into 1st st, ch1 (16)
  Row 1: *sc in next st, picot st* repeat from * to * 6 more times, sc in next st, in the last stitch change to beige, sc in next 4 sts, ch1, turn
  Row 2: sc in next 4 sts, ch1, turn (4)
  Row 3: sc2tog twice, ch1, turn (2)
  Row 4: sc2tog (1)
F/O, secure and weave in the ends.

FEET with beige
There's 4 stitches that where left un-worked. We're going to sc in the 2nd and 4th st to form the little feet.
F/O after every sc, secure and weave in the ends.

ASSEMBLE
     EYE...using black embroidery floss or thread, embroider an eye in the position you like best.
     NOSE...using light brown yarn, embroider the nose on the last sc we made on the beige section.


GLOSSARY:
ch/s:chain/s || sc: single crochet || hdc: half double crochet || sl st: slip stitch || st/s: stitch/es
 sc2tog: single crochet 2 stitches together || rnd: round || f/o: finish off || y/o: yarn over


Don't forget to like this blog facebook fan page.
Or to follow our Instagram page. :)

Have a nice crochet time!
- Janet

This pattern is an original pattern by Janet Carrillo "damn it Janet, let's crochet!" (June 2012). Please do not claim this pattern as your own. If you wish to share this pattern, you may link to this pattern but please do not reprint/repost it on your site. You may print and keep a copy for your own personal use. Please do not resell or distribute it.

June 1, 2012

How to Add Pages You Like in Your Facebook News Feed

  Are you tired of not being able to see the pages you like in your news feed? I know I am. Well problem solve. I figure it out and here are some images I put together for you to guide you through the process.
  You can add as many pages as you like in the list. ツ
Click image to enlarge

Don't forget to like my facebook page to get updates about the blog.
Have a wonderful weekend. :)

- Janet

Crochet Toy Storage Hammock


  A year ago, I made a crochet storage hammock. It was perfect for the little bit of stuffed animals my son had but then I started making more and more amigurumis that it was too small and they where starting to fall out. The new hammock came out perfect and I use the smaller hammock to put a few stuffed animals above the t.v. ツ
   If you're like me that loves to make amigurumis this hammock is a must have. It can be adjusted to be as big as you want it. Plus its a free pattern courtesy of wikiHow; toy storage hammock.
Don't forget to like my facebook page.
Have a wonderful weekend. :)

- Janet

May 22, 2012

Owl Applique

By Janet Carrillo "damn it Janet, let's crochet!"
Ideas on how to use these appliques...
*These would be great to apply to any project.
*You can add them to kitchen towels,
*turn them into a keychain or fridge magnet.
*You can also make several and make a garland.
*Attach a ribbon to make them into bookmarks.

SIZE/MEASUREMENTS
Width: approx. 3” (from wing to wing) x Length: 2.75"
...but they can vary based on yarn and hook size.

MATERIALS
*Crochet hook size: 2.5mm & 3.5mm (E)
*Worsted weight yarn: Brown (10yds), White (2yd), Gold (1yd), & Delft Blue (2yds)
*Stitch Marker to mark your rounds
*Tapestry Needle

PATTERN NOTES
 Numbers in ( ) at the end of each round/row indicate the total number of stitches.
 Always use stitch markers to mark your rounds.
 There's no need to sl st and/or ch when going to the next round unless stated to do so.

SPECIAL STITCHES
 Treble Crochet (tr)- Y/O hook twice, insert hook into stitch & pull up a loop (4 loops remaining), Y/O hook & pull thru 2 loops (3 loops remaining), Y/O hook & pull thru 2 loops (2 loops remaining, Y/O hook & pull thru the 2 remaining loops.
BODY with brown; 3.5mm
  Rnd 1: 6sc in magic ring (6)
  Rnd 2: 2sc in each st around (12)
  Rnd 3: sc in next st, 2sc in next st around (24)
  Rnd 4: sc in each st around, sl st into 1st st (24)
  Rnd 5: ch3, tr in next st, 2tr in next st, sc in next 3 sts, 2tr in next 2 sts, sl st in next st, *sc in next 3 sts,  2sc in next st* repeat from * to * 3 more times, sl st into 1st st (34)
  Rnd 6: sl st in the next 2 sts, hdc in next st, dc in next st, hdc in next st, sl st in next 3 sts, hdc in next st, dc in next st, hdc in next st, sl st in the next 2 sts
F/O, secure and weave in the ends.

EYES with white; make 2; 3.5mm
  Rnd 1: 6hdc in magic ring, sl st into 1st st (6)
F/O, secure and weave in the ends.

LEFT WING with delft blue, 3.5mm
  ch7, dc in 3rd ch from hook, dc in next ch, hdc in next 2 chs, sl st in next ch (5)
F/O, secure and weave in the ends.

RIGHT WING with delft blue, 3.5mm
  ch6, sl st in 2nd ch from hook, hdc in next 2 chs, dc in next 2 chs, sl st into the same st you dc (6)
F/O, secure and weave in the ends.

FEET with gold, 2.5mm
Working in back loops of the body. Attach yarn in the 9th st, ch3, sl st in st you attach. F/O, secure and weave in the ends. Attach yarn on the 12th st of the body, ch3, sl st in st you attach
F/O, secure and weave in the ends.


ASSEMBLE
     EYES...place them as shown in the image below. For the pupils, I use a sharpie. If you're going to use a sharpie just be careful not to smear the marker. You can also embroider or use felt for the black part of the eye.
     BEAK...using the gold yarn make a triangle shaped beak.
     WINGS...sew them on the sides of the owl.

GLOSSARY:
ch/s:chain/s || sc: single crochet || hdc: half double crochet || dc: double crochet || tr: treble crochet
sl st: slip stitch || st/s: stitch/es || rnd: round || f/o: finish off || y/o: yarn over


Don't forget to like this blog facebook fan page.
Or to follow our Instagram page. :)

Have a nice crochet time!
- Janet

This pattern is an original pattern by Janet Carrillo "damn it Janet, let's crochet!" May 2012). Please do not claim this pattern as your own. If you wish to share this pattern, you may link to this pattern but please do not reprint/repost it on your site. You may print and keep a copy for your own personal use. Please do not resell or distribute it.