Showing posts with label Hello Kitty. Show all posts

September 21, 2022

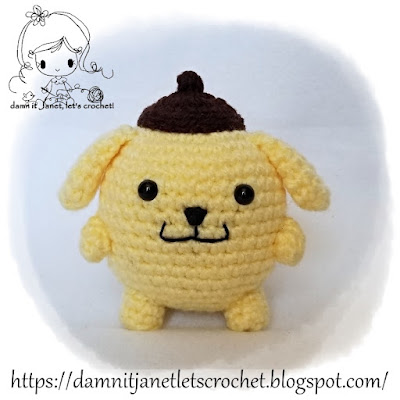
Round Plush Pompompurin

By Janet Carrillo "damn it Janet, let's crochet!"
     For those who love cute things, Pompompurin is the perfect size to hold on your palm or attach to your bag as a keychain and be your traveling companion. You can also make a small blanket and attach him to make a lovey for your little one.

SIZE/MEASUREMENTS
approx. 4.25"height x 4"length

MATERIALS
*Crochet hook size: 3.5mm (E)
*Worsted Weight Yarn: Pale Yellow (50yds) & Brown (6yds)
*Stitch Markers to mark your rounds
*2 Safety Eyes (8mm)
*Black Embroidery Floss 
*Fiberfill
*Tapestry Needle
*Matching Thread
*Felt: Black & Hot Glue (optional for eyes and nose)

PATTERN NOTES - must-read...
 Numbers in ( ) at the end of each round/row indicate the total number of stitches.
 Always use stitch markers to mark your rounds.
 There's no need to sl st and/or ch when going to the next round unless stated to do so.
 Always do the 1st stitch where you slip stitch from the previous round.
 The chain, in the beginning, does NOT count as one stitch unless stated otherwise.
 You slip stitch on the first sc, not on top of the chain 1.

Note: If you are using safety eyes, place them before closing the body between rounds 9 and 10; approx. 5 stitches apart.
HEAD/BODY with pale yellow
  Rnd 1: 6sc in magic ring (6)
  Rnd 2: 2sc in each st around (12)
  Rnd 3: sc in next st, 2sc in next st around (18)
  Rnd 4: sc in next 2 sts, 2sc in next st around (24)
  Rnd 5: sc in next 3 sts, 2sc in next st around (30)
  Rnd 6: sc in next 4 sts, 2sc in next st around (36)
  Rnd 7: sc in next 11 sts, 2sc in next st around (39)
  Rnd 8-16: sc in each st around (39)
  Rnd 17: sc in next 11 sts, sc2tog around (36)
  Rnd 18: sc in next 4 sts, sc2tog around (30)
  Rnd 19: sc in next 3 sts, sc2tog around (24)
Start stuffing the head/body moderately firm.
  Rnd 20: sc in next 2 sts, sc2tog around (18)
  Rnd 21: sc in next st, sc2tog around (12)
  Rnd 22: sc2tog around (6)
F/O and leave a tail for closing. Add any bits of stuffing need it to finish shaping the head/body. Weave in the tail through the final round and draw up tight to close. Secure and weave in the ends.

FEET with pale yellow; make 2
  Rnd 1: 5sc in magic ring (5)
  Rnd 2: *sc in next st, 2sc in next st* repeat from * to * 1 more time, sc in last st (7)
  Rnd 3: working in back loops for this round only sc in each st around (7)
  Rnd 4: sc in each st around (7)
F/O, secure and weave in the ends.

ARMS with pale yellow; make 2
  Rnd 1: 5sc in magic ring (5)
  Rnd 2-3: sc in each st around (5)
  Rnd 4: sc2tog, sc in next 3 sts (4)
F/O, secure and weave in the ends.

EARS with pale yellow; make 2
  Rnd 1: 6sc in magic ring (6)
  Rnd 2: 2sc in each st around (12)
  Rnd 3-4: sc in each st around (12)
  Rnd 5: sc in next 4 sts, sc2tog around (10)
  Rnd 6: sc in each st around (10)
  Rnd 7: sc in next 3 sts, sc2tog around (8)
There is no need to stuff the ear.
  Row 1: flatten to match up the stitches sc in next 4 sts (4)
F/O, secure and weave in the ends.

TAIL with pale yellow
  Row 1: ch5, sl st in 2nd ch from hook, sc in next 3 chs (4)
F/O, secure and weave in the ends.

BERET (base) with brown
  Rnd 1: 6sc in magic ring (6)
  Rnd 2: 2sc in each st around (12)
  Rnd 3: sc in next st, 2sc in next st around (18)
  Rnd 4: sc in next 2 sts, 2sc in next st around (24)
  Rnd 5: back loops only for this rnd sl st in each st around (24)
F/O, secure and weave in the ends.

Note: when you see a + sign, it means all those stitches are worked in that stitch.
BERET (tip) with brown
  ch4, sc in 2nd ch from hook, sc in next ch, sc+sl st in last ch
F/O, secure and leave a tail to sew, Fold the piece in half and sew it to the center of the beret (base).


ASSEMBLE
     I recommend pinning the pieces in place before sewing them to make sure you have them in the position you like best before sewing. (Most people like to use the yarn at the end of the finished pieces to sew them in place, but I personally like to use matching thread).
     EYES...I used safety eyes. If you have no craft stores around your area that sell safety eyes you can use doomed buttons or black felt. Placement for them is between rounds 9 and 10; approx. 5 stitches apart (1.14").
     FEET...if you have not already stuff them lightly. Place them between rounds 18 and 20; approx 1.25" apart.
     ARMS...no need to stuff them. Align them to the feet and place them on rounds 12 and 13.
     TAIL...place it on the back on round 19.
     BERET...place it on the top center of the head/body.
     EARS...place them on round 6.
     NOSE and MOUTH...using black embroidery floss or yarn, embroider the nose and mouth between rounds.


GLOSSARY:
ch/s: chain/s || f/o: finish off || rnd: round || sc: single crochet || sc2tog: single crochet 2 stitches together
st/s: stitch/es


Don't forget to like this blog's Facebook fan page.
Or to follow our Instagram page. :)

Have a nice crochet time!
- Janet

Pompompurin is copyright by Sanrio.
This pattern is an original pattern by Janet Carrillo "damn it Janet, let's crochet!" (September 2022). Please do not claim this pattern as your own. If you wish to share this pattern, you may link to this pattern but please do not reprint/repost it on your site. You may print and keep a copy for your own personal use. Please do not resell or distribute it.

September 7, 2022

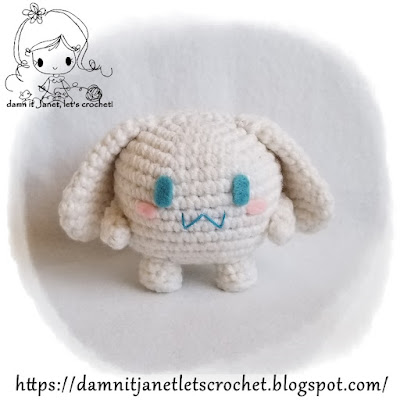
Round Plush Cinnamoroll

By Janet Carrillo "damn it Janet, let's crochet!"
     For those who love cute things, Cinnamoroll is the perfect size to hold on your palm or attach to your bag as a keychain and be your traveling companion. You can also make a small blanket and attach him to make a lovey for your little one.

SIZE/MEASUREMENTS
approx. 2.75"height x 4"length

MATERIALS
*Crochet hook size: 3.5mm (E)
*Worsted Weight Yarn: White (52yds)
*Stitch Markers to mark your rounds
*Felt: Pink & Light Blue
*Fiberfill
*Tapestry Needle
*Matching Thread
*Hot Glue

PATTERN NOTES - must-read...
 Numbers in ( ) at the end of each round/row indicate the total number of stitches.
 Always use stitch markers to mark your rounds.
 There's no need to sl st and/or ch when going to the next round unless stated to do so.
 Always do the 1st stitch where you slip stitch from the previous round.
 The chain, in the beginning, does NOT count as one stitch unless stated otherwise.
 You slip stitch on the first sc, not on top of the chain 1.

HEAD/BODY with white
  Rnd 1: 6sc in magic ring (6)
  Rnd 2: 2sc in each st around (12)
  Rnd 3: sc in next st, 2sc in next st around (18)
  Rnd 4: sc in next 2 sts, 2sc in next st around (24)
  Rnd 5: sc in next 3 sts, 2sc in next st around (30)
  Rnd 6: sc in next 4 sts, 2sc in next st around (36)
  Rnd 7: sc in next 11 sts, 2sc in next st around (39)
  Rnd 8-13: sc in each st around (39)
  Rnd 14: sc in next 11 sts, sc2tog around (36)
  Rnd 15: sc in next 4 sts, sc2tog around (30)
  Rnd 16: sc in next 3 sts, sc2tog around (24)
Start stuffing the head/body moderately firm.
  Rnd 17: sc in next 2 sts, sc2tog around (18)
  Rnd 18: sc in next st, sc2tog around (12)
  Rnd 19: sc2tog around (6)
F/O and leave a tail for closing. Add any bits of stuffing need it to finish shaping the head/body. Weave in the tail through the final round and draw up tight to close. Secure and weave in the ends.

FEET with white; make 2
  Rnd 1: 5sc in magic ring (5)
  Rnd 2: *sc in next st, 2sc in next st* repeat from * to * 1 more time, sc in last st (7)
  Rnd 3: working in back loops for this round only sc in each st around (7)
  Rnd 4: sc in each st around (7)
F/O, secure and weave in the ends.

ARMS with white; make 2
  Rnd 1: 5sc in magic ring (5)
  Rnd 2-3: sc in each st around (5)
  Rnd 4: sc2tog, sc in next 3 sts (4)
F/O, secure and weave in the ends.

EARS with white; make 2
  Rnd 1: 6sc in magic ring (6)
  Rnd 2: 2sc in each st around (12)
  Rnd 3: sc in next 3 sts, 2sc in next st around (15)
  Rnd 4: sc in each st around (15)
  Rnd 5: sc in next 3 sts, sc2tog around (12)
  Rnd 6: sc in next 4 sts, sc2tog around (10)
  Rnd 7-11: sc in each st around (10)
  Rnd 12: sc in next 3 sts, sc2tog around (8)
There is no need to stuff the ear.
  Row 1: flatten to match up the stitches sc in next 4 sts
F/O, secure and weave in the ends.

TAIL with white
  Rnd 1: 5sc in magic ring (5)
  Rnd 2-12: sc in next st around (5)
There is no need to stuff the tail.
  Row 1flatten to match up the stitches sc in next 3 sts, turn (3)
  Row 2: ch1, sc in each st across, turn (3)
  Row 3: ch1, sc2tog, sc in next st (2)
F/O, secure and weave in the ends.


ASSEMBLE
     I recommend pinning the pieces in place before sewing them to make sure you have them in the position you like best before sewing. (Most people like to use the yarn at the end of the finished pieces to sew them in place, but I personally like to use matching thread).
     TIP...For anything that I’m going to be using felt, I like to first sketch it out on white paper and make a stencil of what I need. Then cut it out. Then tape the stencil to the felt and cut it out.
     FEET...if you haven't already stuff them lightly. Place them between rounds 15 and 17; approx. 1.25" apart.
     ARMS...no need to stuff them. Align them to the feet and place them on rounds 11 and 12.
     EARS...place them on round 3, overlapping the arms a bit.
     TAIL...place the tail in the back on round 14. Sew in place. Roll the tail and sew it in place.
     EYES...using a light blue felt, make 2 ovals and place them between rounds 8 and 9; approx. 1" apart.
     BLUSH...you can use pink felt and make tiny circles or you can use makeup blush and apply some on each side of the eyes. You can also embroider lines with thread.
     MOUTH...these can be done however you like; the possibilities are endless. You can search online for "kawaii faces" or anything along those lines to get some ideas.


GLOSSARY:
ch/s: chain/s || f/o: finish off || rnd: round || sc: single crochet || sc2tog: single crochet 2 stitches together
st/s: stitch/es


Don't forget to like this blog's Facebook fan page.
Or to follow our Instagram page. :)

Have a nice crochet time!
- Janet

Cinnamoroll is copyright by Sanrio.
This pattern is an original pattern by Janet Carrillo "damn it Janet, let's crochet!" (September 2022). Please do not claim this pattern as your own. If you wish to share this pattern, you may link to this pattern but please do not reprint/repost it on your site. You may print and keep a copy for your own personal use. Please do not resell or distribute it.

June 16, 2021

Round Plush Hello Kitty

 By Janet Carrillo "damn it Janet, let's crochet!"

     For those who love cute things, Hello Kitty is the perfect size to hold on your palm or attach to your bag as a keychain and be your traveling companion. You can also make a small blanket and attach her to make a lovey for your little one.

SIZE/MEASUREMENTS
approx. 3.25"height x 3.5"length

MATERIALS
*Crochet hook size: 3.5mm (E)
*Worsted Weight Yarn: White (30yds) & Petal Pink (25yds)
*Stitch Markers to mark your rounds
*Felt: Black & Yellow
*Fiberfill
*Tapestry Needle
*Matching Thread
*Hot Glue

PATTERN NOTES - must-read...
 Numbers in ( ) at the end of each round/row indicate the total number of stitches.
 Always use stitch markers to mark your rounds.
 There's no need to sl st and/or ch when going to the next round unless stated to do so.
 Always do the 1st stitch where you slip stitch from the previous round.
 The chain, in the beginning, does NOT count as one stitch unless stated otherwise.
 You slip stitch on the first sc, not on top of the chain 1.

SPECIAL STITCHES 
Invisible join - this VIDEO explains how to do this technique.

HEAD/BODY starting with white
  Rnd 1: 6sc in magic ring (6)
  Rnd 2: 2sc in each st around (12)
  Rnd 3: sc in next st, 2sc in next st around (18)
  Rnd 4: sc in next 2 sts, 2sc in next st around (24)
  Rnd 5: sc in next 3 sts, 2sc in next st around (30)
  Rnd 6: sc in next 4 sts, 2sc in next st around (36)
  Rnd 7: sc in next 11 sts, 2sc in next st around (39)
  Rnd 8-11: sc in each st around, in last st of rnd 11 change to petal pink (39)
  Rnd 12: sl st in each st around (39)
  Rnd 13: working in the back loops only of the sl st's from rnd 12, sc in each st around (39)
  Rnd 14: sc in each st around (39)
  Rnd 15: sc in next 11 sts, sc2tog around (36)
  Rnd 16: sc in next 4 sts, sc2tog around (30)
  Rnd 17: sc in next 3 sts, sc2tog around (24)
Start stuffing the head/body moderately firm.
  Rnd 18: sc in next 2 sts, sc2tog around (18)
  Rnd 19: sc in next st, sc2tog around (12)
  Rnd 20: sc2tog around (6)
F/O and leave a tail for closing. Add any bits of stuffing need it to finish shaping the head/body. Weave in the tail through the final round and draw up tight to close. Secure and weave in the ends.

ARMS with white; make 2 
  Rnd 1: 5sc in magic ring (5)
  Rnd 2-3: sc in each st around (5)
  Rnd 4: sc2tog, sc in next 3 sts (4)
F/O, secure and weave in the ends.

FEET with white; make 2
  Rnd 1: 5sc in magic ring (5)
  Rnd 2: *sc in next st, 2sc in next st* repeat from * to * 1 more time, sc in last st (7)
  Rnd 3: working in back loops for this round only sc in each st around (7)
  Rnd 4: sc in each st around (7)
F/O, secure and weave in the ends.

EARS with white; make 2
  Rnd 1: 4sc in magic ring (4)
  Rnd 2: sc in next st, 2sc in next st around (6)
  Rnd 3: sc in next 2 sts, 2sc in next st around (8)
  Rnd 4: sc in next 3 sts, 2sc in next st around (10)
  Rnd 5-6: sc in each st around, join to the 1st st with the invisible join (10)
F/O, secure and weave in the ends.

NOTE: You can make the bow bigger by chaining more stitches in the beginning.
BOW with petal pink
  Row 1: ch8, hdc in 3rd ch from hook, hdc in next 5 chs, ch2, turn (6)
  Row 2: hdc in each st across, ch2, turn (6)
  Row 3: hdc in each st across, do not ch or turn, sl st around the entire bow
F/O, secure and weave in the ends. With a strand of pink yarn about 8" long wrapped it several times through the middle of the bow and secure it with a knot. Weave in the ends.   


ASSEMBLE
     I recommend pinning the pieces in place before sewing them to make sure you have them in the position you like best before sewing. (Most people like to use the yarn at the end of the finished pieces to sew them in place, but I personally like to use matching thread).
     TIP...For anything that I am going to be using felt, I like to first sketch it out on white paper and make a stencil of what I need. Then cut it out. Then tape the stencil to the felt and cut it out.
     FEET...if you have not already stuff them lightly. Place them between rounds 17 and 18; approx 1.25" apart.
     ARMS...no need to stuff them. Align them to the feet and place them on rounds 13 and 14.
     EARS...there is no need to stuff them, simply flatten them out. Place them between rounds 4 and 7.
     BOW...place it on the right ear and sew it in place.
     EYES...using black felt, make 2 small rounded rectangles and place them in the position you like best. I place mine between rounds 7 and 9; approx. 1" apart.
     NOSE...using yellow felt, make a rounded rectangle, and place it in the position you like best. I place mine in the center of the eyes on round 10.
     WHISKERS...with black yarn or embroidery floss, embroider them in the position you like best. I place mine between rounds 8 and 10; 2.5 stitches wide.


GLOSSARY:
ch/s:chain/s || f/o: finish off || hdc: half double crochet || rnd: round || sc: single crochet
sc2tog: single crochet 2 stitches together || sl st: slip stitch || st/s: stitch/es


Don't forget to like this blog Facebook fan page.
Or to follow our Instagram page. :)

Have a nice crochet time!
- Janet

Hello Kitty is copyright by Sanrio CO.
This pattern is an original pattern by Janet Carrillo "damn it Janet, let's crochet!" (June 2021). Please do not claim this pattern as your own. If you wish to share this pattern, you may link to this pattern but please do not reprint/repost it on your site. You may print and keep a copy for your own personal use. Please do not resell or distribute it.

October 22, 2013

Hello Kitty Earflap Beanie (newborn - toddler size)

By Janet Carrillo "damn it Janet, let's crochet!"
My version of a Hello Kitty beanie that was requested by my sister for my beautiful baby niece.
Hope everyone enjoys this pattern. :)
 

SIZE/MEASUREMENTS
Newborn - 3 months: 12" to 14"                   3 - 6 months: 14" to 16"
6 - 12 months: 16" to 18"                              Toddler (12 months - 3 years): 18" to 19.5"

MATERIALS
*Crochet hook size: 3.0mm & 5.5mm (I)
*Worsted Weight Yarn: White & Pink
*Stitch Markers to mark your rounds
*Tapestry needle
*Matching thread

GAUGE...
At the end of round 6, laying flat = 5 inches in diameter.
Don't forget to check your gauge.

PATTERN NOTES - must read...
 Numbers in ( ) at the end of each round/row indicate the total number of stitches.
 Always use stitch markers to mark your rounds.
 Always do the 1st stitch where you slip stitch from the previous round.
 The chain, in the beginning, does NOT count as one stitch unless stated otherwise.
 You slip stitch on the first hdc, not on top of the chain 2.

** Newborn - 3 months **

BEANIE with white; 5.5mm (I)
  Rnd 1: 8hdc in magic ring, sl st into 1st st (8)
  Rnd 2: ch2, 2hdc in same st you sl st, *2hdc in next st* repeat from * to * around, sl st into 1st st (16)
  Rnd 3: ch2, 2hdc in same st you sl st, hdc in next st, *2hdc in next st, hdc in next st* repeat from * to * around, sl st into 1st st (24)
  Rnd 4: ch2, 2hdc in same st you sl st, hdc in next 2 sts, *2hdc in next st, hdc in next 2 sts* repeat from * to * around, sl st into 1st st (32)
  Rnd 5: ch2, 2hdc in same st you sl st, hdc in next 3 sts, *2hdc in next st, hdc in next 3 sts* repeat from * to * around, sl st into 1st st (40)
  Rnd 6: ch2, 2hdc in same st you sl st, hdc in next 19 sts, *2hdc in next st, hdc in next 19 sts* repeat from * to * around, sl st into 1st st (42)
  Rnd 7-14: ch2, hdc in each st around, sl st into 1st st (42)
At the end of rnd 14, ch1 instead of 2.  Do not F/O, continue on to making the 1st earflap.

1st Earflap with white; 5.5mm (I)
  Row 1: sc in same st and in next 7 sts, ch1, turn (8)
  Row 2-3: sc in each st across, ch1, turn (8)
  Row 4: sc2tog, sc in next 4 sts, sc2tog, ch1, turn (6)
  Row 5: sc2tog, sc in next 2 sts, sc2tog, ch1, turn (4)
  Row 6: sc2tog, sc2tog (2)
F/O, secure and weave in the ends.

2nd Earflap with white; 5.5mm (I)
Count to the right 19sts (that’s including the 8 sts from the 1st earflap). Attach on the 20th st. Repeat rows 1-6 from the 1st earflap.
F/O, secure and weave in the ends.

EDGING with pink; 5.5mm (I)
Attach yarn in any st and ch 1, sc in each st around; working evenly around each earflap. Remember to mark your round with a stitch marker. Do another round of sc around the entire beanie. Join with a sl st into the 1st sc to give it an even finish.
F/O, secure and weave in the ends.

** 3 - 6 months **

BEANIE with white; 5.5mm (I)
  Rnd 1: 8hdc in magic ring, sl st into 1st st (8)
  Rnd 2: ch2, 2hdc in same st you sl st, *2hdc in next st* repeat from * to * around, sl st into 1st st (16)
  Rnd 3: ch2, 2hdc in same st you sl st, hdc in next st, *2hdc in next st, hdc in next st* repeat from * to * around, sl st into 1st st (24)
  Rnd 4: ch2, 2hdc in same st you sl st, hdc in next 2 sts, *2hdc in next st, hdc in next 2 sts* repeat from * to * around, sl st into 1st st (32)
  Rnd 5: ch2, 2hdc in same st you sl st, hdc in next 3 sts, *2hdc in next st, hdc in next 3 sts* repeat from * to * around, sl st into 1st st (40)
  Rnd 6: ch2, 2hdc in same st you sl st, hdc in next 7 sts, *2hdc in next st, hdc in next 7 sts* repeat from * to * around, sl st into 1st st (45)
  Rnd 7-14: ch2, hdc in each st around, sl st into 1st st (45)
At the end of rnd 14, ch1 instead of 2. Do not F/O, continue on to making the 1st earflap.

1st Earflap with white; 5.5mm (I)
  Row 1: sc in same st and in next 7 sts, ch1, turn (8)
  Row 2-3: sc in each st across, ch1, turn (8)
  Row 4: sc2tog, sc in next 4 sts, sc2tog, ch1, turn (6)
  Row 5: sc2tog, sc in next 2 sts, sc2tog, ch1, turn (4)
  Row 6: sc2tog, sc2tog (2)
F/O, secure and weave in the ends.

2nd Earflap with white; 5.5mm (I)
Count to the right 20sts (that’s including the 8 sts from the 1st earflap). Attach to the 21st st. Repeat rows 1-6 from 1st earflap.
F/O, secure and weave in the ends.

EDGING with pink; 5.5mm (I)
Attach yarn in any st and ch 1, sc in each st around; working evenly around each earflap. Remember to mark your round with a stitch marker. Do another round of sc around the entire beanie. Join with a sl st into the 1st sc to give it an even finish.
F/O, secure and weave in the ends.

** 6 - 12 months **

BEANIE with white; 5.5mm (I)
  Rnd 1: 8hdc in magic ring, sl st into 1st st (8)
  Rnd 2: ch2, 2hdc in same st you sl st, *2hdc in next st * repeat from * to * around, sl st into 1st st (16)
  Rnd 3: ch2, 2hdc in same st you sl st, hdc in next st, *2hdc in next st, hdc in next st* repeat from * to * around, sl st into 1st st (24)
  Rnd 4: ch2, 2hdc in same st you sl st, hdc in next 2 sts, *2hdc in next st, hdc in next 2 sts* repeat from * to * around, sl st into 1st st (32)
  Rnd 5: ch2, 2hdc in same st you sl st, hdc in next 3 sts, *2hdc in next st, hdc in next 3 sts* repeat from * to * around, sl st into 1st st (40)
  Rnd 6: ch2, 2hdc in same st you sl st, hdc in next 4 sts, *2hdc in next st, hdc in next 4 sts* repeat from * to * around, sl st into 1st st (48)
  Rnd 7: ch2, 2hdc in same st you sl st, hdc in next 7 sts, *2hdc in next st, hdc in next 7 sts* repeat from * to * around, sl st into 1st st (54)
  Rnd 8-15: ch2, hdc in each st around, sl st into 1st st (54)
At the end of rnd 15, ch1 instead of 2. Do not F/O, continue on to making the 1st earflap. 

1st Earflap with white; 5.5mm (I)
  Row 1: sc in same st and in next 8 sts, ch1, turn (9)
  Row 2-3: sc in each st across, ch1, turn (9)
  Row 4: sc2tog, sc in next 5 sts, sc2tog, ch1, turn (7)
  Row 5: sc in each st across, ch1, turn (7)
  Row 6: sc2tog, sc in next 3 sts, sc2tog, ch1, turn (5)
  Row 7: sc2tog, sc in next st, sc2tog (3)
F/O, secure and weave in the ends.

2nd Earflap with white; 5.5mm (I)
Count to the right 24sts (that’s including the 9 sts from the 1st earflap). Attach on the 25th st. Repeat rows 1-7 from 1st earflap.
F/O, secure and weave in the ends.

EDGING with pink; 5.5mm (I)
Attach yarn in any st and ch 1, sc in each st around; working evenly around each earflap. Remember to mark your round with a stitch marker. Do another round of sc around the entire beanie. Join with a sl st into the 1st sc to give it an even finish.
F/O, secure and weave in the ends.

** Toddler (1yr - 3yrs) **

BEANIE with white; 5.5mm (I)
  Rnd 1: 8hdc in magic ring, sl st into 1st st (8)
  Rnd 2: ch2, 2hdc in same st you sl st, *2hdc in next st* repeat from * to * around, sl st into 1st st (16)
  Rnd 3: ch2, 2hdc in same st you sl st, hdc in next st, *2hdc in next st, hdc in next st* repeat from * to * around, sl st into 1st st (24)
  Rnd 4: ch2, 2hdc in same st you sl st, hdc in next 2 sts, *2hdc in next st, hdc in next 2 sts* repeat from * to * around, sl st into 1st st (32)
  Rnd 5: ch2, 2hdc in same st you sl st, hdc in next 3 sts, *2hdc in next st, hdc in next 3 sts* repeat from * to * around, sl st into 1st st (40)
  Rnd 6: ch2, 2hdc in same st you sl st, hdc in next 4 sts, *2hdc in next st, hdc in next 4 sts* repeat from * to * around, sl st into 1st st (48)
  Rnd 7: ch2, 2hdc in same st you sl st, hdc in next 5 sts, *2hdc in next st, hdc in next 5 sts* repeat from * to * around, sl st into 1st st (56)
  Rnd 8: ch2, 2hdc in same st you sl st, hdc in next 27 sts, *2hdc in next st, hdc in next 27 sts* repeat from * to * around, sl st into 1st st (58)
  Rnd 9-16: ch2, hdc in each st around, sl st into 1st st (58)
At the end of rnd 16, ch1 instead of 2. Do not F/O, continue on to making the 1st earflap.

1st Earflap with white; 5.5mm (I)
  Row 1: sc in same st and in next 9 sts, ch1, turn (10)
  Row 2-3: sc in each st across, ch1, turn (10)
  Row 4: sc2tog, sc in next 6 sts, sc2tog, ch1, turn (8)
  Row 5: sc in each sc across, ch1, turn (8)
  Row 6: sc2tog, sc in next 4 sts, sc2tog, ch1, turn (6)
  Row 7: sc2tog, sc in next 2 sts, sc2tog, ch1, turn (4)
  Row 8: sc2tog, sc2tog (2)
F/O, secure and weave in the ends.

2nd Earflap with white; 5.5mm (I)
Count to the right 26sts (that’s including the 10 sts from the 1st earflap). Attach on the 27th st. Repeat rows 1-8 from 1st earflap.
F/O, secure and weave in the ends

EDGING with pink; 5.5mm (I)
Attach yarn in any st and ch 1, sc in each st around; working evenly around each earflap. Remember to mark your round with a stitch marker. Do another round of sc around the entire beanie. Join with a sl st into the 1st sc to give it an even finish.
F/O, secure and weave in the ends.

** Braids (for all sizes) **

Cut 18 pieces of yarn (9 for each earflap) about 30 inches long. (You can do the braids in pink or white like I did, or just use one color, for example, white or pink). Fold each bunch in half and push the folded end through an opening in the bottom of each earflap. Pull the unfolded ends through the loop and pull tight. Separate the colors and braid the strands. At the end, trim to desired length and tie a knot to secure the braid. Complete the second braid the same way.

** Ears & Bow (for all sizes) **

EARS with white; make 2; 3.0mm
  Rnd 1: 6sc in magic ring (6)
  Rnd 2: sc in next st, 2sc in next st around (9)
  Rnd 3: sc in next 2 sts, 2sc in next st around (12)
  Rnd 4: sc in next 3 sts, 2sc in next st around (15)
  Rnd 5-8: sc in each st around (15)
If you find the ears too small, simply make another increase round and another sc round. Or, if you want them smaller, take out one increase and one sc around.
F/O, secure and weave in the ends

BOW with pink; 3.0mm
  Row 1: ch14, hdc in 3rd ch from hook and across, ch2, turn (12)
  Row 2-5: hdc in each st across, ch2, turn (12)
  Row 6: hdc in each st across, ch1 (12)
  Row 7: do not turn, sc around the entire bow, sl st into 1st st
You can make the bow bigger by chaining more stitches in the beginning.
F/O, secure and weave in the ends. With a strand of pink yarn about 8" long, wrap it several times through the middle of the bow and secure it with a knot. Weave in the ends.


ASSEMBLE
     I recommend pinning the pieces in place before sewing them to make sure you have them in the position you like best before sewing. (Most people like to use the yarn in the end from the finished pieces to sew them in place, but I personally like to use matching thread).
     Ears…there’s no need to stuff them; simply flatten them and sew them between round 4 and 7. For the bigger sizes, you might want to sew them between round 5 and 8. Pin them first and see which one you like best.
     Bow...sew it on the left ear.


GLOSSARY:
ch/s:chain/s || sc: single crochet || hdc: half double crochet || sl st: slip stitch
sc2tog: single crochet 2 stitches together || st/s: stitch/es || rnd: round || f/o: finish off


Don't forget to like this blog facebook fan page.
Or to follow our Instagram page. :)

Have a nice crochet time!
- Janet

Hello Kitty is copyrighted by Sanrio.
This pattern is an original pattern by Janet Carrillo "damn it Janet, let's crochet!" (October 2013). Please do not claim this pattern as your own. If you wish to share this pattern, you may link to this pattern but please do not reprint/repost it on your site. You may print and keep a copy for your own personal use. Please do not resell or distribute it.
June 22, 2012

Hello Kitty Camera Cozy

By JC Designs
SIZE/MEASUREMENTS
To fit a Sony Cyber-shot [3.5" x 2" x .75"] but this same pattern could also be adjusted to fit any other camera out there. You could change the color of the cozy to white, eyes black and nose yellow to make it look like the classic Hello Kitty look.

MATERIALS
*Crochet hook size: 2.5mm & 3.5mm
*Worsted weight yarn: Fuchsia (20yds) & White (18yds)
*Tapestry Needle
*Fuchsia & White Thread
*Sewing Needle
*Snap Fastener

PATTERN NOTES
  Numbers in ( ) at the end of each round or row indicate the total number of stitches for that round or row.

FRONT with fuchsia, 3.5mm hook
  Row 1: ch 17, hdc in 2nd ch from hook and hdc in each ch across, ch 2, turn (15)
  Row 2-5 : hdc in next hdc across, ch 2, turn (15)
  Row 6: hdc in next hdc across, ch 1, turn (15)
  Row 7: (front loops for the top part ONLY) sl st all the way around
F/O, secure and weave in ends.

FRONT TOP with white, 3.5mm hook
  Row 1: On the back loops left unworked, attach the white yarn and hdc across, ch 1, turn (15)
My Hello Kitty pj's. :)
  Row 2-3: hdc in next hdc across, ch 2, turn (15)
  Row 4: dec over the next 2hdc, hdc in next 11hdc, dec over the next 2hdc, ch 2, turn (13)
  Row 5: dec over the next 2hdc, hdc in next 9hdc, dec over the next 2hdc, ch 2, turn (11)
  Row 6: dec over the next 2hdc, hdc in next 7hdc, dec over the next 2hdc, ch 2, turn (9)
F/O, secure and weave in ends.
  Row 7: Attach white yarn in any corner and sl st all the way to the next corner.
F/O, secure and weave in ends.
On the sl st side, embroidery pink yarn. I did mine 2chs length. You can make yours smaller or larger.

BACK with fuchsia, 3.5mm hook
  Row 1: ch 17, hdc in 2nd ch from hook and hdc in each ch across, ch 2, turn (15)
  Row 2-5: hdc in next hdc across, ch 2, turn (15)
  Row 6: hdc in next hdc across, ch 1, turn (15)
  Row 7: sl st all the way around
F/O, secure and weave in ends.

SIDE with white, 3.5mm hook
  Row 1: ch 5, hdc in 2nd ch from hook and hdc in each ch across, ch 2, turn (3)
  Row 2-22: hdc in next hdc across, ch 2, turn (3)
  Row 23: ch 2, hdc in the 3rd st, ch 2, turn [NOTE: This little gap we made here is so you can pull the strap from your camera through. If you don't have a strap in your camera then there's no need to make the gap.]
  Row 24: hdc in next hdc, hdc in next 2chs, ch 2, turn (3)
  Row 25: hdc in next hdc across (3)
F/O, secure and weave in ends.

EYES/NOSE make 3, white yarn, 2.5mm hook
  Rnd 1: ch4, sc in 2nd ch from hook and in the next ch, 3sc in next ch, other side of the chs sc in next ch, 2sc in last ch (8)
  Rnd 2: sl st in only the first st to give it a even look
F/O and weave in ends.

BOW white yarn, 2.5mm hook
  Row 1: ch 9, hdc in 2nd ch from hook and hdc in each ch across, ch 2, turn (7)
  Row 2-3: hdc in next hdc across, ch 2, turn (7)
F/O, secure and weave in ends. With a strand of fuchsia yarn, tie it in the middle of the bow and keep wrapping it in the center. Then weave in that strand of yarn in the back.

ASSEMBLY
   I recommend pinning the pieces in place before sewing them to make sure you have it in the position you like best before sewing.
  Sew the back piece and the side piece together. The slip stich side will be the outside part. Then sew on the front piece. I use the whip stitch technique with fuchsia thread.
  The eyes are placed 1.25" apart between row 3 and 5. Sew them in place with white thread. The nose is sewn with white thread in row 2. Sew the bow on the upper right hand side. Embroidery the whiskers with white thread.
  Tip: you can also use felt for the eyes/nose/whiskers.
  Finally sew on the snap fastener in place. :)
Don't forget to like this blog facebook fan page. :)

Have a nice crochet time!
- Janet

Hello Kitty is copyright Sanrio.
This pattern is an original pattern by Janet Carrillo "JC Designs" (June 2012). Please do not claim this pattern as your own. If you wish to share this pattern, you may link to this pattern but please do not reprint/repost it on your site. You may print and keep a copy for your own personal use but you may not sell or distribute it, or sell items may from this pattern.

May 22, 2012

Hello Kitty Zippered Wristlet

By JC Designs
  This was a request by a friend. She like the style of the Keroppi Wristlet that she wanted me to make her one but of Hello Kitty.

SIZE/MEASUREMENTS
Horizontally 7.5" and 4.5" vertically but can vary based on yarn and hook size.

MATERIALS
*Crochet hook size 2.5mm & 3.5mm
*Worsted weight yarn: Black, Fuchsia, White or any other color of choice
*Zipper 18cm length
*Fabric of choice
*Stitch Marker to mark your rounds
*Tapestry Needle
*White Thread

PATTERN NOTES
  Numbers in ( ) at the end of each round or row indicate the total number of stitches for that round or row.

WRISTLET with 3.5mm hook
  Rnd 1: ch 31, hdc in 2nd ch from hook, hdc in the next 28chs, 3hdc in next ch, hdc in next 28chs, 2hdc in last ch, sl st into the first st (62)
  Rnd 2-12: ch 1, hdc in the same stitch you sl st, hdc around, sl st into the first st of previous rnd (62)
  Rnd 13-14: ch1, sc in the same stitch you sl st, sc around, sl st into the first st of previous rnd (62)
  Rnd 15: ch1, 3hdc in the same stitch you sl st, *sl st in next sc, 3hdc in next sc* repeat from * to * all the way around
F/O and weave in ends.

EYES/NOSE make 3 with 2.5mm hook
  Rnd 1: ch4, sc in 2nd ch from hook and in the next ch, 3sc in next ch, other side of the chs sc in next ch, 2sc in last ch (8)
  Rnd 2: sl st in only the first st to give it a even look
F/O and weave in ends.

BOW with 3.5mm hook
  Row 1: ch 14, hdc in 3rd ch from hook and across, ch2, turn (12)
  Row 2-4: hdc in each hdc across, ch2, turn (12)
F/O and weave in ends. With a 60" strand of yarn, tie it in the middle of the bow and keep wrapping in the center. Then weave in that strand of yarn in the back.

STRAP with 3.5mm hook
  ch 53 (or chain to desire length), sc in 2nd ch from hook and across (52)
F/O and leave a tail to sew the strap unto the wristlet. When folded is measures 6".

 ASSEMBLY
  The eyes you want to sew them between row 8 and 10. Place them 2.5" apart from each other.
  The nose between row 4 and 5 right beneath the middle of the eyes.
  Embroidery the whiskers with white thread.
  The bow place it in the upper right corner. I place it a little bit sticking out of the sides of the wristlet.
  Now you can pin the zipper and fabric in place to begin sewing them. This took me awhile cause I'm a perfectionist plus cause I had to sew it by hand since I don't own a sewing machine. But this would keep your items from falling out.
  Sew the strap on wristlet.
Don't forget to like this blog facebook fan page. :)

Have a nice crochet time!
- Janet

Hello Kitty is copyright Sanrio.
This pattern is an original pattern by Janet Carrillo "JC Designs" (May 2012). Please do not claim this pattern as your own. If you wish to share this pattern, you may link to this pattern but please do not reprint/repost it on your site. You may print and keep a copy for your own personal use but you may not sell or distribute it, or sell items may from this pattern.