Showing posts with label chibi. Show all posts

March 27, 2024

Round Plush Snorlax (Pokemon)

 By Janet Carrillo "damn it Janet, let's crochet!"

     For those who love cute things, Snorlax is the perfect size to hold on to your palm or attach to your bag as a keychain and be your traveling companion. You can also make a small blanket and attach him to make a lovey for your little one.

SIZE/MEASUREMENTS
approx. 4"height x 4"length

MATERIALS
*Crochet hook size: 3.5mm (E)
*Worsted Weight Yarn: Windsor Blue (45yds) & Aran (5yds)
*Stitch Markers to mark your rounds
*Felt: Aran & Light Brown
*Fiberfill
*Tapestry Needle
*Matching Thread
*Hot Glue

PATTERN NOTES - must-read...
 Numbers in ( ) at the end of each round/row indicate the total number of stitches.
 Always use stitch markers to mark your rounds.
 There's no need to sl st and/or ch when going to the next round unless stated to do so.
 Always do the 1st stitch where you slip stitch from the previous round.
 The chain, in the beginning, does NOT count as one stitch unless stated otherwise.
 You slip stitch on the first sc, not on top of the chain 1.

SPECIAL STITCHES
Invisible join - this VIDEO explains how to do this technique.

HEAD/BODY with windsor blue
  Rnd 1: 6sc in magic ring (6)
  Rnd 2: 2sc in each st around (12)
  Rnd 3: sc in next st, 2sc in next st around (18)
  Rnd 4: sc in next 2 sts, 2sc in next st around (24)
  Rnd 5: sc in next 3 sts, 2sc in next st around (30)
  Rnd 6: sc in next 4 sts, 2sc in next st around (36)
  Rnd 7: sc in next 11 sts, 2sc in next st around (39)
  Rnd 8-16: sc in each st around (39)
  Rnd 17: sc in next 11 sts, sc2tog around (36)
  Rnd 18: sc in next 4 sts, sc2tog around (30)
  Rnd 19: sc in next 3 sts, sc2tog around (24)
Start stuffing the head/body moderately firm.
  Rnd 20: sc in next 2 sts, sc2tog around (18)
  Rnd 21: sc in next st, sc2tog around (12)
  Rnd 22: sc2tog around (6)
F/O and leave a tail for closing. Add any bits of stuffing needed to finish shaping the head/body. Weave in the tail through the final round and draw up tight to close. Secure and weave in the ends.

EARS with windsor blue; make 2
  Rnd 1: 4sc in magic ring (4)
  Rnd 2: sc in next st, 2sc in next st around (6)
  Rnd 3: sc in next 2 sts, 2sc in next st around (8)
  Rnd 4: sc in next 3 sts, 2sc in next st around (10)
  Rnd 5: sc in each st around, join to the 1st st with the invisible join (10)
F/O, secure and weave in the ends.

ARMS with windsor blue; make 2
  Rnd 1: 5sc in magic ring (5)
  Rnd 2-3: sc in each st around (5)
  Rnd 4: sc2tog, sc in next 3 sts (4)
F/O, secure and weave in the ends.

FEET with aran; make 2
  Rnd 1: 6sc in magic ring (6)
  Rnd 2: sc in next st, 2sc in next st around (9)
  Rnd 3: sc in each st around (9)
Stuff the feet lightly.
  Rnd 4: sc in next st, sc2tog in next st around (6)
F/O, secure and weave in the ends.


ASSEMBLE
     I recommend pinning the pieces before sewing them to make sure you have them in the position you like best before sewing. (Most people prefer to use the yarn at the end of the finished pieces to sew them in place, but I use matching thread).
     TIP...For anything that I’m going to be using felt, I like to first sketch it out on white paper and make a stencil of what I need. Then cut it out. Then tape the stencil to the felt and cut it out.
     HEAD/BODY PATCH…using an aran color felt, create the center patch. I made 2 circles intertwined and cut out a triangle on top for the face. Before gluing it in place, embroider the eyes, mouth, and teeth using embroidery floss/thread or yarn. Place it between rounds 6 and 17.
     FEET…if you have not to stuff them yet, do so now. Place them between rounds 18 and 19. With light brown felt cut out 2 small circles and glue them at the bottom of the feet.
     EARS...if you have not stuffed them yet, do so now. Place them between rounds 4 and 7.
     ARMS...theirs no need to stuff them. Align them to the ears and place them on rounds 12 and 13.


GLOSSARY:
f/o: finish off || rnd: round || sc: single crochet || sc2tog: single crochet 2 stitches together || st/s: stitch/es


Don't forget to like this blog's Facebook page.
Or follow us on Instagram. :)

Have a nice crochet time!
- Janet

Snorlax and Pokemon are copyrighted by The Pokemon Company.
This pattern is an original pattern by Janet Carrillo "damn it Janet, let's crochet!" (March 2024). Please do not claim this pattern as your own. If you wish to share this pattern, you may link to this pattern but please do not reprint/repost it on your site. You may print and keep a copy for your own personal use. Please do not resell or distribute it.

October 4, 2023

Ghost Cuddler

By Janet Carrillo "damn it Janet, let's crochet!"

SIZE/MEASUREMENTS

approx. 8"height x 10"length (from the widest points)
...but can vary based on yarn and hook size.

MATERIALS
*Crochet hook size: 4.5mm (7) & 5.0mm (H)
*Worsted Weight Yarn: White (145yds)
*Felt: Black & Red
*Fiberfill
*Tapestry Needle
*Hot Glue
*Embroidery Floss or Makeup Blush

PATTERN NOTES - must-read...
 Numbers in ( ) at the end of each round/row indicate the total number of stitches.
 Always use stitch markers to mark your rounds.
 The chain, in the beginning, does NOT count as one stitch unless stated otherwise.

SPECIAL STITCHES
Invisible join - this VIDEO explains how to do this technique.
Single crochet 3 stitches together (sc3tog) – is a decrease over 3sts. Insert yarn thru 1st st, y/o pull thru, insert thru 2nd st, y/o pull thru, insert thru 3rd st, y/o pull thru, & y/o pull thru all 4 loops on hook.


Please note that we will be starting our work from the tail and moving upwards.
BODY with white, make 2; 5.0mm (H)
  Row 1: ch2, sc in 2nd ch from hook, ch1, turn (1)
  Row 2: 2sc in next st, ch1, turn (2)
  Row 3: sc in next st, 2sc in next st, ch1, turn (3)
  Row 4: 2sc in next st, sc in next 2 sts, ch1, turn (4)
  Row 5: sc in next 2 sts, 2sc in next 2 sts, ch1, turn (6)
  Row 6: sc in each st across, ch1, turn (6)
  Row 7: sc in next 5 sts, 2sc in next st, ch1, turn (7)
  Row 8: 2sc in next st, sc in next 6 sts, ch1, turn (8)
  Row 9: sc in next 6 sts, 2sc in next 2 sts, ch1, turn (10)
  Row 10: 2sc in next st, sc in next 9 sts, ch1, turn (11)
  Row 11: 2sc in next st, sc in next 10 sts, ch1, turn (12)
  Row 12: sc in next st, 2sc in next 3 sts, sc in next 8 sts, ch1, turn (15)
  Row 13: sc in next 12 sts, 2sc in next 2 sts, sc in next st, ch1, turn (17)
  Row 14: sc in next st, 2sc in next st, sc in next 15 sts, ch1, turn (18)
  Row 15: sc in next 15 sts, 2sc in next st, sc in next 2 sts, ch1, turn (19)
  Row 16: sc in next 3 sts, 2sc in next st, sc in next 15 sts, ch1, turn (20)
  Row 17: sc in next st, 2sc in next st, sc in next 16 sts, 2sc in next st, sc in next st, ch1, turn (22)
  Row 18: sc in next 5 sts, 2sc in next 2 sts, sc in next 12 sts, sc2tog, sc in next st, ch1, turn (23)
  Row 19: sc in next 18 sts, 2sc in next 2 sts, sc in next 3 sts, ch1, turn (25)
  Row 20: sc in next st, 2sc in next st, sc in next 23 sts, ch1, turn (26)
  Row 21: sc in next 17 sts, 2sc in next st, sc in next 5 sts, 2sc in next st, sc in next 2 sts, ch1, turn (28)
  Row 22: sc in each st across, ch1, turn (28)
  Row 23: sc in next 26 sts, 2sc in next st, sc in next st, ch1, turn (29)
  Row 24: sc in next 3 sts, 2sc in next st, sc in next 25 sts, ch1, turn (30)
  Row 25: sc in each st across, ch1, turn (30)
  Row 26: sc in next 9 sts, 2sc in next st, sc in next 20 sts, ch1, turn (31)
  Row 27: sc in next st, sc2tog, sc in next 14 sts, *2sc in next st, sc in next 6 sts,* repeat from * to * 1 more time, ch1, turn (32)
  Row 28: sc in each st across, ch1, turn (32)
  Row 29: sc in next st, sc2tog, sc in next 7 sts, *2sc in next st, sc in next 10 sts,* repeat from * to * 1 more time, ch1, turn (33)
  Row 30: sc in next 10 sts, 2sc in next st, sc in next 19 sts, sc2tog, sc in next st, ch1, turn (33)
  Row 31: sc in next 19 sts, 2sc in next st, sc in next 13 sts, ch1, turn (34)
  Row 32: sc in next 2 sts, sc2tog, sc in next 8 sts, 2sc in next st, sc in next 21 sts, ch1, turn (34)
  Row 33: sc in next 19 sts, 2sc in next st, sc in next 14 sts, ch1, turn (35)
  Row 34: sc in next 12 sts, 2sc in next st, sc in next 19 sts, sc2tog, sc in next st, ch1, turn (35)
  Row 35: sc in next 20 sts, 2sc in next st, sc in next 14 sts, ch1, turn (36)
  Row 36: sc in next 2 sts, sc2tog, sc in next 9 sts, 2sc in next st, sc in next 19 sts, sc2tog, sc in next st, ch1, turn (35)
  Row 37: sc in next 2 sts, sc2tog, sc in next 27 sts, sc2tog, sc in next 2 sts, ch1, turn (33)
  Row 38: sc in next 2 sts, sc2tog, sc in next 25 sts, sc2tog, sc in next 2 sts, ch1, turn (31)
  Row 39: sc in next 2 sts, sc2tog, sc in next 23 sts, sc2tog, sc in next 2 sts, ch1, turn (29)
  Row 40: sc in next 25 sts, sc2tog, sc in next 2 sts, ch1, turn (28)
  Row 41: sc in next 24 sts, sc2tog, sc in next 2 sts, ch1, turn (27)
  Row 42: sc in next 23 sts, sc2tog, sc in next 2 sts, ch1, turn (26)
  Row 43: sc in next 22 sts, sc2tog, sc in next 2 sts, ch1, turn (25)
  Row 44: sc3tog, sc in next 19 sts, sc3tog, ch1, turn (21)
  Row 45: sc3tog, sc in next 15 sts, sc3tog, do not ch1, turn (17)
  Row 46: sl st in next 3 sts, sc2tog, sc in next 8 sts, sc2tog, sl st in next 2 sts (15)
F/O, secure and weave in the ends. Crochet the second piece. 

ARMS with white, make 2; 4.5mm (7)
ch5, dc in 3rd ch from hook, hdc in next ch, sc in last ch
F/O, leave a tail for sewing. 


ASSEMBLE
     I recommend pinning the pieces before sewing them to make sure you have them in the position you like best before sewing. (Most people prefer to use the yarn at the end of the finished pieces to sew them in place, but I use matching thread).
     TIP...For anything that I’m going to be using felt, I like to first sketch it out on white paper and make a stencil of what I need. Then cut it out. Then tape the stencil to the felt and cut it out.
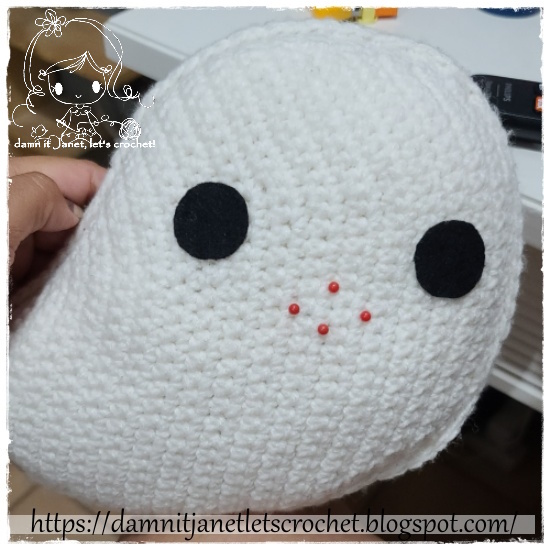
     Align both ghost pieces, so the rows match. Using the 4.5mm (7) hook, attach the yarn in any stitch and sc around both pieces to join them together. To ensure your stitches face forward, it's important to work in a counter-clockwise direction for the tail to be on the left side. [picture 1] (If you want the tail of the ghost to be on the right side. Keep the tail on the right while you are attaching the yarn and work those single crochets clockwise so those single crochet face towards you. [picture 2]) Before closing the pieces together be sure to stuff your ghostie moderately firm. Join to the first stitch with the invisible join. Secure and weave in the ends.
     EYES...using black felt cut out 2 circles. Place them between rounds 25 and 28 & 38 and 42, approx. 2.25" apart from each other.
If you prefer to crochet the eyes...use a 4.5mm (7) hook and black yarn.
ch2, 10hdc in magic ring, join to the first stitch with the invisible join (10)
F/O, secure and weave in the ends. 
     MOUTH... you can play around with this part; the possibilities are endless.
I went with felt and cut out a bean-shaped using black felt. With red felt, I cut out a thin long oval for the tongue. Glue the tongue on either side of the mouth.
Placed the mouth in the center of the eyes right between rounds 32 and 35.
     BLUSH...the possibilities are endless. You can use makeup blush, felt, or embroidery floss. I went with a light orange embroidery floss and embroidered x's on the side of the eyes.
     ARMS...align them to the eyes and place them approx 1.25" below them. Only sew the end of the arms to the ghostie, leaving the rest unsew.


GLOSSARY:
ch/s: chain/s || dc: double crochet || hdc: half double crochet || f/o: finish off || sc: single crochet
sc2tog: single crochet 2 stitches together || sc3tog: single crochet 3 stitches together || sl st: slip stitch
st/s: stitch/es || y/o: yarn over


Don't forget to like this blog's Facebook page.
Or follow us on Instagram. :)

Have a nice crochet time!
- Janet

This pattern is an original pattern by Janet Carrillo "damn it Janet, let's crochet!" (October 2023). Please do not claim this pattern as your own. If you wish to share this pattern, you may link to this pattern but please do not reprint/repost it on your site. You may print and keep a copy for your own personal use. Please do not resell or distribute it.

September 13, 2023

Round Plush Fuecoco (Pokemon)

  By Janet Carrillo "damn it Janet, let's crochet!"

   For those who love cute things, Fuecoco is the perfect size to hold on to your palm or attach to your bag as a keychain and be your traveling companion. You can also make a small blanket and attach it to make a lovey for your little one.

SIZE/MEASUREMENTS
approx. 3.75"height x 3"length

MATERIALS
*Crochet hook size: 3.5mm (E)
*Worsted Weight Yarn: Red (38yds), Aran (15yds) & Yellow (1yd)
*Stitch Markers to mark your rounds
*8mm Safety Eyes
*Felt: Yellow, White & Black
*Fiberfill
*Tapestry Needle
*Matching Thread
*Hot Glue

PATTERN NOTES - must-read...
 Numbers in ( ) at the end of each round/row indicate the total number of stitches.
 Always use stitch markers to mark your rounds.
 There is no need to sl st and/or ch when going to the next round unless stated to do so.
 You slip stitch on the first sc, not on top of the chain 1.
 When a round or row mentions “around/across” you will be working that whole sequence from that round/row around the entire piece. (EX: sc in next st, 2sc in next st, around = sc, inc, sc, inc,…)

SPECIAL STITCHES
Invisible join - this VIDEO explains how to do this technique.
Other side of the foundation chains - this VIDEO explains how to do this technique.

HEAD/BODY starting with red
  Rnd 1: 6sc in magic ring (6)
  Rnd 2: 2sc in each st around (12)
  Rnd 3: sc in next st, 2sc in next st, around (18)
  Rnd 4: sc in next 2 sts, 2sc in next st, around (24)
  Rnd 5: sc in next 3 sts, 2sc in next st, around (30)
  Rnd 6: sc in next 4 sts, 2sc in next st, around (36)
  Rnd 7: sc in next 11 sts, 2sc in next st, around (39)
  Rnd 8-13: sc in each st around (39)
  Rnd 14: sc in next 11 sts, sc2tog, around, in the last st change to aran (36)
  Rnd 15: sl st in each st around (36)
  Rnd 16: working in the back loops only of the sl st's from rnd 15, sc in next 4 sts, sc2tog, around (30)
  Rnd 17: sc in next 3 sts, sc2tog, around (24)
Start stuffing the head/body moderately firm.
  Rnd 18: sc in next 2 sts, sc2tog, around (18)
  Rnd 19: sc in next st, sc2tog, around (12)
  Rnd 20: sc2tog around (6)
F/O and leave a tail for closing. Add any bits of stuffing need it to finish shaping the head/body. Weave in the tail through the final round and draw up tight to close. Secure and weave in the ends.

FEET with red, make 2
  Rnd 1: 5sc in magic ring (5)
  Rnd 2: *sc in next st, 2sc in next st* repeat from * to 1 more time, sc in last st (7)
  Rnd 3: working in back loops for this round only sc in each st around (7)
  Rnd 4: sc in each st around (7)
  Rnd 5: hdc in next 3 sts, ch1, sl st in same st as previous
F/O, secure and weave in the ends.

ARMS with red, make 2
  Rnd 1: 5sc in magic ring (5)
  Rnd 2-3: sc in each st around (5)
  Rnd 4: sc2tog, sc in next 3 sts (4)
F/O, secure and weave in the ends.

TAIL starting with red
  Rnd 1: 4sc in magic ring (4)
  Rnd 2: sc in each st around (4)
  Rnd 3: sc in next st, in last st change to aran, 2sc in next 2 sts, in last st change to red, sc in next st (6)
  Rnd 4: sc in next 2 sts, in last st change to aran, 2sc in next 2 sts, in last st change to red, sc in next 2 sts (8)
  Rnd 5: sc in next 3 sts, in last st change to aran, 2sc in next 2 sts, in last st change to red, sc in next 3 sts (10)
  Rnd 6: sc in next 3 sts, in last st change to aran, sc in next 4 sts, in last st change to red, sc in next 3 sts (10)
  Rnd 7: hdc in next 2 sts, sl st in next st
F/O, secure and weave in the ends.

SNOUT with red
  Rnd 1: 6sc in magic ring (6)
  Rnd 2: sc in next st, 3hdc in next st, hdc in next 2 sts, 3hdc in next st, sc in next st (10)
  Rnd 3: sc in next 2 sts, 3hdc in next st, hdc in next 4 sts, 3hdc in next st, sc in next 2 sts, join to the 1st st with the invisible join (14)
F/O, secure and weave in the ends.

TOP of the SNOUT with aran
  Row 1: ch8, sc in 2nd ch from hook and across, ch1, turn (7)
  Row 2: sc2tog, sc in next 3 sts, sc2tog, ch1, turn (5)
  Row 3: sc2tog, sc in next st. sc2tog (3)
F/O, secure and weave in the ends.

THING behind the EYES with aran, make 2
  Row 1: ch5, hdc on 3rd ch, hdc, 4hdc on last ch, other side of the foundations chains hdc in next 2 chs, ch2, sl st in same ch as previous
F/O, secure and weave in the ends.

TUFT with aran, make 2
  Row 1: 
ch4, sc in 2nd ch from hook, sc in next ch, sl st in next ch, ch6, hdc on 3rd ch from hook, hdc in next ch, sc in next 2 chs, sl st into 1st ch from ch4
F/O, secure and weave in the ends.


ASSEMBLE
      I recommend pinning the pieces before sewing them to assure you have them in the position you like best before sewing. (Most people prefer to use the yarn at the end of the finished pieces to sew them in place, but I use matching thread).
      TIP...For anything I'll be using felt, I prefer to first sketch it out on white paper and make a stencil of what I need. Then cut it out. Then tape the stencil to the felt and cut it out.
     TAIL...stuff it lightly. Find the center of the back of the body and match the color changes from the body to the tail.
     FEET...stuff them lightly. From the tail count 8 stitches (the red front loops left unworked from round 14) on each side and place them between rounds 13 and 14.
     ARMS...no need to stuff them. Align them to the feet and place them on rounds 11 and 12.
     SNOUT...lightly stuff it. The hdc's section goes facing downward. Place it between rounds 11 and 13.
     EYES...sew both pieces together by 4 stitches. Place the safety eyes in the position you like best. Sew the piece right above the snout between rounds 6 and 10.
     TOP of the SNOUT...place it above the snout. Sew in place.
     TURF...place it on the top center of the head/body.
     PATCHES...using yellow felt, cut out 2 small rectangles. Place one on the bottom of the snout on round 16. The other goes on top of the tail.
     TEETH...using white felt, cut out 3 small triangles. Place one in the center of the upper jaw and the other two on either side of the lower jaw.
     NOSTRILS...using black felt, cut out 2 small triangles and place them on the upper portion of the snout.
     DETAILS on the FEET...with black embroidery floss or thread. Embroider 2 lines on each foot for his toes.


GLOSSARY:
ch/s: chain/s || f/o: finish off || hdc: half double crochet || rnd: round || sc: single crochet
sc2tog: single crochet 2 stitches together || sl st: slip stitch || st/s: stitch/es


Don't forget to like this blog's Facebook page.
Or follow us on Instagram. :)

Have a nice crochet time!
- Janet

Fuecoco and Pokemon are copyrighted by The Pokemon Company.
This pattern is an original pattern by Janet Carrillo "damn it Janet, let's crochet!" (September 2023). Please do not claim this pattern as your own. If you wish to share this pattern, you may link to this pattern but please do not reprint/repost it on your site. You may print and keep a copy for your own personal use. Please do not resell or distribute it.
September 6, 2023

Round Plush Quaxly (Pokemon)

  By Janet Carrillo "damn it Janet, let's crochet!"

     For those who love cute things, Quaxly is the perfect size to hold on to your palm or attach it to your bag as a keychain and be your traveling companion. You can also make a small blanket and attach it to make a lovey for your little one.

SIZE/MEASUREMENTS
approx. 3.25"height x 4"length

MATERIALS
*Crochet hook size: 3.5mm (E)
*Worsted Weight Yarn: White (36yds), Turquoise (22yds) & Yellow (2yds)
*Stitch Markers to mark your rounds
*8mm Safety Eyes
*Fiberfill
*Embroidery Floss: White
*Tapestry Needle
*Matching Thread

PATTERN NOTES - must-read...
 Numbers in ( ) at the end of each round/row indicate the total number of stitches.
 Always use stitch markers to mark your rounds.
 There is no need to sl st and/or ch when going to the next round unless stated to do so.
 Always do the 1st stitch where you slip stitch from the previous round.
 The chain, in the beginning, does NOT count as one stitch unless stated otherwise.
 You slip stitch on the first sc, not on top of the chain 1.
 When a round or row mentions “around/across” you will be working that whole sequence from that round/row around the entire piece. (EX: sc in next st, 2sc in next st, around = sc, inc, sc, inc,…)

SPECIAL STITCHES
Invisible join - this VIDEO explains how to do this technique.
Picot Stitch - ch3, insert hook into the 3rd chain from hook, y/o & draw up the yarn through all the loops.

Note: If you are using safety eyes, place them before closing the body between rounds 8 and 9; approx. 5 stitches apart.
HEAD/BODY with white
  Rnd 1: 6sc in magic ring (6)
  Rnd 2: 2sc in each st around (12)
  Rnd 3: sc in next st, 2sc in next st, around (18)
  Rnd 4: sc in next 2 sts, 2sc in next st, around (24)
  Rnd 5: sc in next 3 sts, 2sc in next st, around (30)
  Rnd 6: sc in next 4 sts, 2sc in next st, around (36)
  Rnd 7: sc in next 11 sts, 2sc in next st, around (39)
  Rnd 8-13: sc in each st around (39)
  Rnd 14: sc in next 11 sts, sc2tog, around (36)
  Rnd 15: sc in next 4 sts, sc2tog, around (30)
  Rnd 16: sc in next 3 sts, sc2tog, around (24)
Start stuffing the head/body moderately firm.
  Rnd 17: sc in next 2 sts, sc2tog, around (18)
  Rnd 18: sc in next st, sc2tog, around (12)
  Rnd 19: sc2tog around (6)
F/O and leave a tail for closing. Add any bits of stuffing needed to finish shaping the head/body. Weave in the tail through the final round and draw up tight to close. Secure and weave in the ends.

FEET with turquoise, make 2
  Rnd 1: 6sc in magic ring (6)
  Rnd 2: 3sc in next st, sc in next 2 sts, around (10)
  Rnd 3: sc in each st around (10)
There's no need to stuff the feet.
  Row 1: flatten to match up the stitches and *sc in next st, ch2, sl st into 2nd ch, sc in same st, sl st in next st* repeat from * to * 1 more time, sc in last st, ch2, sl st into 2nd st, sc in same st
F/O, secure and weave in the ends.
LEFT-WING with white
  Rnd 1: 4sc in magic ring (4)
  Rnd 2: 2sc in next st, sc in next 2 sts, 2sc in next st (6)
  Rnd 3: 2sc in next st, sc in next 4 sts, 2sc in next st (8)
  Rnd 4: 2sc in next st, sc in next 6 sts, 2sc in next st (10)
There is no need to stuff the wing.
  Row 1: flatten to match up the stitches and *picot st, sl st in next st* repeat from * to * 4 more times
F/O, secure and weave in the ends.

RIGHT-WING with white
  Rnd 1: 4sc in magic ring (4)
  Rnd 2: sc in next st, 2sc in next 2 sts, sc in next st (6)
  Rnd 3: sc in next 2 sts, 2sc in next 2 sts, sc in next 2 sts (8)
  Rnd 4: sc in next 3 sts, 2sc in next 2 sts, sc in next 3 sts (10)
There is no need to stuff the wing.
  Row 1: flatten to match up the stitches and *picot st, sl st in next st* repeat from * to * 4 more times
F/O, secure and weave in the ends.

BEAK with yellow
  Rnd 1: 4sc in magic ring (4)
  Rnd 2: 3sc in next st, sc in next st around (8)
  Rnd 3-4: sc in each st around, join to the 1st st with the invisible join (8)
F/O, secure and weave in the ends.

TUFT underneath beak with white
  Rnd 1: sc, hdc, ch2, hdc, sc, ch1, sl st in magic ring
Pull as tightly as possible so there's no hole showing through.
F/O, secure and weave in the ends.

CREST with turquoise
  Rnd 1: 6sc in magic ring (6)
  Rnd 2: 2sc in each st around (12)
  Rnd 3: sc in next st, 2sc in next st, around (18)
  Rnd 4: sc in next 2 sts, 2sc in next st, around (24)
  Rnd 5: sc in next 3 sts, 2sc in next st, around (30)
  Rnd 6: sc in next 16 sts, dc in next 2 sts, sc in next 12 sts (30)
  Rnd 7: sc in next 16 sts, 2dc in next 2 sts, sc in next 12 sts (32)
  Rnd 8: sc in next 16 sts, dc in next st, 2dc in next 2 sts, dc in next st, sc in next 12 sts (34)
  Rnd 9: sc in next 16 sts, sc2tog in next 6 sts, sc in next 12 sts (31)
F/O, secure and weave in the ends.

LONGER TUFT in front of the crest with turquoise
  Rnd 1: 5sc in magic ring (5)
  Rnd 2-5: sc in each st around (5)
  Rnd 6: sc in next 4 sts, sc2tog (4)
There's no need to stuff the tuft.
  Row 1: flatten to match up the stitches and sc in each st (2)
F/O, secure and weave in the ends.

SHORTER TUFT in front of the crest with turquoise
  Rnd 1: 5sc in magic ring (5)
  Rnd 2: sc in next 4 sts, sc2tog (4)
There's no need to stuff the tuft.
  Row 1: flatten to match up the stitches and sc in each st (2)
F/O, secure and weave in the ends.

TAIL with white
  Rnd 1: 4sc in magic ring (4)
  Rnd 2: sc in each st around (4)
  Rnd 3: sc in next st, 2sc in next 2 sts, sc in next st (6)
  Rnd 4: sc in next 2 sts, 2sc in next 2 sts, sc in next 2 sts (8)
F/O, secure and weave in the ends.


ASSEMBLE
     I recommend pinning the pieces before sewing them to make sure you have them in the position you like best before sewing. (Most people prefer to use the yarn at the end of the finished pieces to sew them in place, but I use matching thread).
     FEET...try to find the position you like best. I place mine between rounds 17 and 18; approx. 0.50" apart. Only sew the 2 first rounds from the feet to the body. 
     WINGS...align them with the feet and place them on rounds 10 and 11; 3 stitches between the eyes and the wings. Only sew the top portion leaving the rest of the wing unsown so he can flap around.
     BEAK...there's no need to stuff it. Place it in the center of the eyes between rounds 10 and 11.
     TUFT underneath the beak...place it underneath the beak on round 12. The rounded part goes facing down and the flat side upward. Only sew the flat side.
     TAIL...if you haven't already, stuff it lightly. Find the center of the back of the body and place it between rounds 14 and 16. Make sure that the part with the increases is facing downwards.
     CREST...stuff it lightly. In the section where we made the dc's (the part that's sticking out), face it towards the left side. The crest will be placed up to round 5.
     Using white embroidery floss/thread/yarn, embroider a curvy line like a wave in the front center of the crest on round 7.
     LONG and SHORT TUFT...place them in the center and on round 9 of the crest. The shorter tuft goes behind the longer tuft.


GLOSSARY:
ch/s: chain/s || dc: double crochet || f/o: finish off || hdc: half double crochet || rnd: round
sc: single crochet || sc2tog: single crochet 2 stitches together || sl st: slip stitch || st/s: stitch/es
y/o: yarn over


Don't forget to like this blog's Facebook page.
Or follow us on Instagram. :)

Have a nice crochet time!
- Janet

Quaxly and Pokemon are copyrighted by The Pokemon Company.
This pattern is an original pattern by Janet Carrillo "damn it Janet, let's crochet!" (September 2023). Please do not claim this pattern as your own. If you wish to share this pattern, you may link to this pattern but please do not reprint/repost it on your site. You may print and keep a copy for your own personal use. Please do not resell or distribute it.