Showing posts with label ghost. Show all posts

October 4, 2023

Ghost Cuddler

By Janet Carrillo "damn it Janet, let's crochet!"

SIZE/MEASUREMENTS

approx. 8"height x 10"length (from the widest points)
...but can vary based on yarn and hook size.

MATERIALS
*Crochet hook size: 4.5mm (7) & 5.0mm (H)
*Worsted Weight Yarn: White (145yds)
*Felt: Black & Red
*Fiberfill
*Tapestry Needle
*Hot Glue
*Embroidery Floss or Makeup Blush

PATTERN NOTES - must-read...
 Numbers in ( ) at the end of each round/row indicate the total number of stitches.
 Always use stitch markers to mark your rounds.
 The chain, in the beginning, does NOT count as one stitch unless stated otherwise.

SPECIAL STITCHES
Invisible join - this VIDEO explains how to do this technique.
Single crochet 3 stitches together (sc3tog) – is a decrease over 3sts. Insert yarn thru 1st st, y/o pull thru, insert thru 2nd st, y/o pull thru, insert thru 3rd st, y/o pull thru, & y/o pull thru all 4 loops on hook.


Please note that we will be starting our work from the tail and moving upwards.
BODY with white, make 2; 5.0mm (H)
  Row 1: ch2, sc in 2nd ch from hook, ch1, turn (1)
  Row 2: 2sc in next st, ch1, turn (2)
  Row 3: sc in next st, 2sc in next st, ch1, turn (3)
  Row 4: 2sc in next st, sc in next 2 sts, ch1, turn (4)
  Row 5: sc in next 2 sts, 2sc in next 2 sts, ch1, turn (6)
  Row 6: sc in each st across, ch1, turn (6)
  Row 7: sc in next 5 sts, 2sc in next st, ch1, turn (7)
  Row 8: 2sc in next st, sc in next 6 sts, ch1, turn (8)
  Row 9: sc in next 6 sts, 2sc in next 2 sts, ch1, turn (10)
  Row 10: 2sc in next st, sc in next 9 sts, ch1, turn (11)
  Row 11: 2sc in next st, sc in next 10 sts, ch1, turn (12)
  Row 12: sc in next st, 2sc in next 3 sts, sc in next 8 sts, ch1, turn (15)
  Row 13: sc in next 12 sts, 2sc in next 2 sts, sc in next st, ch1, turn (17)
  Row 14: sc in next st, 2sc in next st, sc in next 15 sts, ch1, turn (18)
  Row 15: sc in next 15 sts, 2sc in next st, sc in next 2 sts, ch1, turn (19)
  Row 16: sc in next 3 sts, 2sc in next st, sc in next 15 sts, ch1, turn (20)
  Row 17: sc in next st, 2sc in next st, sc in next 16 sts, 2sc in next st, sc in next st, ch1, turn (22)
  Row 18: sc in next 5 sts, 2sc in next 2 sts, sc in next 12 sts, sc2tog, sc in next st, ch1, turn (23)
  Row 19: sc in next 18 sts, 2sc in next 2 sts, sc in next 3 sts, ch1, turn (25)
  Row 20: sc in next st, 2sc in next st, sc in next 23 sts, ch1, turn (26)
  Row 21: sc in next 17 sts, 2sc in next st, sc in next 5 sts, 2sc in next st, sc in next 2 sts, ch1, turn (28)
  Row 22: sc in each st across, ch1, turn (28)
  Row 23: sc in next 26 sts, 2sc in next st, sc in next st, ch1, turn (29)
  Row 24: sc in next 3 sts, 2sc in next st, sc in next 25 sts, ch1, turn (30)
  Row 25: sc in each st across, ch1, turn (30)
  Row 26: sc in next 9 sts, 2sc in next st, sc in next 20 sts, ch1, turn (31)
  Row 27: sc in next st, sc2tog, sc in next 14 sts, *2sc in next st, sc in next 6 sts,* repeat from * to * 1 more time, ch1, turn (32)
  Row 28: sc in each st across, ch1, turn (32)
  Row 29: sc in next st, sc2tog, sc in next 7 sts, *2sc in next st, sc in next 10 sts,* repeat from * to * 1 more time, ch1, turn (33)
  Row 30: sc in next 10 sts, 2sc in next st, sc in next 19 sts, sc2tog, sc in next st, ch1, turn (33)
  Row 31: sc in next 19 sts, 2sc in next st, sc in next 13 sts, ch1, turn (34)
  Row 32: sc in next 2 sts, sc2tog, sc in next 8 sts, 2sc in next st, sc in next 21 sts, ch1, turn (34)
  Row 33: sc in next 19 sts, 2sc in next st, sc in next 14 sts, ch1, turn (35)
  Row 34: sc in next 12 sts, 2sc in next st, sc in next 19 sts, sc2tog, sc in next st, ch1, turn (35)
  Row 35: sc in next 20 sts, 2sc in next st, sc in next 14 sts, ch1, turn (36)
  Row 36: sc in next 2 sts, sc2tog, sc in next 9 sts, 2sc in next st, sc in next 19 sts, sc2tog, sc in next st, ch1, turn (35)
  Row 37: sc in next 2 sts, sc2tog, sc in next 27 sts, sc2tog, sc in next 2 sts, ch1, turn (33)
  Row 38: sc in next 2 sts, sc2tog, sc in next 25 sts, sc2tog, sc in next 2 sts, ch1, turn (31)
  Row 39: sc in next 2 sts, sc2tog, sc in next 23 sts, sc2tog, sc in next 2 sts, ch1, turn (29)
  Row 40: sc in next 25 sts, sc2tog, sc in next 2 sts, ch1, turn (28)
  Row 41: sc in next 24 sts, sc2tog, sc in next 2 sts, ch1, turn (27)
  Row 42: sc in next 23 sts, sc2tog, sc in next 2 sts, ch1, turn (26)
  Row 43: sc in next 22 sts, sc2tog, sc in next 2 sts, ch1, turn (25)
  Row 44: sc3tog, sc in next 19 sts, sc3tog, ch1, turn (21)
  Row 45: sc3tog, sc in next 15 sts, sc3tog, do not ch1, turn (17)
  Row 46: sl st in next 3 sts, sc2tog, sc in next 8 sts, sc2tog, sl st in next 2 sts (15)
F/O, secure and weave in the ends. Crochet the second piece. 

ARMS with white, make 2; 4.5mm (7)
ch5, dc in 3rd ch from hook, hdc in next ch, sc in last ch
F/O, leave a tail for sewing. 


ASSEMBLE
     I recommend pinning the pieces before sewing them to make sure you have them in the position you like best before sewing. (Most people prefer to use the yarn at the end of the finished pieces to sew them in place, but I use matching thread).
     TIP...For anything that I’m going to be using felt, I like to first sketch it out on white paper and make a stencil of what I need. Then cut it out. Then tape the stencil to the felt and cut it out.
     Align both ghost pieces, so the rows match. Using the 4.5mm (7) hook, attach the yarn in any stitch and sc around both pieces to join them together. To ensure your stitches face forward, it's important to work in a counter-clockwise direction for the tail to be on the left side. [picture 1] (If you want the tail of the ghost to be on the right side. Keep the tail on the right while you are attaching the yarn and work those single crochets clockwise so those single crochet face towards you. [picture 2]) Before closing the pieces together be sure to stuff your ghostie moderately firm. Join to the first stitch with the invisible join. Secure and weave in the ends.
     EYES...using black felt cut out 2 circles. Place them between rounds 25 and 28 & 38 and 42, approx. 2.25" apart from each other.
If you prefer to crochet the eyes...use a 4.5mm (7) hook and black yarn.
ch2, 10hdc in magic ring, join to the first stitch with the invisible join (10)
F/O, secure and weave in the ends. 
     MOUTH... you can play around with this part; the possibilities are endless.
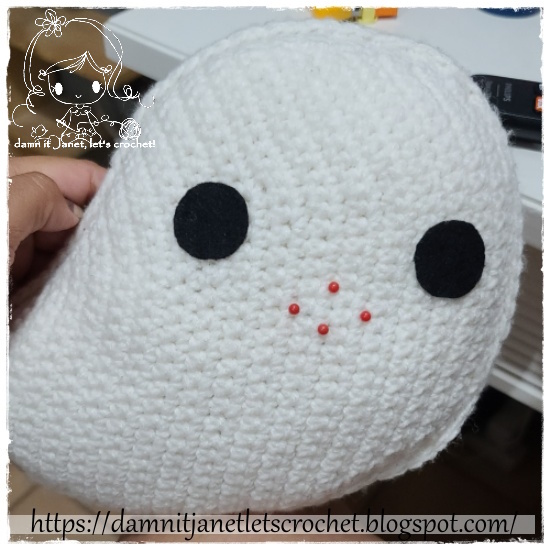
I went with felt and cut out a bean-shaped using black felt. With red felt, I cut out a thin long oval for the tongue. Glue the tongue on either side of the mouth.
Placed the mouth in the center of the eyes right between rounds 32 and 35.
     BLUSH...the possibilities are endless. You can use makeup blush, felt, or embroidery floss. I went with a light orange embroidery floss and embroidered x's on the side of the eyes.
     ARMS...align them to the eyes and place them approx 1.25" below them. Only sew the end of the arms to the ghostie, leaving the rest unsew.


GLOSSARY:
ch/s: chain/s || dc: double crochet || hdc: half double crochet || f/o: finish off || sc: single crochet
sc2tog: single crochet 2 stitches together || sc3tog: single crochet 3 stitches together || sl st: slip stitch
st/s: stitch/es || y/o: yarn over


Don't forget to like this blog's Facebook page.
Or follow us on Instagram. :)

Have a nice crochet time!
- Janet

This pattern is an original pattern by Janet Carrillo "damn it Janet, let's crochet!" (October 2023). Please do not claim this pattern as your own. If you wish to share this pattern, you may link to this pattern but please do not reprint/repost it on your site. You may print and keep a copy for your own personal use. Please do not resell or distribute it.

October 6, 2021

Round Plush Ghost

By Janet Carrillo "damn it Janet, let's crochet!"
     For those who love cute things, this little ghost is the perfect size to hold on your palm or attach to your bag as a keychain and be your traveling companion. You can also make a small blanket and attach her to make a lovey for your little one.

SIZE/MEASUREMENTS
approx. 2.5"height x 3.25"length

MATERIALS
*Crochet hook size: 3.5mm (E)
*Worsted Weight Yarn: White (45yds)
*Stitch Markers to mark your rounds
*Fiberfill
*2 Black Round Doomed buttons or Safety Eyes (10mm)
*Tapestry Needle
*Matching Thread
*Makeup Blush & Q-tip (optional)

PATTERN NOTES - must-read...
 Numbers in ( ) at the end of each round/row indicate the total number of stitches.
 Always use stitch markers to mark your rounds.
 There's no need to sl st and/or ch when going to the next round unless stated to do so.
 Always do the 1st stitch where you slip stitch from the previous round.
 The chain, in the beginning, does NOT count as one stitch unless stated otherwise.
 You slip stitch on the first sc, not on top of the chain 1.

Note: If you are going to be using safety eyes, place them before closing the body. I am using round domed buttons.
When you see a + sign it means all those stitches are supposed to be done in that one particular stitch.
HEAD/BODY with white
  Rnd 1: 6sc in magic ring (6)
  Rnd 2: 2sc in each st around (12)
  Rnd 3: sc in next st, 2sc in next st around (18)
  Rnd 4: sc in next 2 sts, 2sc in next st around (24)
  Rnd 5: sc in next 3 sts, 2sc in next st around (30)
  Rnd 6: sc in next 4 sts, 2sc in next st around (36)
  Rnd 7: sc in next 11 sts, 2sc in next st around (39)
  Rnd 8-15: sc in each st around (39)
  Rnd 16: working in the front loops for this round only *sc+2hdc+sc in next st, sk next st, sl st in next st, sk next st* repeat from * to * 8 more times, sc+2hdc+sc in next st, sk next st, sl st in last st
F/O, secure and weave in the ends.

BOTTOM of the body with white
  Rnd 1: 6sc in magic ring (6)
  Rnd 2: 2sc in each st around (12)
  Rnd 3: sc in next st, 2sc in next st around (18)
  Rnd 4: sc in next 2 sts, 2sc in next st around (24)
  Rnd 5: sc in next 3 sts, 2sc in next st around (30)
  Rnd 6: sc in next 4 sts, 2sc in next st around (36)
F/O and leave a tail for closing.

ARMS with white; make 2
  Rnd 1: 5sc in magic ring (5)
  Rnd 2-3: sc in each st around (5)
  Rnd 4: sc2tog, sc in next 3 sts (4)
F/O, secure and weave in the ends. 


ASSEMBLE
     I recommend pinning the pieces in place before sewing them to make sure you have them in the position you like best before sewing. (Most people like to use the yarn at the end of the finished pieces to sew them in place, but I personally like to use matching thread).
     TIP...For anything that I am going to be using felt, I like to first sketch it out on white paper and make a stencil of what I need. Then cut it out. Then tape the stencil to the felt and cut it out.
     BODY to the BOTTOM...start by stuffing the head/body moderately firm. Be sure to attach the safety eyes in the position you like best. I place mine between rounds 8 and 9; 4 stitches apart. Place the bottom section underneath the body and sew it through the front loops of the body. Before you completely close the bottom section, add any bits of stuffing needed to finish shaping the head/body.
     ARMS...no need to stuff them. Place them on rounds 11 and 12.
     MOUTH...using black embroidery floss or thread, embroider the smile.
     BLUSH...using pink embroidery floss or thread, embroider a line underneath the eye for the blush. You can also use pink felt and make a tiny circle or you can use makeup blush and apply some using a q-tip.


GLOSSARY:
f/o: finish off || hdc: half double crochet || rnd: round || sc: single crochet
sc2tog: single crochet 2 stitches together || sl st: slip stitch || rnd: round || sk: skip || st/s: stitch/es


Don't forget to like this blog's Facebook fan page.
Or to follow our Instagram page. :)

Have a nice crochet time!
- Janet

This pattern is an original pattern by Janet Carrillo "damn it Janet, let's crochet!" (October 2021). Please do not claim this pattern as your own. If you wish to share this pattern, you may link to this pattern but please do not reprint/repost it on your site. You may print and keep a copy for your own personal use. Please do not resell or distribute it.

October 14, 2018

Halloween Applique: Scary Ghost

By Janet Carrillo "damn it Janet, let's crochet!"
Ideas on how to use these appliques...
*These would be great to apply to any project.
*You can add them to kitchen towels,
*turn them into a keychain or fridge magnet.
*You can also make several and make a garland.
*Attach a ribbon to make them into bookmarks.

SIZE/MEASUREMENTS
approx. 2.25"height x 2.50"length
...but they can vary based on yarn and hook size.

MATERIALS
*Crochet hook size: 3.5mm (E)
*Worsted weight yarn: White (5yds)
*Stitch Markers to mark your rounds
*Felt: Black
*Tapestry Needle
*Hot Glue

PATTERN NOTES - must-read...
 Numbers in ( ) at the end of each round/row indicate the total number of stitches.
 Always use stitch markers to mark your rounds.
 There's no need to sl st and/or ch when going to the next round unless stated to do so.

SPECIAL STITCHES
Other side of the foundation chains - this VIDEO explains how to do this technique.
Invisible join - this VIDEO explains how to do this technique.

GHOST (left tail) with white
  Rnd 1: ch6, 2hdc in 2nd ch from hook, hdc in next 3 chs, 4hdc in next ch, other side of the foundation chains hdc in next 3 chs, 2hdc in next ch, sl st into 1st st (14)
  Rnd 2: ch1, 2hdc in next 2 sts, hdc in next 4 sts, 2hdc in next 3 sts, hdc in next 4 sts, 2hdc in next st, sl st into 1st st (20)
  Rnd 3: ch1, sk 1st st, sl st in 2nd st, sl st in next 4 sts, (ch4, sl st in 2nd ch from hook, sc in next 2 chs), sl st in next 3 sts, dc in next st, (ch4, sl st in 2nd ch from hook, sc in next 2 chs), 3dc in same st as previous dc, hdc on next st, sc in next st, sl st in next 5 sts, (ch4, sl st in 2nd ch from hook, sc in next 2 chs), sl st in next 3 sts, join to 1st st with the invisible join
F/O, secure and weave in the ends.

GHOST (right tail) with white
  Rnd 1: ch6, 2hdc in 2nd ch from hook, hdc in next 3 chs, 4hdc in next ch, other side of the foundation chains hdc in next 3 chs, 2hdc in next ch, sl st into 1st st (14)
  Rnd 2: ch1, 2hdc in next 2 sts, hdc in next 4 sts, 2hdc in next 3 sts, hdc in next 4 sts, 2hdc in next st, sl st into 1st st (20)
  Rnd 3: ch1, sk 1st st, sl st in 2nd st, sl st in next 4 sts, (ch4, sl st in 2nd ch from hook, sc in next 2 chs), sl st in next 5 sts, sc in next st, hdc in next st, 3dc in next st, (ch4, sl st in 2nd ch from hook, sc in next 2 chs), dc in same st as previous dc's, sl st in next 3 sts, (ch4, sl st in 2nd ch from hook, sc in next 2 chs), sl st in next 3 sts, join to 1st st with the invisible join
F/O, secure and weave in the ends.


ASSEMBLE
     TIP...For anything that I’m going to be using felt, I like to first sketch it out on a white paper and make a stencil of what I need. Then cut it out. Then tape the stencil to the felt and cut it out.
     EYES...using black felt make the eyes. You can play around with it and make it however you like, the possibilities are endless.


GLOSSARY:
ch/s: chain/s || sc: single crochet || hdc: half double crochet || dc: double crochet
sl st: slip stitch || st/s: stitch/es || sk: skip || rnd: round || f/o: finish off


Don't forget to like this blog Facebook fan page.
Or to follow our Instagram page. :)

Have a nice crochet time!
- Janet

This pattern is an original pattern by Janet Carrillo "damn it Janet, let's crochet!" (October 2018). Please do not claim this pattern as your own. If you wish to share this pattern, you may link to this pattern but please do not reprint/repost it on your site. You may print and keep a copy for your own personal use. Please do not resell or distribute it.