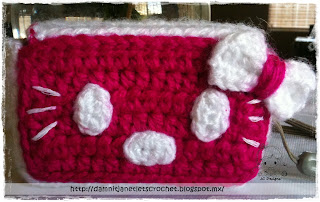
SIZE/MEASUREMENTS
To fit a Sony Cyber-shot [3.5" x 2" x .75"] but this same pattern could also be adjusted to fit any other camera out there. You could change the color of the cozy to white, eyes black and nose yellow to make it look like the classic Hello Kitty look.
MATERIALS
*Crochet hook size: 2.5mm & 3.5mm
*Worsted weight yarn: Fuchsia (20yds) & White (18yds)
*Tapestry Needle
*Fuchsia & White Thread
*Sewing Needle
*Snap Fastener
PATTERN NOTES
Numbers in ( ) at the end of each round or row indicate the total number of stitches for that round or row.
FRONT with fuchsia, 3.5mm hook
Row 1: ch 17, hdc in 2nd ch from hook and hdc in each ch across, ch 2, turn (15)
Row 2-5 : hdc in next hdc across, ch 2, turn (15)
Row 6: hdc in next hdc across, ch 1, turn (15)
Row 7: (front loops for the top part ONLY) sl st all the way around
F/O, secure and weave in ends.
FRONT TOP with white, 3.5mm hook
Row 1: On the back loops left unworked, attach the white yarn and hdc across, ch 1, turn (15)
 |
| My Hello Kitty pj's. :) |
Row 4: dec over the next 2hdc, hdc in next 11hdc, dec over the next 2hdc, ch 2, turn (13)
Row 5: dec over the next 2hdc, hdc in next 9hdc, dec over the next 2hdc, ch 2, turn (11)
Row 6: dec over the next 2hdc, hdc in next 7hdc, dec over the next 2hdc, ch 2, turn (9)
F/O, secure and weave in ends.
Row 7: Attach white yarn in any corner and sl st all the way to the next corner.
F/O, secure and weave in ends.
On the sl st side, embroidery pink yarn. I did mine 2chs length. You can make yours smaller or larger.
Row 1: ch 17, hdc in 2nd ch from hook and hdc in each ch across, ch 2, turn (15)
Row 2-5: hdc in next hdc across, ch 2, turn (15)
Row 6: hdc in next hdc across, ch 1, turn (15)
Row 7: sl st all the way around
F/O, secure and weave in ends.
SIDE with white, 3.5mm hook
Row 1: ch 5, hdc in 2nd ch from hook and hdc in each ch across, ch 2, turn (3)
Row 2-22: hdc in next hdc across, ch 2, turn (3)
Row 23: ch 2, hdc in the 3rd st, ch 2, turn [NOTE: This little gap we made here is so you can pull the strap from your camera through. If you don't have a strap in your camera then there's no need to make the gap.]
Row 24: hdc in next hdc, hdc in next 2chs, ch 2, turn (3)
Row 25: hdc in next hdc across (3)
F/O, secure and weave in ends.
EYES/NOSE make 3, white yarn, 2.5mm hook
Rnd 1: ch4, sc in 2nd ch from hook and in the next ch, 3sc in next ch, other side of the chs sc in next ch, 2sc in last ch (8)
Rnd 2: sl st in only the first st to give it a even look
F/O and weave in ends.
BOW white yarn, 2.5mm hook
Row 1: ch 9, hdc in 2nd ch from hook and hdc in each ch across, ch 2, turn (7)
Row 2-3: hdc in next hdc across, ch 2, turn (7)
F/O, secure and weave in ends. With a strand of fuchsia yarn, tie it in the middle of the bow and keep
wrapping it in the center. Then weave in that strand of yarn in the back.
ASSEMBLY
I recommend pinning the pieces in place before sewing them to make sure you have it in the position you like best before sewing.
Sew the back piece and the side piece together. The slip stich side will be the outside part. Then sew on the front piece. I use the whip stitch technique with fuchsia thread.
The eyes are placed 1.25" apart between row 3 and 5. Sew them in place with white thread. The nose is sewn with white thread in row 2. Sew the bow on the upper right hand side. Embroidery the whiskers with white thread.
Tip: you can also use felt for the eyes/nose/whiskers.
Finally sew on the snap fastener in place. :)
Don't forget to like this blog facebook fan page. :)
Have a nice crochet time!
- Janet
- Janet
Hello Kitty is copyright Sanrio.
This pattern is an original pattern by Janet Carrillo "JC Designs" (June 2012). Please do not claim this pattern as your own. If you wish to share this pattern, you may link to this pattern but please do not reprint/repost it on your site. You may print and keep a copy for your own personal use but you may not sell or distribute it, or sell items may from this pattern.
This pattern is an original pattern by Janet Carrillo "JC Designs" (June 2012). Please do not claim this pattern as your own. If you wish to share this pattern, you may link to this pattern but please do not reprint/repost it on your site. You may print and keep a copy for your own personal use but you may not sell or distribute it, or sell items may from this pattern.


Just wanted to stop by and say hello. I sometimes do not comment, but I do read your posts. Stay cool!
ReplyDelete@ Charlotte, Hi. Thanks for reading my blog. Have a wonderful summer. :)
ReplyDeleteWhat a lovely pattern, thank you. I will make this for my hot pink camera lol. My favorite color is pink hahah.
ReplyDeleteGreetings from Marian form Thailand :D