Showing posts with label trendy. Show all posts

February 4, 2026

Slowpoke Beanie (knit)

By Janet Carrillo "damn it Janet, let's crochet!"
    Simple but yet very stylish; for boys and girls of all ages. You can comfortably wear it during any season, depending on the yarn you used and the weather, of course. This is an easy-to-knit beanie if you know the basics: knit, purl, and k2tog.

SIZE/MEASUREMENTS
Child (6yrs - 10yrs) [19" to 20" head circumference]
Teen/Small Adult [20" to 21" head circumference]
Adult (men) [21" to 23" head circumference]

MATERIALS
*Worsted Weight Yarn: salmon & small amounts of cream, white, brown, & a different shade of pink for the mouth
*DPN's or Circular Needles: 4.5mm & 5.0mm
*Stitch Marker to mark your rounds
*Tapestry Needle

GAUGE
Using 5.0mm needles...  4.5 stitches x  6 rows = 1"
Don't forget to check your gauge.

PATTERN NOTES
  This pattern can either be knitted when making the hat or duplicate stitched on afterward; the choice is yours. Here's a great video on how to duplicate stitch: HERE.
With a lighter shade of pink for the mouth.

STARTING the BEANIE
CO 80 (90, 90) sts on 4.5mm needles with main color yarn.
Place a marker and join in the round, being careful not to twist the stitches.
Do ribbing (k1, p1) for 1 inch (approx. 6 rounds).
Change to larger needles and proceed knitting for 4 (4.5, 5) inches. This will give you approx. 27 (32, 37) rounds. Please follow the graph to determine which rows to apply the color changes.

SHAPING the CROWN
  Rnd 1: k8, k2tog around
  Rnd 2 and all even rounds: knit around
  Rnd 3: k7, k2tog around
  Rnd 5: k6, k2tog around
  Rnd 7: k5, k2tog around
  Rnd 9: k4, k2tog around
  Rnd 11: k3, k2tog around
  Rnd 13: k2, k2tog around
  Rnd 15: k1, k2tog around
  Rnd 17: k2tog around
Leave a tail (up to 8"). You will use a tapestry needle to thread the tail through the last remaining stitches on your needle. After removing the needles from the stitches, pull tightly to close the top hole. Lastly, hide the tail inside and weave it in.


NOTE: The ears are worked all in one piece and then folded in half.
EARS starting with salmon; make 2
CO 4 stitches with the 5.0mm needles
  Row 1: kfb, k2, kfb (6sts)
  Row 2: kfb, p4, kfb (8sts)
  Row 3: kfb, k6, kfb (10sts)
  Row 4: kfb, p8, kfb (12sts)
  Row 5: kfb, k10, kfb (14sts)
  Row 6: purl across (14sts)
  Row 7: knit across (14sts)
  Row 8: purl across (14sts)
  Row 9: knit across (14sts)
  Row 10: p2tog, p10, p2tog (12sts)
  Row 11: knit across (12sts)
  Row 12: purl across (12sts)
  Row 13: purl across (12sts)
  Row 14: purl across (12sts)
  Row 15: knit across (12sts)
  Row 16: kfb, p10, kfb (14sts)
  Row 17: knit across (14sts)
  Row 18: purl across (14sts)
  Row 19: knit across (14sts)
  Row 20: purl across (14sts)
  Row 21: k2tog, k10, k2tog (12sts)
  Row 22: p2tog, p8, p2tog (10sts)
  Row 23: k2tog, k6, k2tog (8sts)
  Row 24: p2tog, p4, p2tog (6sts)
  Row 25: k2tog, k2, k2tog (4sts)
Cast off all stitches. Weave in the ends. Fold the ear in half along row 13. Using the 3.75mm (F) crochet hook, single crochet along the entire ear to close it off. F/O, weave in all ends. Another method you can use if you're not comfortable with crocheting, use a tapestry needle and whip stitch along the entire ear to close it off.

ASSEMBLE
     I recommend pinning the pieces before sewing them to make sure you have them in the position you like best before sewing.
     EARS...lay out the beanie flat and find the position you like best.


Note: right-click on the image and open the image in a new tab to enlarge and print out.
The grid lines on the pattern graph may look uneven on your monitor, but will print out evenly.
Child size is up to the red line.
Teen/Small Adult size is up to the green line.
Adult (men) size is the full graph.


GLOSSARY:
CO: cast on || k: knit || p: purl || k2tog: knit 2 stitches together


Don't forget to like this blog's Facebook page.
Or follow us on Instagram. :)

Have a nice knit time!
- Janet

Slowpoke and Pokemon are copyrighted by The Pokemon Company.
This pattern is an original pattern by Janet Carrillo "damn it Janet, let's crochet!" (February 2026). Please do not claim this pattern as your own. If you wish to share this pattern, you may link to this pattern, but please do not reprint/repost it on your site. You may print and keep a copy for your own personal use. Please do not resell or distribute it.

April 3, 2024

Snorlax Beanie (knit)

By Janet Carrillo "damn it Janet, let's crochet!"
    Simple but yet very stylish; for boys and girls of all ages. You can comfortably wear it during any season depending on the yarn you used and the weather, of course. This is an easy-to-knit beanie if you know the basics knit, purl and k2tog.

SIZE/MEASUREMENTS
Child (6yrs - 10yrs) [19" to 20" head circumference]
Teen/Small Adult [20" to 21" head circumference]
Adult (men) [21" to 23" head circumference]

MATERIALS
*Worsted Weight Yarn: windsor blue & small amounts of cream, black & white
*DPN's or Circular Needles: 4.5mm & 5.0mm
*Stitch Marker to mark your rounds
*Tapestry Needle

GAUGE
Using 5.0mm needles...  4.5 stitches x  6 rows = 1"
Don't forget to check your gauge.

PATTERN NOTES
  This pattern can either be knitted when making the hat or duplicate stitched on afterward; the choice is yours. Here's a great video on how to duplicate stitch; HERE.


STARTING the BEANIE
CO 80 (90, 90) sts on 4.5mm needles with windsor blue yarn.
Place a marker and join in the round, being careful not to twist the stitches.
Do ribbing (k1, p1) for 1 inch (approx. 6 rounds).
Change to larger needles and proceed knitting for 4 (4.5, 5) inches. This will give you approx. 27 (32, 37) rounds. Please follow the graph to know in which rows to do the color changes.

SHAPING the CROWN
  Rnd 1: k8, k2tog around
  Rnd 2 and all even rnds: knit around
  Rnd 3: k7, k2tog around
  Rnd 5: k6, k2tog around
  Rnd 7: k5, k2tog around
  Rnd 9: k4, k2tog around
  Rnd 11: k3, k2tog around
  Rnd 13: k2, k2tog around
  Rnd 15: k1, k2tog around
  Rnd 17: k2tog around
Leave a tail (up to 8"). You will use a tapestry needle to thread the tail through the last remaining stitches on your needle. After removing the needles from the stitches, pull tightly to close the top hole. Lastly, hide the tail inside and weave it in.

NOTE: The ears are worked all in one piece and then folded in half.
EARS with windsor blue; make 2
CO 1 stitch with the 5.0mm needles
  Row 1: kfb (2sts)
  Row 2: knit across (2sts)
  Row 3: kfb, kfb (4sts)
  Row 4: knit across (4sts)
  Row 5: kfb, p2, kfb (6sts)
  Row 6: kfb, k4, kfb (8sts)
  Row 7: kfb, p6, kfb (10sts)
  Row 8: knit across (10sts)
  Row 9: purl across (10sts)
  Row 10: knit across (10sts)
  Row 11: purl across (10sts)
  Row 12: knit across (10sts)
  Row 13: purl across (10sts)
  Row 14: knit across (10sts)
  Row 15: purl across (10sts)
  Row 16: purl across (10sts)
  Row 17: purl across (10sts)
  Row 18: knit across (10sts)
  Row 19: purl across (10sts)
  Row 20: knit across (10sts)
  Row 21: purl across (10sts)
  Row 22: knit across (10sts)
  Row 23: purl across (10sts)
  Row 24: k2tog, k6, k2tog (8sts)
  Row 25: p2tog, p4, p2tog (6sts)
  Row 26: k2tog, k2, k2tog (4sts)
  Row 27: purl across (4sts)
  Row 28: k2tog x2 (2sts)
  Row 29: purl across (2sts)
  Row 30: slip1, knit 1, psso
F/O and draw through the remaining stitch. Weave in the ends.
Fold the ear in half along row 16. Using the 3.75mm (F) crochet hook, single crochet along the entire ear to close it off. F/O, weave in all ends.
Another method you can use if you're not comfortable crocheting, use a tapestry needle and whip stitch along the entire ear to close it off.


ASSEMBLE
     I recommend pinning the pieces before sewing them to make sure you have them in the position you like best before sewing. (Most people prefer to use the yarn at the end of the finished pieces to sew them in place, but I use matching thread).
     EARS...lay out the beanie flat and find the position you like best.

Note: right-click on the image and open the image in a new tab to enlarge and print out.
The grid lines on the pattern graph may look uneven on your monitor but will print out evenly.
Child size is up to the red line.
Teen/Small Adult size is up to the green line.
Adult (men) size is the full graph.


GLOSSARY:
co: cast on || k: knit || k2tog: knit 2 stitches together || kfb: knit front and back || p: purl
p2tog: purl 2 stitches together || psso: pass slipped stitch over || rnd/s: round/s || st/s: stitch/es


Don't forget to like this blog's Facebook page.
Or follow us on Instagram. :)

Have a nice knit time!
- Janet

Janet

Snorlax and Pokemon are copyrighted by The Pokemon Company.
This pattern is an original pattern by Janet Carrillo "damn it Janet, let's crochet!" (April 2024). Please do not claim this pattern as your own. If you wish to share this pattern, you may link to this pattern but please do not reprint/repost it on your site. You may print and keep a copy for your own personal use. Please do not resell or distribute it.

January 17, 2024

Kirby Beanie (knit)

By Janet Carrillo "damn it Janet, let's crochet!"
    Simple but yet very stylish; for boys and girls of all ages. You can comfortably wear it during any season depending on the yarn you used and the weather, of course. This is an easy-to-knit beanie if you know the basics knit, purl and k2tog.

SIZE/MEASUREMENTS
Child (6yrs - 10yrs) [19" to 20" head circumference]
Teen/Small Adult [20" to 21" head circumference]
Adult (men) [21" to 23" head circumference]

MATERIALS
*Worsted Weight Yarn: Main Color & small amounts of 2 shades of pink, black, white and light blue
*DPN's or Circular Needles: 4.5mm & 5.0mm
*Stitch Marker to mark your rounds
*Tapestry Needle

GAUGE
Using 5.0mm needles...  4.5 stitches x  6 rows = 1"
Don't forget to check your gauge.

PATTERN NOTES
  This pattern can either be knitted when making the hat or duplicate stitched on afterward; the choice is yours. Here's a great video on how to duplicate stitch; HERE.


STARTING the BEANIE
CO 80 (90, 90) sts on 4.5mm needles with main color yarn.
Place a marker and join in the round, being careful not to twist the stitches.
Do ribbing (k1, p1) for 1 inch (approx. 6 rounds).
Change to larger needles and proceed knitting for 4 (4.5, 5) inches. This will give you approx. 27 (32, 37) rounds. Please follow the graph to know in which rows to do the color changes.

SHAPING the CROWN
  Row 1: k8, k2tog around
  Row 2 and all even rows: knit around
  Row 3: k7, k2tog around
  Row 5: k6, k2tog around
  Row 7: k5, k2tog around
  Row 9: k4, k2tog around
  Row 11: k3, k2tog around
  Row 13: k2, k2tog around
  Row 15: k1, k2tog around
  Row 17: k2tog around
Leave a tail (up to 8"). You will use a tapestry needle to thread the tail through the last remaining stitches on your needle. After removing the needles from the stitches, pull tightly to close the top hole. Lastly, hide the tail inside and weave it in.


Note: right-click on the image and open the image in a new tab to enlarge and print out.
The grid lines on the pattern graph may look uneven on your monitor but will print out evenly.
Child size is up to the red line.
Teen/Small Adult size is up to the green line.
Adult (men) size is the full graph.


GLOSSARY:
CO: cast on || k: knit || p: purl || k2tog: knit 2 stitches together


Don't forget to like this blog's Facebook page.
Or follow us on Instagram. :)

Have a nice knit time!
- Janet

Kirby is copyrighted by Hal Laboratory and Nintendo.
This pattern is an original pattern by Janet Carrillo "damn it Janet, let's crochet!" (January 2024). Please do not claim this pattern as your own. If you wish to share this pattern, you may link to this pattern but please do not reprint/repost it on your site. You may print and keep a copy for your own personal use. Please do not resell or distribute it.

March 24, 2023

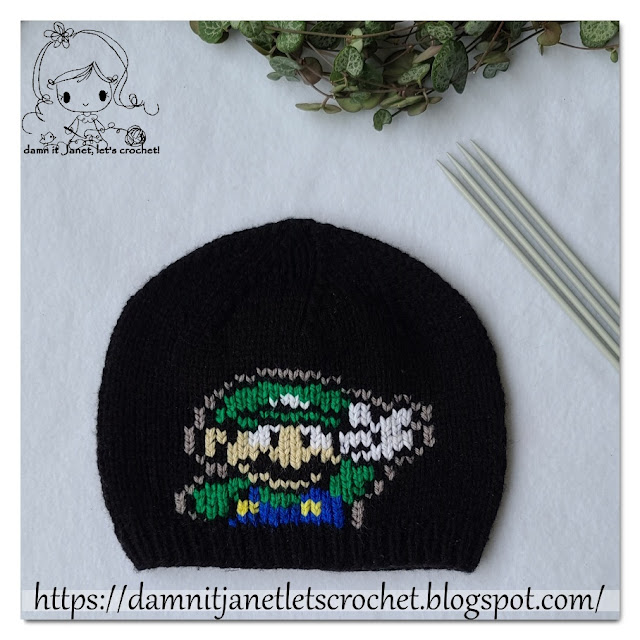
Luigi/Mario Beanie (knit)

By Janet Carrillo "damn it Janet, let's crochet!"

    Simple but yet very stylish; for boys of all ages. You can comfortably wear it during any season depending on the yarn you used and the weather, of course. This is an easy-to-knit beanie if you know the basics knit, purl and k2tog.

SIZE/MEASUREMENTS
Child (3yrs - 10yrs) [19" to 21.5" head circumference]
Teen [20.5" to 22.5" head circumference]
Adult [21.5" to 23" head circumference]

MATERIALS
*Worsted Weight Yarn: Main Color & small amounts of Black, Green, Blue, Yellow, Beige, White and Gray
*DPN's or Circular Needles: 4.0mm & 4.5mm
*Stitch Marker to mark your rounds
*Tapestry Needle

GAUGE
Using 4.5mm needles... 9 stitches x 12 rows = 2"
Don't forget to check your gauge.

PATTERN NOTES
  This pattern can either be knitted when making the hat or duplicate stitched on afterward; the choice is yours. Here's a great video on how to duplicate stitch; HERE.
  Change the green to red to turn it into Mario.


STARTING the BEANIE
CO 80 (90, 100) sts on 4.0mm needles with main color yarn.
Place a marker and join in the round, being careful not to twist the stitches.
Do ribbing (k1, p1) for 1 inch (approx.. 7 rounds).
Change to larger needles and proceed in knitting for 4.25 (5, 5.50) inches. This will give you 29 (34, 39) rounds. Please follow the graph to know in which rows to do the color changes.

SHAPING the CROWN
  Row 1: k8, k2tog around
  Row 2 and all even rows: knit around
  Row 3: k7, k2tog around
  Row 5: k6, k2tog around
  Row 7: k5, k2tog around
  Row 9: k4, k2tog around
  Row 11: k3, k2tog around
  Row 13: k2, k2tog around
  Row 15: k1, k2tog around
  Row 17: k2tog around
  Row 19: k2tog around
Leave a tail (up to 8"). You will use a tapestry needle to thread the tail through the last remaining stitches on your needle. After that remove the needles from the stitches and pull tightly to close the top hole. Lastly, hide the tail inside and weave it in.


Note: Click on the image to enlarge and print out.
The grid lines on the pattern graph may look uneven on your monitor but will print out evenly.
Child size is up to the dark blue line.
Teen size is up to the dark orange line.
Adult size is the full graph.


GLOSSARY:
CO: cast on || k: knit || p: purl || k2tog: knit 2 stitches together


Don't forget to like this blog's Facebook page.
Or to follow our Instagram page. :)

Have a nice crochet time!
- Janet

 Luigi and Mario are copyright by Nintendo.
This pattern is an original pattern by Janet Carrillo "damn it Janet, let's crochet!" (March 2023). Please do not claim this pattern as your own. If you wish to share this pattern, you may link to this pattern but please do not reprint/repost it on your site. You may print and keep a copy for your own personal use. Please do not resell or distribute it.

February 23, 2023

Easy Crochet Knit-Like Beanie

By Janet Carrillo "damn it Janet, let's crochet!
     Slouchy beanies are really trendy among teenagers, as well as adults. I truly hope that this beanie grabs your attention and gets a top place in your collection of beanies. You can comfortably wear it during any season depending on the yarn you used and the weather, of course.

SIZE/MEASUREMENTS
This beanie fits someone with a head circumference of...
21" to 23" (adult/women) and
22" to 24" (adult/male).
...but can vary based on yarn and hook size.

MATERIALS
*Crochet hook size: 3.5mm (E) & 5.0mm (H)
*Worsted Weight Yarn: color of choice (155yds)
*Tapestry Needle

PATTERN NOTES - must-read...
 Numbers in ( ) at the end of each round/row indicate the total number of stitches.
 The chain, in the beginning, does NOT count as one stitch unless stated otherwise.
Easily Customizable... chain any number of chains + 2.
  If you want to make your beanie more slouchy, add more chains to your foundation chain or less for a non-slouchy look.
  To fit a child, simply do less rows and chains but always end with a row 2.

How to crochet on the 3rd loop of the hdc stitch?
As you have seen in the picture below, theirs a “third” loop in the half double crochet stitch. In addition, the two main loops (the V on the top of each stitch which is referred to as the front loop and back loop). By crocheting into the third loop, you will be pushing the top V (the front and back loops) forward. This will make it look a lot like knitting. At least on the right side of your project.

BEANIE
  Row 1 [RS]: ch40, hdc in 3rd ch from hook and in the next 32 chs, sc in next ch, sl st in next 4 chs, ch1, turn (38)
  Row 2 [WS]: front loops for the following 5 sts, sl st in next 4 chs, sc in next st, 3rd loops for the rest of the row, hdc in each st across, ch2, turn (38)
  Row 3 [RS]: back loops only for this row hdc in next 32 sts, sc in next st, sl st in next 4 sts, ch1, turn (38)
Repeat row 2 and 3 until you reach the desired width. Finished the beanie with a row 2. The beanie shown here consists of 46 rows.
Do NOT finish off.

Slip stitch the edges together, we will be going through the back loop from the piece on your hook and both loops of the foundation chains.

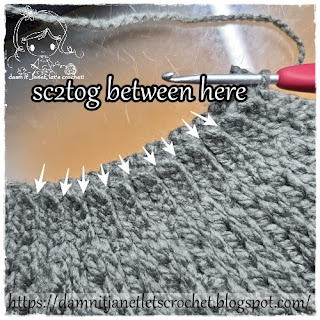
After you have slip stitch the side up, we will sc2tog around the top using a 3.5mm (E) hook and only going through every other stitch.
F/O, leave a long tail. Weave the yarn back and forth through stitches around top. Pull tight to cinch the opening closed. Weave in the ends.

Would you like to make the matching scarf?
Pattern --> HERE.


GLOSSARY:
ch/s:chain/s || hdc: half double crochet || sl st: slip stitch || st/s: stitch/es || f/o: finish off


Don't forget to like this blog's Facebook page.
Or to follow our Instagram page. :)

Have a nice crochet time!
- Janet

This pattern is an original pattern by Janet Carrillo "damn it Janet, let's crochet!" (February 2023). Please do not claim this pattern as your own. If you wish to share this pattern, you may link to this pattern but please do not reprint/repost it on your site. You may print and keep a copy for your own personal use. Please do not resell or distribute it.

November 11, 2020

Easy Crochet Knit-Like Scarf

By Janet Carrillo "damn it Janet, let's crochet!"
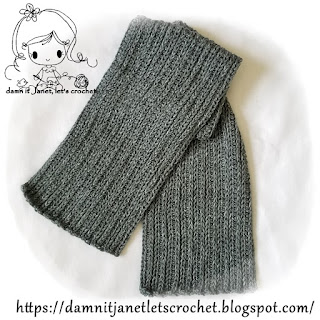
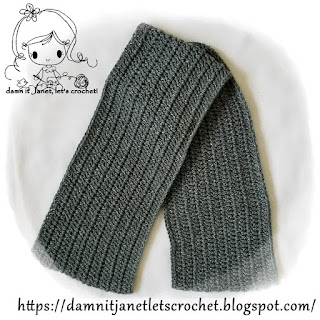
     Fashionable winter scarf for boys and girls. Tie your cold-weather look together with this stylish scarf cause this is the sort of statement an outfit needs. The scarf is reversible, you can either wear it with the right side (knit-like side) or the wrong side (crochet side).

SIZE/MEASUREMENTS
Child size but can be easily customized 
approx. 47"length x 6.5"width
...but can vary based on yarn and hook size.

MATERIALS
*Crochet hook size: 5.0mm (H)
*Worsted Weight Yarn: color of choice (320yds)
*Tapestry Needle

PATTERN NOTES - must-read...
 Numbers in ( ) at the end of each round/row indicate the total number of stitches.
 The chain, in the beginning, does NOT count as one stitch unless stated otherwise.
 Easily customizable chain any number of chains + 2.
 Sew the ends together to turn it into a cowl scarf or add length to make it into an infinity scarf.
Front Side
Back Side
How to crochet on the 3rd loop of the hdc stitch?
As you have seen in the picture below, theirs a “third” loop in the half double crochet stitch. In addition, the two main loops (the V on the top of each stitch which is referred to as the front loop and back loop). By crocheting into the third loop, you will be pushing the top V (the front and back loops) forward. This will make it look a lot like knitting. At least on the right side of your project.

SCARF with color of choice
  Row 1 [RS]: ch162, hdc in 3rd ch from hook and across, ch2, turn (176)
  Row 2 [WS]: 3rd loops only for this row hdc in each st across, ch2, turn (176)
  Row 3 [RS]: back loops only for this row hdc in each st across, ch2, turn (176)
Repeat row 2 and 3 until you reach the desired width. Finished the scarf with a row 2.
The scarf shown here consists of 18 rows.
F/O, secure and weave in the ends


GLOSSARY:
ch/s:chain/s || hdc: half double crochet || sl st: slip stitch || st/s: stitch/es || f/o: finish off


Don't forget to like this blog Facebook fan page.
Or to follow our Instagram page. :)

Have a nice crochet time!
- Janet

This pattern is an original pattern by Janet Carrillo "damn it Janet, let's crochet!" (November 2020). Please do not claim this pattern as your own. If you wish to share this pattern, you may link to this pattern but please do not reprint/repost it on your site. You may print and keep a copy for your own personal use. Please do not resell or distribute it.

February 19, 2018

Marigold Buttoned Cowl

By Janet Carrillo "damn it Janet, let's crochet!"
     Tie your cold-weather look together with this stylish cowl cause this is the sort of statement an outfit needs.

SIZE/MEASUREMENTS
Teen - Adult
Width: 7.5" (19.05cm)
Length: 24" (60.96cm)
You're able to easily customize the cowl by adding less/more rows by casting on multiples of 4.

MATERIALS
*Straight or Circular Needles: 6mm (US10)
*Worsted Weight Yarn: Mustard or color of choice (130yds)
*3 Wood like Buttons (34mm diameter)
*Tapestry Needle
*Matching Thread

GAUGE
9stitches & 11rows in stockinette stitch = 2 inches
Don't forget to check your gauge.

PATTERN NOTES - must read...
 Numbers in () at the end of each round/row indicate the total number of stitches.
 Watch this VIDEO on how to bind off in the middle of your work and for the cable cast on technique.

COWL with mustard
CO 32 stitches with the 6mm needles (32sts)
  Row 1 [WS]: *k2, p2*, repeat from * to * across, turn work (32sts)
  Row 2 [RS]: *k2, p2*, repeat from * to * across, turn work (32sts)
  Row 3 [WS]: *k2, p2*, repeat from * to * across, turn work (32sts)
  Row 4 [RS]: *k2, p2*, repeat from * to * across, turn work (32sts)
  Row 5 [WS]: *k2, p2*, repeat from * to * across, turn work (32sts)
NOTE: in the following 2 rows (row 6-7) we will be creating the buttonholes by binding off and casting on using the cable cast on technique where indicated.
  Row 6 [RS]: k2, p2, bind off next 4 sts, k2, p2, k2, bind off next 4 sts, p2, k2, p2, bind off next 4 sts, k2, p2, turn work (20sts)
  Row 7 [WS]: k2, p2, turn your work and use the cable cast on technique to cast 4 sts, turn your work, k2, p2, k2, turn your work and use the cable cast on technique to cast 4sts, turn your work, p2, k2, p2, turn your work and use the cable cast on technique to cast 4 sts, turn your work, k2, p2, turn work (32sts)
  Row 8 [RS]: *k2, p2*, repeat from * to * across, turn work (32sts)
  Row 9 [WS]: *k2, p2*, repeat from * to * across, turn work (32sts)
  Row 10 [RS]: *k2, p2*, repeat from * to * across, turn work (32sts)
  Row 11 [WS]: *k2, p2*, repeat from * to * across, turn work (32sts)
  Row 12 [RS]: *k2, p2*, repeat from * to * across, turn work (32sts)
  Row 13 [WS]: *k2, p2*, repeat from * to * across, turn work (32sts)
  Row 14 [RS]: purl across, turn work (32sts)
  Row 15 [WS]: knit across, turn work (32sts)
  Row 16 [RS]: knit across, turn work (32sts)
  Row 17 [WS]: purl across, turn work (32sts)
Rows 14 through 17 are repeats rows.
Continue repeating these rows 'til you have reach row 131 or desired length (you'll want to end with 2 rows of purl on the right side).
  Row 132 [RS]: *k2, p2*, repeat from * to * across, turn work (32sts)
  Row 133 [WS]: *k2, p2*, repeat from * to * across, turn work (32sts)
  Row 134 [RS]: *k2, p2*, repeat from * to * across, turn work (32sts)
  Row 135 [WS]: *k2, p2*, repeat from * to * across, turn work (32sts)
  Row 136 [RS]: *k2, p2*, repeat from * to * across, turn work (32sts)
  Row 137 [WS]: *k2, p2*, repeat from * to * across, turn work (32sts)
  Row 138 [RS]: *k2, p2*, repeat from * to * across, turn work (32sts)
  Row 139 [WS]: *k2, p2*, repeat from * to * across, turn work (32sts)
  Row 140 [RS]: *k2, p2*, repeat from * to * across, turn work (32sts)
  Row 141 [WS]: *k2, p2*, repeat from * to * across, turn work (32sts)
  Row 142 [RS]: *k2, p2*, repeat from * to * across, turn work (32sts)
  Row 143 [WS]: *k2, p2*, repeat from * to * across, turn work (32sts)
  Row 144 [RS]: Bind off by doing the following...k2, slip 1st st over, p1, slip st over new st, p1, slip st over new st, k1, slip st over new st, k1, slip st over new st...
Continue binding off this way 'til you have one stitch left, break (or cut) your yarn and pull tight. Weave in the ends.


ASSEMBLE
     You'll want to block your piece; I usually like to use my iron since it has a steam option but theirs many other options available.
     BUTTONS...align them to the buttonholes and sew them in place.

GLOSSARY:
co: cast on || k: knit || p: purl || ws: wrong side || rs: right side || st/s: stitch/es


Don't forget to like this blog facebook fan page.
Or to follow our Instagram page. :)

Have a nice knit time!
- Janet

This pattern is an original pattern by Janet Carrillo "damn it Janet, let's crochet!" (February2018). Please do not claim this pattern as your own. If you wish to share this pattern, you may link to this pattern but please do not reprint/repost it on your site. You may print and keep a copy for your own personal use. Please do not resell or distribute it.

January 22, 2018

Zinnia Triangle Scarf

By Janet Carrillo "damn it Janet, let's crochet!"

     Tie your cold-weather look together with this stylish scarf cause this is the sort of statement an outfit needs.

SIZE/MEASUREMENTS
Teen - Adult
Width: 46" (116.8cm)
Length: 22.5" (57.1cm) 
You're able to easily customize the scarf by adding less or more rows.

MATERIALS
*Crochet hook size: 5.0mm (H)
*Sport Weight Yarn: Mustard (450yds) & Bark (25yds)
*Tapestry Needle
*A 4.5" by 4" cardboard to make tassels
*Scissors

GAUGE
9stitches & 5rows in double crochet = 2 inches
Don't forget to check your gauge.

PATTERN NOTES - must read...
 The chains, in the beginning, count as 1dc and 1chain.
 Each row will increase in the center space.
 The last dc in every row is done on top of the ch3 from the ch4 that was made from the previous round.

SCARF with mustard
  Row 1: ch4 (counts as 1 dc & ch1 sp), 3dc, ch3, 3dc, ch1, dc in magic ring, pull as tightly as possible to close the hole and turn your work
  Row 2: ch4 (counts as 1 dc & ch1 sp), 3dc in next ch sp, ch1, 3dc+ch3+3dc in next ch3 sp, ch1, 3dc in next ch sp, ch1, dc on top of the 3rd ch, turn your work
  Row 3: ch4 (counts as 1 dc & ch1 sp), *3dc in next ch sp, ch1,* repeat from * to * 1 more time, 3dc+ch3+3dc in next ch3 sp, ch1, *3dc in next ch sp, ch1,* repeat from * to * 1 more time, dc on top of the 3rd ch, turn your work
  Row 4: ch4 (counts as 1 dc & ch1 sp), *3dc in next ch sp, ch1,* repeat from * to * 2 more times, 3dc+ch3+3dc in next ch3 sp, ch1, *3dc in next ch sp, ch1,* repeat from * to * 2 more times, dc on top of the 3rd ch, turn your work
  Row 5: ch4 (counts as 1 dc & ch1 sp), *3dc in next ch sp, ch1,* repeat from * to * 3 more times, 3dc+ch3+3dc in next ch3 sp, ch1, *3dc in next ch sp, ch1,* repeat from * to * 3 more times, dc on top of the 3rd ch, turn your work
  Row 6: ch4 (counts as 1 dc & ch1 sp), *3dc in next ch sp, ch1,* repeat from * to * 4 more times, 3dc+ch3+3dc in next ch3 sp, ch1, *3dc in next ch sp, ch1,* repeat from * to * 4 more times, dc on top of the 3rd ch, turn your work
  Row 7: ch4 (counts as 1 dc & ch1 sp), *3dc in next ch sp, ch1,* repeat from * to * 5 more times, 3dc+ch3+3dc in next ch3 sp, ch1, *3dc in next ch sp, ch1,* repeat from * to * 5 more times, dc on top of the 3rd ch, turn your work
  Row 8-35: repeat the same process as we have been doing in the previous rows but you'll be adding an extra (3dc in next ch sp, ch1) in every repeat part. In the last st of round 35, change to bark to continue working with the edging.

EDGING with bark
  Row 36: ch1, sc in next st, sc in ch sp, *sc in next 3 sts, sc in ch sp* repeat from * to * 33 more times, sc in next 3 sts, 3sc in ch3 sp, sc in next 3 sts, sc in ch sp, *sc in next 3 sts, sc in ch sp* repeat from * to * 33 more times, sc on top of the 3rd ch, turn your work
  Row 37: sl st in each st across
F/O, secure and weave in the ends.

TASSELS with mustard; make 2
  Step 1: Cut a piece of cardboard with the following dimensions 4.5" width by 4" length.
  Step 2: Wrap yarn around your piece of cardboard (lengthwise) about 40 times.  More if you want your tassel to be fuller.
  Step 3: Take a long piece of yarn and tie it around the entire bunch of yarn at one end. Don't finish off; we'll be using the ends to attach it to the scarf.
  Step 4: At the opposite end, cut through all of the yarn.
  Step 5: Take another long piece of yarn and wrap it a few times around the entire bunch near the top to create your tassel (see images below for clarity.) Tie it off and with a tapestry needle, weave the ends through so they hang with the rest of the yarn instead of cutting them off (a slight possibility that it would come undone if cut off).
  Step 6: Trim the bottom of the yarn tassel to make it even.
  Step 7: Sew tassels on each end of your scarf.


GLOSSARY:
ch:chain || sc: single crochet || dc: double crochet || sl st: slip stitch || st/s: stitch/es || sp: space || f/o: finish off


Don't forget to like this blog facebook fan page.
Or to follow our Instagram page. :)

Have a nice crochet time!
- Janet

This pattern is an original pattern by Janet Carrillo "damn it Janet, let's crochet!" (January 2018). Please do not claim this pattern as your own. If you wish to share this pattern, you may link to this pattern but please do not reprint/repost it on your site. You may print and keep a copy for your own personal use. Please do not resell or distribute it.

August 8, 2017

Ribbed Slouchy Beanie (knit)

By Janet Carrillo "damn it Janet, let's crochet!"
10 year old with the adult/male size.
Folded in to fit perfectly.

      Slouchy beanies are really trendy among teenagers, as well as adults. I truly hope that this beanie grabs your attention and gets a top place in your collection of knit beanies. You can comfortably wear it during any season depending on the yarn you used and the weather, of course. This is an easy-to-knit beanie if you know the basics (cast on, knit, purl, and slip knit past [skp]).

SIZE/MEASUREMENTS
This beanie fits someone with a head circumference of...
20.5" to 21" (child or teen),
21.5" to 22.5" (adult/women) and
23" to 24" (adult/male).

MATERIALS
*DPN's or Circular Needles: 3.5mm
*Worsted Weight Yarn: Black or any color of choice
*Stitch Markers to mark your rounds
*Tapestry Needle

GAUGE
Stretch out 21stitches x 36rows  = 4"
Don't forget to check your gauge.

PATTERN NOTES - must-read...
  Numbers in ( ) at the end of each round/row indicate the total number of stitches.
  Always use stitch markers to mark your rounds.
  You're able to easily customize the beanie by casting on multiples of 6.


STARTING the BEANIE
CO 114 stitches with the 3.5mm needles (114sts)
Place a marker and join in the round, being careful not to twist the stitches.
  Rnd 1: *k3, p3*, repeat from * to * all around (114sts)
  Rnd 2 - ?: repeat round 1 for (child or teen: 80 rnds), (adult/women: 90 rnds) & (adult/men: 110 rnds) or 'til you have reach the desire length.

SHAPING the CROWN
There are several ways to decrease, check this VIDEO out on how to.
  Rnd 1: k2tog repeat around (57sts)
  Rnd 2: knit around (57sts)
  Rnd 3: k2tog repeat around, knit in last st (29sts)
  Rnd 4: knit around (29sts)
  Rnd 5: k2tog repeat around, knit in last st (15sts)
If you cast on a bigger or smaller number of stitches in the beginning, then you will get a bigger or smaller number of stitches on needles after decreasing. In case you get more than 20 stitches on your needles - repeat round 4 and 5.
When you finish round 5, leave a long tail (up to 8"). Next, you will use a hook or a tapestry needle to thread the tail through the last remaining stitches on your needles. After that remove the needles from the stitches and pull tightly to close the top hole. Lastly, hide the tail inside of the hat and weave it in.

OPTIONAL...
You can add a pom-pom on the top of the beanie.
You will find this video very useful on how to make a pom-pom using the pom-pom maker.


GLOSSARY:
CO: cast on || k: knit || p: purl || k2tog: knit 2 stitches together || rnd/s: round/s || st/s: stitch/es


Don't forget to like this blog's Facebook fan page.
Or to follow our Instagram page. :)

Have a nice knit time!
- Janet

This pattern is an original pattern by Janet Carrillo "damn it Janet, let's crochet!" (August 2017). Please do not claim this pattern as your own. If you wish to share this pattern, you may link to this pattern but please do not reprint/repost it on your site. You may print and keep a copy for your own personal use. Please do not resell or distribute it.