Showing posts with label Mario. Show all posts

March 25, 2026

Mario Bros. Mushroom Beanie (knit)

By Janet Carrillo "damn it Janet, let's crochet!"
    Simple but yet very stylish; for boys and girls of all ages. You can comfortably wear it during any season, depending on the yarn you used and the weather, of course. This is an easy-to-knit beanie if you know the basics: knit, purl, and k2tog.

SIZE/MEASUREMENTS
Child (6yrs - 10yrs) [19" to 20" head circumference]
Teen/Small Adult [20" to 21" head circumference]
Adult (men) [21" to 23" head circumference]

MATERIALS
*Worsted Weight Yarn: Main Color & small amounts of black, white and cream
*DPN's or Circular Needles: 4.5mm & 5.0mm
*Stitch Marker to mark your rounds
*Tapestry Needle

GAUGE
Using 5.0mm needles...  4.5 stitches x  6 rows = 1"
Don't forget to check your gauge.

PATTERN NOTES
  This pattern can either be knitted when making the hat or duplicate stitched on afterward; the choice is yours. Here's a great video on how to duplicate stitch: HERE.

March 11, 2026

Mario & Luigi Plushie

By Janet Carrillo "damn it Janet, let's crochet!"

SIZE/MEASUREMENTS
approx. 8"height x 3.5"length (20cm x 9cm)
...but can vary based on yarn and hook size.

MATERIALS
*Crochet hook size: 3.5mm (E)
*Worsted Weight Yarn: brown, blue, red, white, black, & cream
*Stitch Markers to mark your rounds
*12mm Safety Eyes
*2 small yellow buttons or felt
*Embroidery Floss: green or red
*Fiberfill
*Tapestry Needle

PATTERN NOTES - must-read...
 Numbers in ( ) at the end of each round/row indicate the total number of stitches.
 Always use stitch markers to mark your rounds.
 There is no need to sl st and/or ch when going to the next round unless stated to do so.
 When a round or row mentions “around/across,” you will be working that whole sequence from that round/row around the entire piece. (EX: sc in next st, 2sc in next st, around = sc, inc, sc, inc,…)

SPECIAL STITCHES
Bobble Stitch (3dc bobble st) - Y/O hook, insert hook into stitch & pull up a loop. Y/O hook & pull through 2 loops on hook; 2 loops remaining. Y/O hook, insert hook in the same stitch & pull up a loop. Y/O hook & pull through 2 loops on hook; 3 loops remaining. Y/O hook, insert hook in the same stitch & pull up a loop. Y/O hook & pull through 2 loops on hook; 4 loops remaining. Y/O hook & pull through all 4 loops on the hook.
Invisible join - this VIDEO explains how to do this technique.
Other side of the foundation chains - this VIDEO explains how to do this technique.
Single crochet 3 stitches together (sc3tog) - is a decrease over 3sts. Insert yarn thru 1st st, y/o pull thru, insert thru 2nd st, y/o pull thru, insert thru 3rd st, y/o pull thru, & y/o pull thru all 4 loops on hook.

March 24, 2023

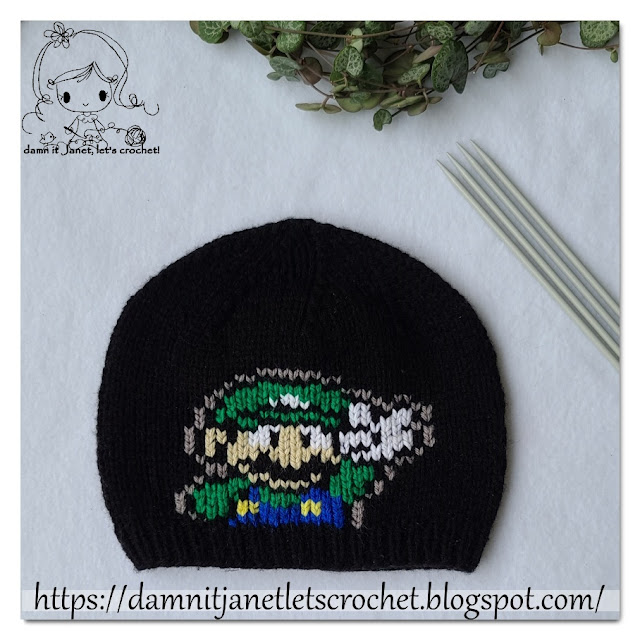
Luigi/Mario Beanie (knit)

By Janet Carrillo "damn it Janet, let's crochet!"

    Simple but yet very stylish; for boys of all ages. You can comfortably wear it during any season depending on the yarn you used and the weather, of course. This is an easy-to-knit beanie if you know the basics knit, purl and k2tog.

SIZE/MEASUREMENTS
Child (3yrs - 10yrs) [19" to 21.5" head circumference]
Teen [20.5" to 22.5" head circumference]
Adult [21.5" to 23" head circumference]

MATERIALS
*Worsted Weight Yarn: Main Color & small amounts of Black, Green, Blue, Yellow, Beige, White and Gray
*DPN's or Circular Needles: 4.0mm & 4.5mm
*Stitch Marker to mark your rounds
*Tapestry Needle

GAUGE
Using 4.5mm needles... 9 stitches x 12 rows = 2"
Don't forget to check your gauge.

PATTERN NOTES
  This pattern can either be knitted when making the hat or duplicate stitched on afterward; the choice is yours. Here's a great video on how to duplicate stitch; HERE.
  Change the green to red to turn it into Mario.


STARTING the BEANIE
CO 80 (90, 100) sts on 4.0mm needles with main color yarn.
Place a marker and join in the round, being careful not to twist the stitches.
Do ribbing (k1, p1) for 1 inch (approx.. 7 rounds).
Change to larger needles and proceed in knitting for 4.25 (5, 5.50) inches. This will give you 29 (34, 39) rounds. Please follow the graph to know in which rows to do the color changes.

SHAPING the CROWN
  Row 1: k8, k2tog around
  Row 2 and all even rows: knit around
  Row 3: k7, k2tog around
  Row 5: k6, k2tog around
  Row 7: k5, k2tog around
  Row 9: k4, k2tog around
  Row 11: k3, k2tog around
  Row 13: k2, k2tog around
  Row 15: k1, k2tog around
  Row 17: k2tog around
  Row 19: k2tog around
Leave a tail (up to 8"). You will use a tapestry needle to thread the tail through the last remaining stitches on your needle. After that remove the needles from the stitches and pull tightly to close the top hole. Lastly, hide the tail inside and weave it in.


Note: Click on the image to enlarge and print out.
The grid lines on the pattern graph may look uneven on your monitor but will print out evenly.
Child size is up to the dark blue line.
Teen size is up to the dark orange line.
Adult size is the full graph.


GLOSSARY:
CO: cast on || k: knit || p: purl || k2tog: knit 2 stitches together


Don't forget to like this blog's Facebook page.
Or to follow our Instagram page. :)

Have a nice crochet time!
- Janet

 Luigi and Mario are copyright by Nintendo.
This pattern is an original pattern by Janet Carrillo "damn it Janet, let's crochet!" (March 2023). Please do not claim this pattern as your own. If you wish to share this pattern, you may link to this pattern but please do not reprint/repost it on your site. You may print and keep a copy for your own personal use. Please do not resell or distribute it.

November 3, 2016

Bowser Pillow in Tunisian Crochet Tutorial

By Janet Carrillo "damn it Janet, let's crochet!"

SIZE/MEASUREMENTS
approx. size: 14" length x 10" width but can vary based on yarn and hook size

MATERIALS
*Tunisian Crochet hook size: 3.0mm
*Worsted weight yarn: Blue, Black, White, Beige, Light Green, Dark Green, Yellow, Red, Gray, Charcoal, Aran, Gold
*Tapestry Needle
*Measuring Tape
*Fiberfill
*Pen to mark your squares as you go!
*Bowser 8-bit graph that you'll find below. If you want to use a different character, there are plenty to be found on the web by searching for 8-bit Mario characters or anything along those lines.
Click on image to enlarge.

A site and videos on how to Tunisian Crochet
-Tunisian Crochet Basics by Purl soho; it has various images to show you how to while your reading.
-If you're more of a visual person rather than reading then this video by thecrochetside might be great for you.
-To bind off your work watch this video by Bethintx1.
-For color changes watch this video by GegeCrochet.

Tips
-On the basics tutorial video, it says for the last stitch of the forward pass for you to put the hook through the last two end stitches. Cause if you don't and when it's time to sew up the sides is going to look holey.
-On the color changes, don’t pull the yarns too tight. Since this graph has a lot of color changes start a new yarn thread cause if you keep pulling them too tightly the pillow its gonna get smaller as you continue making it. (This happen to me with my first Tunisian project I ever made.)
-Measure! Measure! Measure! You don't want your pillow to look uneven.
-Remember to mark off each square/row as you go. Double check your work to make sure you haven't missed a square.
Now lets make the back side
-Instead of binding off your work when you reach the last row of the graph, continue making the back side to save on sewing time (which I dislike).
-Make another black row, make 68 rows blue with the first & last stitch in black and the last row all black.
-Remember on the last all black row to bind off.
Last Steps
-All that's left to do is to weave in all the ends (that's the part I hate the most but its gotta be done)......
-......and sew the sides. Leave one side un-sew and stuff it moderately firm. As you continue sewing the last side, stuff as needed.

Don't forget to like this blog facebook fan page.
Or to follow our Instagram page. :)

Have a nice crochet time!
- Janet


Bowser and Mario Bros. are copyright by Nintendo.
 This pattern is an original pattern by Janet Carrillo "damn it Janet, let's crochet!" (November 2016). Please do not claim this pattern as your own. If you wish to share this pattern, you may link to this pattern but please do not reprint/repost it on your site. You may print and keep a copy for your own personal use. Please do not resell or distribute it.

October 13, 2016

Luigi with Yoshi Beanie (knit)

By Janet Carrillo "damn it Janet, let's crochet!"

SIZE/MEASUREMENTS
age 5 - adult

MATERIALS
*DPN's or Circular: 3.0mm & 3.5mm
*approx. 100yds of Main Color (worsted weight)
*Small amounts of the following (worsted weight): Green, White, Beige, Navy Blue, Black, Orange & Red
*Tapestry Needle

PATTERN NOTES
  Luigi can easily be turned into Mario by simply changing the green to red.
  This pattern can either be knitted when making the hat or duplicate stitched on afterward; the choice is yours. Here's a great video on how to duplicate stitch; Click Here.


Note: The grid lines on the pattern graph may look uneven on your monitor but will print out evenly.


Don't forget to like this blog facebook fan page. :)

Have a nice crochet time!
- Janet


 Luigi and Yoshi are copyright by Nintendo.
This pattern is an original pattern by Janet Carrillo "damn it Janet, let's crochet!" (October 2016). Please do not claim this pattern as your own. If you wish to share this pattern, you may link to this pattern but please do not reprint/repost it on your site. You may print and keep a copy for your own personal use. Please do not resell or distribute it.

November 5, 2013

Mario Bros. Mushroom Beanie

By Janet Carrillo "damn it Janet, let's crochet!"

SIZE/MEASUREMENTS
Toddler (12 months - 3yrs) [18" to 19.5" head circumference]
Child/Small Adult [20" to 21.5" head circumference]

MATERIALS
*Crochet hook size: 4.0mm (G) & 5.0mm (H)
*Worsted weight yarn: Main Color (110yds), Beige (40yds) & White (45yds) or any color of choice
*Stitch Markers to mark your rounds
*Tapestry needle
*Felt: Black & White
*Hot Glue
*Matching thread

GAUGE - don't forget to read it...
3 hdc stitches x 2.5 rows = 1"
At the end of round 8, laying flat = 6.25" in diameter
Don’t forget to check your gauge.

PATTERN NOTES - must read...
 Numbers in ( ) at the end of each round/row indicate the total number of stitches.
 Always use stitch markers to mark your rounds.
 The ch 2 at the beginning of each round counts as 1 hdc.
 You slip stitch on the top of the chain 2.
 When a round or row mentions “around/across” you will be working that whole sequence from that round/row around the entire piece. (EX: sc in next st, 2sc in next st, around = sc, inc, sc, inc,…)

** Toddler **

BEANIE with main color; with 5.0mm (H)
  Rnd 1: 8hdc in magic ring, sl st into 1st st (8)
  Rnd 2: ch2, hdc in same st you sl st, *2hdc in next st* repeat from * to * around, sl st on top of ch 2 (16)
  Rnd 3: ch2, hdc in same st you sl st, hdc in next st, *2hdc in next st, hdc in next st* repeat from * to * around, sl st on top of ch 2 (24)
  Rnd 4: ch2, hdc in same st you sl st, hdc in next 2 sts, *2hdc in next st, hdc in next 2 sts* repeat from * to * around, sl st on top of ch 2 (32)
  Rnd 5: ch2, hdc in same st you sl st, hdc in next 3 sts, *2hdc in next st, hdc in next 3 sts* repeat from * to * around, sl st on top of ch 2 (40)
  Rnd 6: ch2, hdc in same st you sl st, hdc in next 4 sts, *2hdc in next st, hdc in next 4 sts* repeat from * to * around, sl st on top of ch 2 (48)
  Rnd 7: ch2, hdc in same st you sl st, hdc in next 5 sts, *2hdc in next st, hdc in next 5 sts* repeat from * to * around, sl st on top of ch 2 (56)
  Rnd 8: ch2, hdc in same st you sl st, hdc in next 27 sts, *2hdc in next st, hdc in next 27 sts* repeat from * to * around, sl st on top of ch 2 (58)
  Rnd 9-14: ch2, hdc in each st around, sl st on top of ch 2, in the last st change to cream (58)
  Rnd 15-18: ch1, sc in each st around, sl st into 1st st
Do not F/O, continue on to making the first earflap.

1st EARFLAP with cream; with 5.0mm (H)
  Row 1: ch1, sc in next 10 sts, ch1, turn (10)
  Row 2-3: sc in each st across, ch1, turn (10)
  Row 4: sc2tog, sc in next 6 sts, sc2tog, ch1, turn (8)
  Row 5: sc in each st across, ch1, turn (8)
  Row 6: sc2tog, sc in next 4 sts, sc2tog, ch1, turn (6)
  Row 7: sc2tog, sc in next 2 sts, sc2tog, ch1, turn (4)
  Row 8: sc2tog, sc2tog (2)
F/O, secure and weave in the ends.

2nd EARFLAP with cream; with 5.0mm (H)
Count to the left 18sts (not including the 10 sts from the first earflap). Attach on the 19th stitch.
Repeat rows 1-8 from the first earflap.
F/O, secure and weave in the ends

EDGING with cream; with 5.0mm (H)
Attach yarn in any st and ch1, sc in each st around; working evenly around each earflap. Remember to mark your round with a stitch marker. Do another round of sc around the entire beanie. Join with an invisible join to the 1st st.
F/O, secure and weave in the ends.

** Child / Small Adult **

BEANIE with main color; with 5.0mm (H)
  Rnd 1: 8hdc in magic ring, sl st into 1st st (8)
  Rnd 2: ch2, hdc in same st you sl st, *2hdc in next st* repeat from * to * around, sl st on top of ch 2 (16)
  Rnd 3: ch2, hdc in same st you sl st, hdc in next st, *2hdc in next st, hdc in next st* repeat from * to * around, sl st on top of ch 2 (24)
  Rnd 4: ch2, hdc in same st you sl st, hdc in next 2 sts, *2hdc in next st, hdc in next 2 sts* repeat from * to * around, sl st on top of ch 2 (32)
  Rnd 5: ch2, hdc in same st you sl st, hdc in next 3 sts, *2hdc in next st, hdc in next 3 sts* repeat from * to * around, sl st on top of ch 2 (40)
  Rnd 6: ch2, hdc in same st you sl st, hdc in next 4 sts, *2hdc in next st, hdc in next 4 sts* repeat from * to * around, sl st on top of ch 2 (48)
  Rnd 7: ch2, hdc in same st you sl st, hdc in next 5 sts, *2hdc in next st, hdc in next 5 sts* repeat from * to * around, sl st on top of ch 2 (56)
  Rnd 8: ch2, hdc in same st you sl st, hdc in next 6 sts, *2hdc in next st, hdc in next 6 sts* repeat from * to * around, sl st on top of ch 2 (64)
  Rnd 9: ch2, hdc in same st you sl st, hdc in next 15 sts, *2hdc in next st, hdc in next 15 sts* repeat from * to * around, sl st on top of ch 2 (68)
  Rnd 10-17: ch2, hdc in each st around, sl st on top of ch 2, in the last st change to cream (68)
  Rnd 18-21: ch1, sc in each st around, sl st into 1st st (68)
Don’t F/O, continue to make the first earflap.

1st EARFLAP with cream; with 5.0mm (H)
  Row 1: ch1, sc in next 12 sts, ch1, turn (12)
  Row 2-3: sc in each st across, ch1, turn (12)
  Row 4: sc2tog, sc in next 8 sts, sc2tog, ch1, turn (10)
  Row 5: sc in each st across, ch1, turn (10)
  Row 6: sc2tog, sc in next 6 sts, sc2tog, ch1, turn (8)
  Row 7: sc in each st across, ch 1, turn (8)
  Row 8: sc2tog, sc in next 4 sts, sc2tog, ch1, turn (6)
  Row 9: sc2tog, sc in next 2 sts, sc2tog, ch1, turn (4)
  Row 10: sc2tog, sc2tog (2)
F/O, secure and weave in the ends.

2nd EARFLAP with cream; with 5.0mm (H)
Count to the left 23 sts (not including the 12 from the first earflap). Attach the yarn on 24th stitch.
Repeat rows 1-10 from the first earflap.
F/O, secure and weave in the ends.

EDGING with cream; with 5.0mm (H)
Attach yarn in any stitch and ch1, sc in each st around; working evenly around each earflap. Remember to mark your round with a stitch marker. Do another round of sc around the entire beanie. Join with an invisible join to the 1st st.
F/O, secure and weave in the ends.


SPOTS with white, make 4; 4.0mm (G)
  Rnd 1: 8hdc in magic ring, sl st into 1st st (8)
  Rnd 2: ch2, 2hdc in same st you sl st, *2 hdc in next st* repeat from * to * around, sl st into 1st st (16)
  Rnd 3: ch2, 2hdc in same st you sl st, hdc in next st, *2 hdc in next st, hdc in next st* repeat from * to  * around, sl st into 1st st (24)
For toddler size up to here, continue to the next round for child/adult size.
  Rnd 4: ch2, 2hdc in same st you sl st, hdc in next 2 sts, *2 hdc in next st, hdc in next 2 sts* repeat from * to * around, sl st into 1st st (32)
F/O, secure and leave a long tail for sewing.

 
BRAIDS
Cut 18 pieces of yarn (9 for each earflap) about 36 inches long. Fold each bunch in half and push the folded end through an opening in the bottom of each earflap. Pull the unfolded ends through the loop and pull tight. Braid the strands and tie a knot to secure the braid. Complete the second braid the same way.


ASSEMBLE
     I recommend pinning the pieces before sewing them to make sure you have them in the position you like best before sewing.
     Spots…play around with the spots and placed them in the position you like best.
     Eyes…with black felt cut 2 oval shapes. With the white felt cut 2 very small ovals. The black ovals, glue them between round 19 and 23. Space them about 1.5” (approx. 5 stitches). The white ovals glue those on the top center portion of the black ones.


GLOSSARY:
ch/s: chain/s || f/o: finish off || hdc: half double crochet || rnd: round || sc: single crochet
sc2tog: single crochet 2 stitches together || sl st: slip stitch || st/s: stitch/es


Don't forget to like this blog's Facebook page.
Or follow us on Instagram page. :)

Have a nice crochet time!
- Janet

Mini, Super & 1-Up Mushrooms and Mario Bros. are copyright by Nintendo.
This pattern is an original pattern by Janet Carrillo "damn it Janet, let's crochet!" (November 2013). Please do not claim this pattern as your own. If you wish to share this pattern, you may link to this pattern but please do not reprint/repost it on your site. You may print and keep a copy for your own personal use. Please do not resell or distribute it.