Showing posts with label Mario Bros. Show all posts

March 25, 2026

Mario Bros. Mushroom Beanie (knit)

By Janet Carrillo "damn it Janet, let's crochet!"
    Simple but yet very stylish; for boys and girls of all ages. You can comfortably wear it during any season, depending on the yarn you used and the weather, of course. This is an easy-to-knit beanie if you know the basics: knit, purl, and k2tog.

SIZE/MEASUREMENTS
Child (6yrs - 10yrs) [19" to 20" head circumference]
Teen/Small Adult [20" to 21" head circumference]
Adult (men) [21" to 23" head circumference]

MATERIALS
*Worsted Weight Yarn: Main Color & small amounts of black, white and cream
*DPN's or Circular Needles: 4.5mm & 5.0mm
*Stitch Marker to mark your rounds
*Tapestry Needle

GAUGE
Using 5.0mm needles...  4.5 stitches x  6 rows = 1"
Don't forget to check your gauge.

PATTERN NOTES
  This pattern can either be knitted when making the hat or duplicate stitched on afterward; the choice is yours. Here's a great video on how to duplicate stitch: HERE.

March 11, 2026

Mario & Luigi Plushie

By Janet Carrillo "damn it Janet, let's crochet!"

SIZE/MEASUREMENTS
approx. 8"height x 3.5"length (20cm x 9cm)
...but can vary based on yarn and hook size.

MATERIALS
*Crochet hook size: 3.5mm (E)
*Worsted Weight Yarn: brown, blue, red, white, black, & cream
*Stitch Markers to mark your rounds
*12mm Safety Eyes
*2 small yellow buttons or felt
*Embroidery Floss: green or red
*Fiberfill
*Tapestry Needle

PATTERN NOTES - must-read...
 Numbers in ( ) at the end of each round/row indicate the total number of stitches.
 Always use stitch markers to mark your rounds.
 There is no need to sl st and/or ch when going to the next round unless stated to do so.
 When a round or row mentions “around/across,” you will be working that whole sequence from that round/row around the entire piece. (EX: sc in next st, 2sc in next st, around = sc, inc, sc, inc,…)

SPECIAL STITCHES
Bobble Stitch (3dc bobble st) - Y/O hook, insert hook into stitch & pull up a loop. Y/O hook & pull through 2 loops on hook; 2 loops remaining. Y/O hook, insert hook in the same stitch & pull up a loop. Y/O hook & pull through 2 loops on hook; 3 loops remaining. Y/O hook, insert hook in the same stitch & pull up a loop. Y/O hook & pull through 2 loops on hook; 4 loops remaining. Y/O hook & pull through all 4 loops on the hook.
Invisible join - this VIDEO explains how to do this technique.
Other side of the foundation chains - this VIDEO explains how to do this technique.
Single crochet 3 stitches together (sc3tog) - is a decrease over 3sts. Insert yarn thru 1st st, y/o pull thru, insert thru 2nd st, y/o pull thru, insert thru 3rd st, y/o pull thru, & y/o pull thru all 4 loops on hook.

March 24, 2023

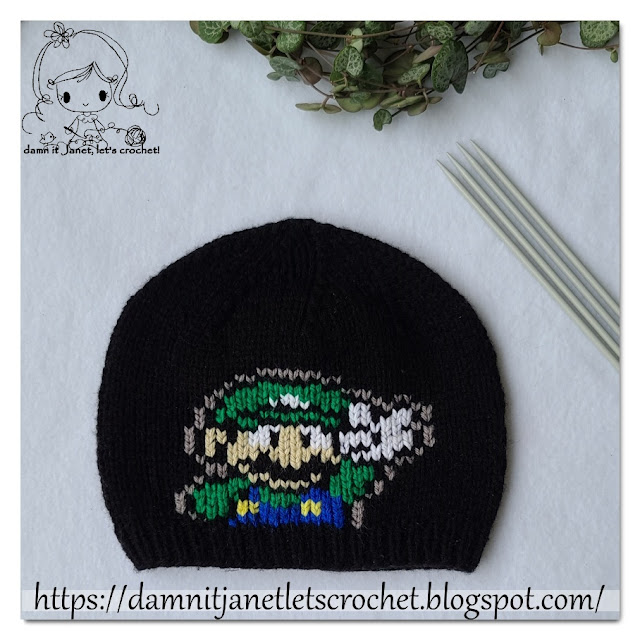
Luigi/Mario Beanie (knit)

By Janet Carrillo "damn it Janet, let's crochet!"

    Simple but yet very stylish; for boys of all ages. You can comfortably wear it during any season depending on the yarn you used and the weather, of course. This is an easy-to-knit beanie if you know the basics knit, purl and k2tog.

SIZE/MEASUREMENTS
Child (3yrs - 10yrs) [19" to 21.5" head circumference]
Teen [20.5" to 22.5" head circumference]
Adult [21.5" to 23" head circumference]

MATERIALS
*Worsted Weight Yarn: Main Color & small amounts of Black, Green, Blue, Yellow, Beige, White and Gray
*DPN's or Circular Needles: 4.0mm & 4.5mm
*Stitch Marker to mark your rounds
*Tapestry Needle

GAUGE
Using 4.5mm needles... 9 stitches x 12 rows = 2"
Don't forget to check your gauge.

PATTERN NOTES
  This pattern can either be knitted when making the hat or duplicate stitched on afterward; the choice is yours. Here's a great video on how to duplicate stitch; HERE.
  Change the green to red to turn it into Mario.


STARTING the BEANIE
CO 80 (90, 100) sts on 4.0mm needles with main color yarn.
Place a marker and join in the round, being careful not to twist the stitches.
Do ribbing (k1, p1) for 1 inch (approx.. 7 rounds).
Change to larger needles and proceed in knitting for 4.25 (5, 5.50) inches. This will give you 29 (34, 39) rounds. Please follow the graph to know in which rows to do the color changes.

SHAPING the CROWN
  Row 1: k8, k2tog around
  Row 2 and all even rows: knit around
  Row 3: k7, k2tog around
  Row 5: k6, k2tog around
  Row 7: k5, k2tog around
  Row 9: k4, k2tog around
  Row 11: k3, k2tog around
  Row 13: k2, k2tog around
  Row 15: k1, k2tog around
  Row 17: k2tog around
  Row 19: k2tog around
Leave a tail (up to 8"). You will use a tapestry needle to thread the tail through the last remaining stitches on your needle. After that remove the needles from the stitches and pull tightly to close the top hole. Lastly, hide the tail inside and weave it in.


Note: Click on the image to enlarge and print out.
The grid lines on the pattern graph may look uneven on your monitor but will print out evenly.
Child size is up to the dark blue line.
Teen size is up to the dark orange line.
Adult size is the full graph.


GLOSSARY:
CO: cast on || k: knit || p: purl || k2tog: knit 2 stitches together


Don't forget to like this blog's Facebook page.
Or to follow our Instagram page. :)

Have a nice crochet time!
- Janet

 Luigi and Mario are copyright by Nintendo.
This pattern is an original pattern by Janet Carrillo "damn it Janet, let's crochet!" (March 2023). Please do not claim this pattern as your own. If you wish to share this pattern, you may link to this pattern but please do not reprint/repost it on your site. You may print and keep a copy for your own personal use. Please do not resell or distribute it.