Showing posts with label tutorial. Show all posts

November 3, 2016

Bowser Pillow in Tunisian Crochet Tutorial

By Janet Carrillo "damn it Janet, let's crochet!"

SIZE/MEASUREMENTS
approx. size: 14" length x 10" width but can vary based on yarn and hook size

MATERIALS
*Tunisian Crochet hook size: 3.0mm
*Worsted weight yarn: Blue, Black, White, Beige, Light Green, Dark Green, Yellow, Red, Gray, Charcoal, Aran, Gold
*Tapestry Needle
*Measuring Tape
*Fiberfill
*Pen to mark your squares as you go!
*Bowser 8-bit graph that you'll find below. If you want to use a different character, there are plenty to be found on the web by searching for 8-bit Mario characters or anything along those lines.
Click on image to enlarge.

A site and videos on how to Tunisian Crochet
-Tunisian Crochet Basics by Purl soho; it has various images to show you how to while your reading.
-If you're more of a visual person rather than reading then this video by thecrochetside might be great for you.
-To bind off your work watch this video by Bethintx1.
-For color changes watch this video by GegeCrochet.

Tips
-On the basics tutorial video, it says for the last stitch of the forward pass for you to put the hook through the last two end stitches. Cause if you don't and when it's time to sew up the sides is going to look holey.
-On the color changes, don’t pull the yarns too tight. Since this graph has a lot of color changes start a new yarn thread cause if you keep pulling them too tightly the pillow its gonna get smaller as you continue making it. (This happen to me with my first Tunisian project I ever made.)
-Measure! Measure! Measure! You don't want your pillow to look uneven.
-Remember to mark off each square/row as you go. Double check your work to make sure you haven't missed a square.
Now lets make the back side
-Instead of binding off your work when you reach the last row of the graph, continue making the back side to save on sewing time (which I dislike).
-Make another black row, make 68 rows blue with the first & last stitch in black and the last row all black.
-Remember on the last all black row to bind off.
Last Steps
-All that's left to do is to weave in all the ends (that's the part I hate the most but its gotta be done)......
-......and sew the sides. Leave one side un-sew and stuff it moderately firm. As you continue sewing the last side, stuff as needed.

Don't forget to like this blog facebook fan page.
Or to follow our Instagram page. :)

Have a nice crochet time!
- Janet


Bowser and Mario Bros. are copyright by Nintendo.
 This pattern is an original pattern by Janet Carrillo "damn it Janet, let's crochet!" (November 2016). Please do not claim this pattern as your own. If you wish to share this pattern, you may link to this pattern but please do not reprint/repost it on your site. You may print and keep a copy for your own personal use. Please do not resell or distribute it.

February 15, 2016

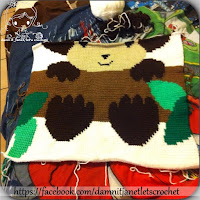
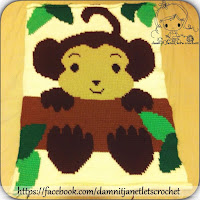
Monkey Graphgan in Tunisian Crochet Tutorial

By Janet Carrillo "damn it Janet, let's crochet!"
I can't wait to welcome the newest member of the family with this adorable blanket.
SIZE/MEASUREMENTS
approx. size: 27.5" x 36" but can vary based on yarn and hook size

MATERIALS
*Tunisian Crochet hook size: 6.0mm
*Worsted weight yarn: Ivory, Light Green, Green, Brown, Light Brown, Beige and Black
*Tapestry Needle
*Measuring Tape
*Warm Snuggie Fleece Fabric depending on your blanket size
*Pen to mark your squares as you go!
*Monkey In Tree Graph by chellacrochet and its available for purchase HERE on Etsy for only $4.00. When I saw it on Pinterest, I knew I had to make it for our newest member. (Can't wait to have you in my arms.) The instant download PDF file comes with the pixel graph you will need, cover sheet which includes yarn amounts, approximate finished size and a file containing basic tips.
CLICK HERE to purchase the Monkey in Tree Graph
  This is my 3rd tunisian crochet project and this time around it worked up pretty quickly. Thinking of making our baby another blanket, but just don't know of what.
  When working from these graphs you gotta keep in mind that one square equals one stitch, the amount of stitches you need on your hook needs to be one more than the amount of squares you need.
Ex: If the graph has 32 stitches you'll need to chain 33 stitches.

A site and videos on how to Tunisian Crochet
-Tunisian Crochet Basics by Purl soho; it has various images to show you how to while your reading.
-If your more of a visual person rather than reading then this video by thecrochetside might be great for you.
-To bind off your work watch this video by Bethintx1.
-For color changes watch this video by GegeCrochet.

Tips
-On the basics tutorial video, it says for the last stitch of the forward pass for you to put the hook through the last two end stitches. Cause if you don't and when it's time to make the border is going to look holey.
-On the color changes, don’t pull the yarns too tight. If you’re doing a graph with a lot of color changes start a new yarn thread cause if you keep pulling them too tightly the blanket its gonna get smaller as you continue making it. (This happen to me with my first Tunisian graph I ever made.)
-Measure! Measure! Measure! You don't want your blanket to look uneven.
-Remember to mark off each square/row as you go. Double check your work to make sure you haven't missed a square.
Now lets make the border
-When it's time to bind off your work, change to beige so you can start making the border and just continue single crocheting around the blanket 'til you reach the 1st single crochet.
-I made a simple border using 3 rows of single crochets (first beige, then light brown, then brown) and finishing with a picot edging in ivory. In each corner when making the single crochet rounds they need to have 2 single crochets.
-The picot edging consist of *3sc, ch3, sl st to first chain, 3sc* repeating from * to * all the way around. Try your best to land a picot stitch in each corner.
Last Steps
-All that's left to do is to weave in all the ends (that's the part I hate the most but its gotta be done)......
-......and sew a nice warm, snuggie fabric on the back. Now, its ready to keep your little one nice and warm.

Don't forget to like this blog facebook fan page. :)

Have a nice crochet time!
- Janet