Showing posts with label granny square. Show all posts

January 22, 2018

Zinnia Triangle Scarf

By Janet Carrillo "damn it Janet, let's crochet!"

     Tie your cold-weather look together with this stylish scarf cause this is the sort of statement an outfit needs.

SIZE/MEASUREMENTS
Teen - Adult
Width: 46" (116.8cm)
Length: 22.5" (57.1cm) 
You're able to easily customize the scarf by adding less or more rows.

MATERIALS
*Crochet hook size: 5.0mm (H)
*Sport Weight Yarn: Mustard (450yds) & Bark (25yds)
*Tapestry Needle
*A 4.5" by 4" cardboard to make tassels
*Scissors

GAUGE
9stitches & 5rows in double crochet = 2 inches
Don't forget to check your gauge.

PATTERN NOTES - must read...
 The chains, in the beginning, count as 1dc and 1chain.
 Each row will increase in the center space.
 The last dc in every row is done on top of the ch3 from the ch4 that was made from the previous round.

SCARF with mustard
  Row 1: ch4 (counts as 1 dc & ch1 sp), 3dc, ch3, 3dc, ch1, dc in magic ring, pull as tightly as possible to close the hole and turn your work
  Row 2: ch4 (counts as 1 dc & ch1 sp), 3dc in next ch sp, ch1, 3dc+ch3+3dc in next ch3 sp, ch1, 3dc in next ch sp, ch1, dc on top of the 3rd ch, turn your work
  Row 3: ch4 (counts as 1 dc & ch1 sp), *3dc in next ch sp, ch1,* repeat from * to * 1 more time, 3dc+ch3+3dc in next ch3 sp, ch1, *3dc in next ch sp, ch1,* repeat from * to * 1 more time, dc on top of the 3rd ch, turn your work
  Row 4: ch4 (counts as 1 dc & ch1 sp), *3dc in next ch sp, ch1,* repeat from * to * 2 more times, 3dc+ch3+3dc in next ch3 sp, ch1, *3dc in next ch sp, ch1,* repeat from * to * 2 more times, dc on top of the 3rd ch, turn your work
  Row 5: ch4 (counts as 1 dc & ch1 sp), *3dc in next ch sp, ch1,* repeat from * to * 3 more times, 3dc+ch3+3dc in next ch3 sp, ch1, *3dc in next ch sp, ch1,* repeat from * to * 3 more times, dc on top of the 3rd ch, turn your work
  Row 6: ch4 (counts as 1 dc & ch1 sp), *3dc in next ch sp, ch1,* repeat from * to * 4 more times, 3dc+ch3+3dc in next ch3 sp, ch1, *3dc in next ch sp, ch1,* repeat from * to * 4 more times, dc on top of the 3rd ch, turn your work
  Row 7: ch4 (counts as 1 dc & ch1 sp), *3dc in next ch sp, ch1,* repeat from * to * 5 more times, 3dc+ch3+3dc in next ch3 sp, ch1, *3dc in next ch sp, ch1,* repeat from * to * 5 more times, dc on top of the 3rd ch, turn your work
  Row 8-35: repeat the same process as we have been doing in the previous rows but you'll be adding an extra (3dc in next ch sp, ch1) in every repeat part. In the last st of round 35, change to bark to continue working with the edging.

EDGING with bark
  Row 36: ch1, sc in next st, sc in ch sp, *sc in next 3 sts, sc in ch sp* repeat from * to * 33 more times, sc in next 3 sts, 3sc in ch3 sp, sc in next 3 sts, sc in ch sp, *sc in next 3 sts, sc in ch sp* repeat from * to * 33 more times, sc on top of the 3rd ch, turn your work
  Row 37: sl st in each st across
F/O, secure and weave in the ends.

TASSELS with mustard; make 2
  Step 1: Cut a piece of cardboard with the following dimensions 4.5" width by 4" length.
  Step 2: Wrap yarn around your piece of cardboard (lengthwise) about 40 times.  More if you want your tassel to be fuller.
  Step 3: Take a long piece of yarn and tie it around the entire bunch of yarn at one end. Don't finish off; we'll be using the ends to attach it to the scarf.
  Step 4: At the opposite end, cut through all of the yarn.
  Step 5: Take another long piece of yarn and wrap it a few times around the entire bunch near the top to create your tassel (see images below for clarity.) Tie it off and with a tapestry needle, weave the ends through so they hang with the rest of the yarn instead of cutting them off (a slight possibility that it would come undone if cut off).
  Step 6: Trim the bottom of the yarn tassel to make it even.
  Step 7: Sew tassels on each end of your scarf.


GLOSSARY:
ch:chain || sc: single crochet || dc: double crochet || sl st: slip stitch || st/s: stitch/es || sp: space || f/o: finish off


Don't forget to like this blog facebook fan page.
Or to follow our Instagram page. :)

Have a nice crochet time!
- Janet

This pattern is an original pattern by Janet Carrillo "damn it Janet, let's crochet!" (January 2018). Please do not claim this pattern as your own. If you wish to share this pattern, you may link to this pattern but please do not reprint/repost it on your site. You may print and keep a copy for your own personal use. Please do not resell or distribute it.

May 16, 2016

The Reggae Rasta Coin Purse

By Janet Carrillo "damn it Janet, let's crochet!"
A small mother day's gift for my older sister.

SIZE/MEASUREMENTS
approx. size: 4"H x 4"W but can vary based on yarn and hook size

MATERIALS
*Crochet hook size: 4.0mm (G)
*Worsted weight yarn: Olive Green, Gold, Red & Black
*Tapestry Needle
*Zipper 16cm length
*Fabric of choice
*Stitch Markers to mark your rounds

GAUGE - don't forget to check it...
9sts and 4 rows in double crochet = 2"

HOW TO DO A FRONT POST STITCH...
Front Post Double Crochet (fpdc) - YO hook, insert hook under front post of st. YO hook, pull up a loop, three loops on hook. Y/O, pull through two loops on hook, twice.

PATTERN NOTES
  Always use stitch markers to mark you rounds.
  The ch3 in the beginning of each round ALWAYS counts as 1 dc


Don't forget to like this blog facebook fan page. :)

Have a nice crochet time!
- Janet

This pattern is an original pattern by Janet Carrillo "damn it Janet, let's crochet!" (May 2016). Please do not claim this pattern as your own. If you wish to share this pattern, you may link to this pattern but please do not reprint/repost it on your site. You may print and keep a copy for your own personal use. Please do not resell or distribute it.

April 17, 2016

The Adam Baby Blanket

By Janet Carrillo "damn it Janet, let's crochet!"
Can't wait to curl up with my baby with this warm snuggly blanket.💓

SIZE/MEASUREMENTS
size: 29"  x  35.5" but can vary based on yarn and hook size

MATERIALS
*Crochet hook size: 6.0mm (J)
*Worsted Weight Yarn: Navy Blue (320yds), Gray (320yds) & Ivory (320yds) or colors of choice
*Fleece Fabric (amount & color depending on your blanket size)
*Tapestry Needle

PATTERN NOTES - must-read...
 Numbers in ( ) at the end of each round/row indicate the total number of stitches.
 The chains in the beginning DO count as a stitch.
 If you want to make the blanket bigger, you chain multiples of 4.
 Make the color changes in whichever row you like. I did mine after every 2nd row. Or you can make it all in one color.


BLANKET
  Row 1: ch100, 2dc in 4th ch from hook, *ch1, sk 3 chs, 3dc in next ch,* repeat from * to * 23 more times, ch4, turn (74 dc's & 24 ch1 spaces)
  Row 2: *3dc in next ch1 sp, ch1,* repeat from * to * 23 more times, dc into 3rd ch, ch3, turn (73 dc's & 25 ch1 space)
  Row 3: 2dc in next ch1 sp, *ch1, 3dc in next ch1 sp,* repeat from * to * 23 more times, 3dc in last ch1 sp, ch4, turn (74 dc's & 24 ch1 spaces)
  Row 4-68: repeat rows 2 and 3 or until you reach desired length.

BORDER
  On the last row, don’t finish off the navy blue yarn (or the color you use). If you haven’t already, weave in all the ends. Once that has been done, let’s go back to crocheting where we left at. Be sure to mark where you start off with a stitch marker.
  I made a simple border using 2 rows of single crochets (first navy blue, then gray) and finishing with a picot edging in ivory. In each corner do 2sc.
  The picot edging consists of *3sc, ch3, sl st to 1st ch* repeat from * to * all the way around. Try your best to land a picot stitch in each corner.
F/O, secure and weave in all the ends.

LAST STEP
  All that's left to do is to sew a nice warm fleece fabric on the back. Now, it’s ready to keep your little one nice and warm.


GLOSSARY:
ch/s: chain/s || f/o: finish off || dc: double crochet || sc: single crochet || sk: skip || sl st: slip stitch || sp: space


Don't forget to like this blog's Facebook fan page.
Or to follow our Instagram page. :)

Have a nice crochet time!
- Janet

This pattern is an original pattern by Janet Carrillo "damn it Janet, let's crochet!" (April 2016). Please do not claim this pattern as your own. If you wish to share this pattern, you may link to this pattern but please do not reprint/repost it on your site. You may print and keep a copy for your own personal use. Please do not resell or distribute it.

September 20, 2011

Granny Square Raccoon Mario blanket

 By Janet Carrillo "damn it Janet, let's crochet!"


SIZE/MEASUREMENTS
approx. 62" x 59" (5.17ft. x 4.92ft.)
...but can vary based on yarn and hook size.

MATERIALS
*Crochet hook size: 4.5mm for the border
*Crochet hook size: 5.0mm (H) for the granny squares
*Worsted Weight Yarn: Red (315yds), Back (892yds), Tan (429yds) & Royal Blue (1370yds)
*Tapestry Needle

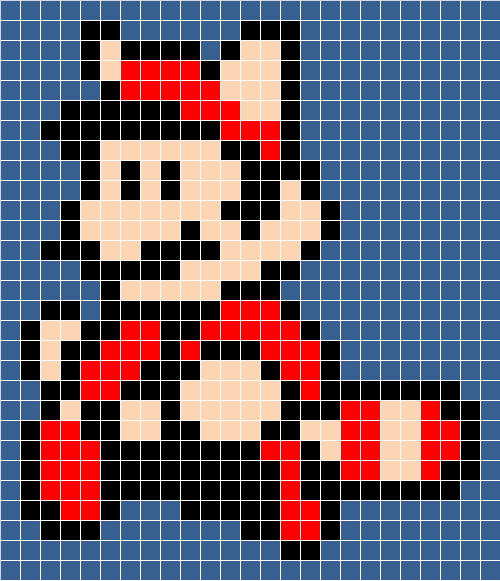
     This was my 8th crochet project. It was inspired by this Mario bedspread I saw on Ravelry but it was the old Mario (the one from the very first game). Even though Russ McAllister did an amazing job, I wanted a different Mario image to work on. After searching for days I found an image of the raccoon Mario that I like better and started working on it.
     I made this back in February '11 and finish in May '11. It took me quite a while to finish since I was getting annoyed by making granny squares. I made some Mario Bros. amigurumis in between. Even though, it got annoying of making approximately 670some squares the end result was amazing. Seeing my son's face light up with joy when I show him the blanket was priceless. :)
     The squares I made are 2"x2". Since it was my first time doing granny squares I had to search for how to make granny squares on YouTube. Here's the video I use to learn; link. But if I would have known about Tunisian crochet then, I would of most definitely made it like that. Just three weeks ago, I learn about Tunisian crochet. *giggles*
Here's the 8-bit image I use to make the blanket. :)


Don't forget to like this blog's Facebook fan page.
Or to follow our Instagram page. :)

Have a nice crochet time!
- Janet