March 27, 2016

Ice Cream Popsicles Applique

By Janet Carrillo "damn it Janet, let's crochet!"
Ideas on how to use these appliques...
*These would be great to apply to any project.
*You can add them to kitchen towels,
*turn them into a keychain or fridge magnet.
*You can also make several and make a garland.
*Attach a ribbon to make them into bookmarks.

SIZE/MEASUREMENTS
approx. size: 2.5"height x 1.25"length
..but can vary based on yarn and hook size

MATERIALS
*Crochet hook size: 3.25mm (D)
*Worsted weight yarn: Main Color (4yds) & Cream (1yd)
*Tapestry Needle
*Embroidery Floss: color of choice
*Felt: color of choice
*Wite-out pencil (optional)

PATTERN NOTES
 Numbers in ( ) at the end of each round/row indicate the total number of stitches.
 Always use stitch markers to mark your rounds.
 There's no need to sl st and/or ch when going to the next round unless stated to do so.
 Always do the 1st stitch where you slip stitch from the previous round.
 The chain, in the beginning, does NOT count as one stitch unless stated otherwise.
 You slip stitch on the first sc not on top of the chain 1.

SPECIAL STITCHES
 Other side of the foundation chains - this VIDEO explains how to do this technique.

 UPPER PART (ice cream) with color of choice
  Rnd 1: ch8, hdc in 2nd ch from hook, hdc in next 4 chs, 4hdc in last ch, other side of the foundations chains hdc in next 5 chs, ch1, turn (14)
  Rnd 2: sc in next 5 sts, 2sc in next st, sc in next 2 sts, 2sc in next st, sc in next 5 sts, ch1, turn (16)
  Rnd 3: sl st in each st all the way around
F/O, secure and weave in the ends.

LOWER PART (stick part)

  Rnd 1: find the 2 stitches that are in the middle of the bottom part, from the ice cream part. Attach the cream yarn on one of 2 stitches and working on the back loops for this round only, sc on both of the stitches, ch1, turn (2)
  Rnd 2-4: sc in each st across, ch1, turn (2)
F/O, secure and weave in the ends.


ASSEMBLE
     EYES...these can be done however you like, the possibilities are endless. You can search online for "kawai faces" or anything along those lines to get some ideas.
     SMILE...using black thread or embroidery floss, embroider a smile or use felt.
     BLUSH...you can add a little bit of makeup blush underneath the eyes with a q-tip.
Would you like to make the Ice Cream Cone?
Click HERE.


GLOSSARY:
ch/s:chain/s || sc: single crochet || hdc: half double crochet || sl st: slip stitch || st/s: stitch/es
rnd: round || f/o: finish off


Don't forget to like this blog facebook fan page.
Or to follow our Instagram page. :)

Have a nice crochet time!
- Janet

This pattern is an original pattern by Janet Carrillo "damn it Janet, let's crochet!" (March 2016). Please do not claim this pattern as your own. If you wish to share this pattern, you may link to this pattern but please do not reprint/repost it on your site. You may print and keep a copy for your own personal use. Please do not resell or distribute it.

March 6, 2016

Milk Carton & Cookie Applique

By Janet Carrillo "damn it Janet, let's crochet!"
Ideas on how to use these appliques...
*These would be great to apply to any project.
*You can add them to kitchen towels,
*turn them into a keychain or fridge magnet.
*You can also make several and make a garland.
*Attach a ribbon to make them into bookmarks.

SIZE/MEASUREMENTS
Cookie approx. size: 2.25"height x 2.25"length
Milk Carton approx. size: 3"height x 2.25"length
...but can vary based on yarn and hook size

MATERIALS
*Crochet hook size: 3.5mm (E)
*Worsted weight yarn: Beige (6yds), Brown (1yd) &White (8yds)
*Stitch markers to mark your rounds
*Tapestry Needle
*Embroidery Floss: Black
*Felt: Black & Light Pink
*Hot Glue (optional)

PATTERN NOTES
  Numbers in ( ) at the end of each round/row indicate the total number of stitches.
  Always use stitch markers to mark your rounds.
  You ALWAYS do the first stitch where you slip stitch from the previous round.
  The ch2, in the beginning, doesn't count as a stitch.

SPECIAL STITCHES
Invisible join - this VIDEO explains how to do this technique.

COOKIE with beige
  Rnd 1: 8hdc in magic ring, sl st into 1st st (8)
  Rnd 2: ch2, 2hdc in each st, sl st into 1st st (16)
  Rnd 3: ch 2, 2hdc in next st, hdc in next st around, sl st into 1st st (24)
  Rnd 4: ch1, sc in each st around, join to 1st st with the invisible join (24)
F/O, secure and weave in the ends.

ASSEMBLE
     EYES...with black felt, cut 2 small circles for the eyes. If you have a hole puncher, use that it makes perfect little eyes. Glue the eyes on round 2 with 5 stitches in between them.
     SMILE…with black embroidery floss or thread, embroider the smile.
     CHOCOLATE CHIPS…with brown yarn, make the chocolate chips all around and as many as you like.

MILK CARTON with white
  Row 1: ch10, hdc in 3rd ch from hook and across, ch2, turn (8)
  Row 2-6: hdc in each st across, ch2, turn (8)
  Row 7: hdc in each st across, ch1, turn (8)
  Row 8: sk 1st st, sc in next 6 sts, sl st in next st, ch1, turn (7)
  Row 9: sk 1st st, sc in next 5 sts, sl st in next st, ch1, turn (6)
  Row 10: sk 1st st, sc in next 4 sts, sl st in next st, ch1, turn (5)
  Row 11: sk 1st st, sc in next 4 sts, ch1, turn (4)
  Row 12: sc in each st across, ch1, turn and sl st around the entire milk carton.
F/O, secure and weave in the ends.

ASSEMBLE
     EYES...with black felt, cut 2 small circles for the eyes. If you have a hole puncher, use that it makes perfect little eyes. Glue the eyes on row 6 with 2 stitches in between them.
     SMILE...with black embroidery floss or thread, embroider the smile on row 5.
     With the pink felt, cut out a right triangle and 2 stripes. Make one of the stripes, slightly smaller than the other one. Glue the longer stripe on row 8 and the smaller stripe on row 10. The triangle goes on the lower right-hand side.
     With black embroidery floss or thread, embroider the work “Milk” at the bottom. If you’re really bad at embroidering like I am, use a thin sharpie to write it out.

TIPS: You can play around with the eyes and mouth, the possibilities are endless.
You can add a little blush underneath the eyes with a q-tip.


GLOSSARY:
ch/s:chain/s || sc: single crochet || hdc: half double crochet || sl st: slip stitch || st/s: stitch/es
sk: skip || rnd: round || f/o: finish off


Don't forget to like this blog facebook fan page.
Or to follow our Instagram page. :)

Have a nice crochet time!
- Janet

This pattern is an original pattern by Janet Carrillo "damn it Janet, let's crochet!" (March 2016). Please do not claim this pattern as your own. If you wish to share this pattern, you may link to this pattern but please do not reprint/repost it on your site. You may print and keep a copy for your own personal use. Please do not resell or distribute it.

February 15, 2016

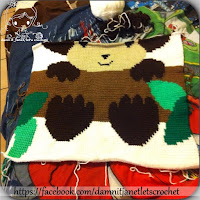
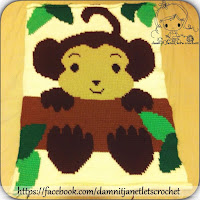
Monkey Graphgan in Tunisian Crochet Tutorial

By Janet Carrillo "damn it Janet, let's crochet!"
I can't wait to welcome the newest member of the family with this adorable blanket.
SIZE/MEASUREMENTS
approx. size: 27.5" x 36" but can vary based on yarn and hook size

MATERIALS
*Tunisian Crochet hook size: 6.0mm
*Worsted weight yarn: Ivory, Light Green, Green, Brown, Light Brown, Beige and Black
*Tapestry Needle
*Measuring Tape
*Warm Snuggie Fleece Fabric depending on your blanket size
*Pen to mark your squares as you go!
*Monkey In Tree Graph by chellacrochet and its available for purchase HERE on Etsy for only $4.00. When I saw it on Pinterest, I knew I had to make it for our newest member. (Can't wait to have you in my arms.) The instant download PDF file comes with the pixel graph you will need, cover sheet which includes yarn amounts, approximate finished size and a file containing basic tips.
CLICK HERE to purchase the Monkey in Tree Graph
  This is my 3rd tunisian crochet project and this time around it worked up pretty quickly. Thinking of making our baby another blanket, but just don't know of what.
  When working from these graphs you gotta keep in mind that one square equals one stitch, the amount of stitches you need on your hook needs to be one more than the amount of squares you need.
Ex: If the graph has 32 stitches you'll need to chain 33 stitches.

A site and videos on how to Tunisian Crochet
-Tunisian Crochet Basics by Purl soho; it has various images to show you how to while your reading.
-If your more of a visual person rather than reading then this video by thecrochetside might be great for you.
-To bind off your work watch this video by Bethintx1.
-For color changes watch this video by GegeCrochet.

Tips
-On the basics tutorial video, it says for the last stitch of the forward pass for you to put the hook through the last two end stitches. Cause if you don't and when it's time to make the border is going to look holey.
-On the color changes, don’t pull the yarns too tight. If you’re doing a graph with a lot of color changes start a new yarn thread cause if you keep pulling them too tightly the blanket its gonna get smaller as you continue making it. (This happen to me with my first Tunisian graph I ever made.)
-Measure! Measure! Measure! You don't want your blanket to look uneven.
-Remember to mark off each square/row as you go. Double check your work to make sure you haven't missed a square.
Now lets make the border
-When it's time to bind off your work, change to beige so you can start making the border and just continue single crocheting around the blanket 'til you reach the 1st single crochet.
-I made a simple border using 3 rows of single crochets (first beige, then light brown, then brown) and finishing with a picot edging in ivory. In each corner when making the single crochet rounds they need to have 2 single crochets.
-The picot edging consist of *3sc, ch3, sl st to first chain, 3sc* repeating from * to * all the way around. Try your best to land a picot stitch in each corner.
Last Steps
-All that's left to do is to weave in all the ends (that's the part I hate the most but its gotta be done)......
-......and sew a nice warm, snuggie fabric on the back. Now, its ready to keep your little one nice and warm.

Don't forget to like this blog facebook fan page. :)

Have a nice crochet time!
- Janet

June 21, 2015

Piggy Applique

By Janet Carrillo "damn it Janet, let's crochet!"
  These would be great for applying to any projects or as home decor for example beach bag, towels, etc., making it into a keychain or turning them into fridge magnets .

SIZE/MEASUREMENTS
approx. size: 3"H x 3"W but can vary based on yarn and hook size

MATERIALS
*Crochet hook size: 3.5mm
*Worsted weight yarn: Pink & a darker shade of pink
*Stitch markers to mark your rounds
*Tapestry Needle
*Matching Thread
*Embroidery Floss: Black
*Hot Glue (optional)
*Magnet (optional)

PATTERN NOTES
  Numbers in ( ) at the end of each round/row indicate the total number of stitches.
  Always use stitch markers to mark you rounds.
  You ALWAYS do the first stitch where you slip stitch from the previous round.
  The ch2 in the beginning don't count as a stitch.
  Stitches inside the red [ ] are all done in one stitch.


Don't forget to like this blog facebook fan page. :)

Have a nice crochet time!
- Janet

This pattern is an original pattern by Janet Carrillo "damn it Janet, let's crochet!" (June 2015). Please do not claim this pattern as your own. If you wish to share this pattern, you may link to this pattern but please do not reprint/repost it on your site. You may print and keep a copy for your own personal use. Please do not resell or distribute it.