September 28, 2011

Tunisian Crochet Mario Pillow


MATERIALS
•Tunisian Crochet hook size 4.5mm
•DK weight yarn
•Tapestry needle
•Fiberfill
•Measuring tape


* First Tunisian Crochet Project *
  Thanks to Another Kay Jones for inspiring this project. I had already made my son a Mario blanket and thought this will go great with it. Plus I let my son pick out the characters he wanted, so he's going to love it when it's done. :) I'm going to be making him another pillow but with different Mario characters so he can have two.
  I made the charts on Microsoft Excel except for Goomba, I copied that one from Another Kay Jones and the others from doing a Google search and making them into 8-bit graphs. If you want to use different characters, there are plenty to be found on the web by searching for 8-bit Mario characters or anything along those lines.
  When working from these graphs you gotta keep in mind that one square equals one stitch, the amount of stitches you need on your hook needs to be one more than the amount of squares you need.
Ex: On the small graphs theirs 32 so I need to chain 33 stitches.
  Since I don’t know how to add Microsoft Excel files on here, I have just put the images up. If you would like me to e-mail you the Excel files, feel free to contact me. (Links on how to contact me are on the upper left hand side).
  To save on sewing (which I’m not great at), I made the character squares two at a time, so I crocheted the Goomba and Boo as one piece, with the color change half way, then I did the Blooper and Bomb-Omb as one piece. Then whip stitch the two pieces together. I use whip stitch when sewing the whole pillow together.

A site and videos on how to Tunisian Crochet
-An Introduction to Tunisian Crochet; it has images to show you how to while your reading. Great site, this is the one I use to learn.
-If your more of a video person rather than reading then this video is great for you.
-To bind off your work watch this video.
-For color changes watch this video.

Tips
-On the basics tutorial video, it says for the last stitch of the forward pass, put the hook through the two end stitches. Cause if you don't and when its time to sew them together the edges are gonna look holey. Just in case this happens to you. Simply use the same color thread and sew it so it wont look so obvious.
-On the color changes, don’t pull the threads too tight. If you’re doing a square with a lot of color changes start a new yarn thread cause if you keep pulling them the square its gonna get smaller as you continue making it. (This happen to me with the first square)
-Measure! Measure! Measure! You don't want your square to look uneven.

8-bit Graphs
  Go ahead and use the graphs if you want these characters. :)

Boo 32x32
Bomb-Omb 32x32
Blooper 32x32
Super Mushroom 64x64


- Janet Carrillo

September 27, 2011

Stitch Markers

  These stitch markers are a fun alternative to plain old stitch markers. They are a fun project to add some fun to your project or as a gift for a crocheter/knitter you know. Like jewelry for your crocheting/knitting! =) Plus this isn’t too difficult or time consuming.

Materials
•Leverback Earrings (crochet) or Split Rings (knitting)
•Head Pins (2 inches in length)
•An assortment of Beads
•Round-nosed Pliers
•Wire Cutters
  I went to this store where they sell only beads and all the accessories needed to make bracelets, necklaces, earrings, keychains, etc. I have past by this store several times before when I gone to ModaTelas (where I buy yarn) but never when in. Today I check it out and WOW! they have a HUGE selection of beads. While I was browsing, I decide to buy some materials to make stitch markers.
  Only cost me $85MXN ($6.90USD) for all the materials you see in the first image. I made 22 fabulous stitch markers and I still have enough materials to make at least another 15. I love the way they turn out. Plus it's cheaper than eBay or Etsy, LOVE it. :)
Stitch markers for crochet
Stitch markers for knitting
Have a wonderful day and see you next time. :)
- Janet Carrillo

September 20, 2011

Granny Square Raccoon Mario blanket

 By Janet Carrillo "damn it Janet, let's crochet!"


SIZE/MEASUREMENTS
approx. 62" x 59" (5.17ft. x 4.92ft.)
...but can vary based on yarn and hook size.

MATERIALS
*Crochet hook size: 4.5mm for the border
*Crochet hook size: 5.0mm (H) for the granny squares
*Worsted Weight Yarn: Red (315yds), Back (892yds), Tan (429yds) & Royal Blue (1370yds)
*Tapestry Needle

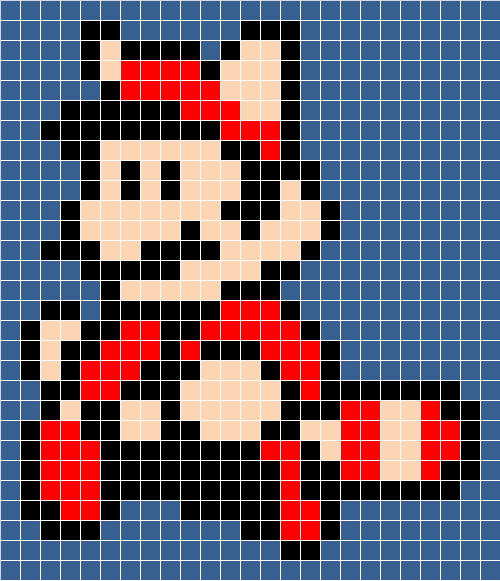
     This was my 8th crochet project. It was inspired by this Mario bedspread I saw on Ravelry but it was the old Mario (the one from the very first game). Even though Russ McAllister did an amazing job, I wanted a different Mario image to work on. After searching for days I found an image of the raccoon Mario that I like better and started working on it.
     I made this back in February '11 and finish in May '11. It took me quite a while to finish since I was getting annoyed by making granny squares. I made some Mario Bros. amigurumis in between. Even though, it got annoying of making approximately 670some squares the end result was amazing. Seeing my son's face light up with joy when I show him the blanket was priceless. :)
     The squares I made are 2"x2". Since it was my first time doing granny squares I had to search for how to make granny squares on YouTube. Here's the video I use to learn; link. But if I would have known about Tunisian crochet then, I would of most definitely made it like that. Just three weeks ago, I learn about Tunisian crochet. *giggles*
Here's the 8-bit image I use to make the blanket. :)


Don't forget to like this blog's Facebook fan page.
Or to follow our Instagram page. :)

Have a nice crochet time!
- Janet

September 17, 2011

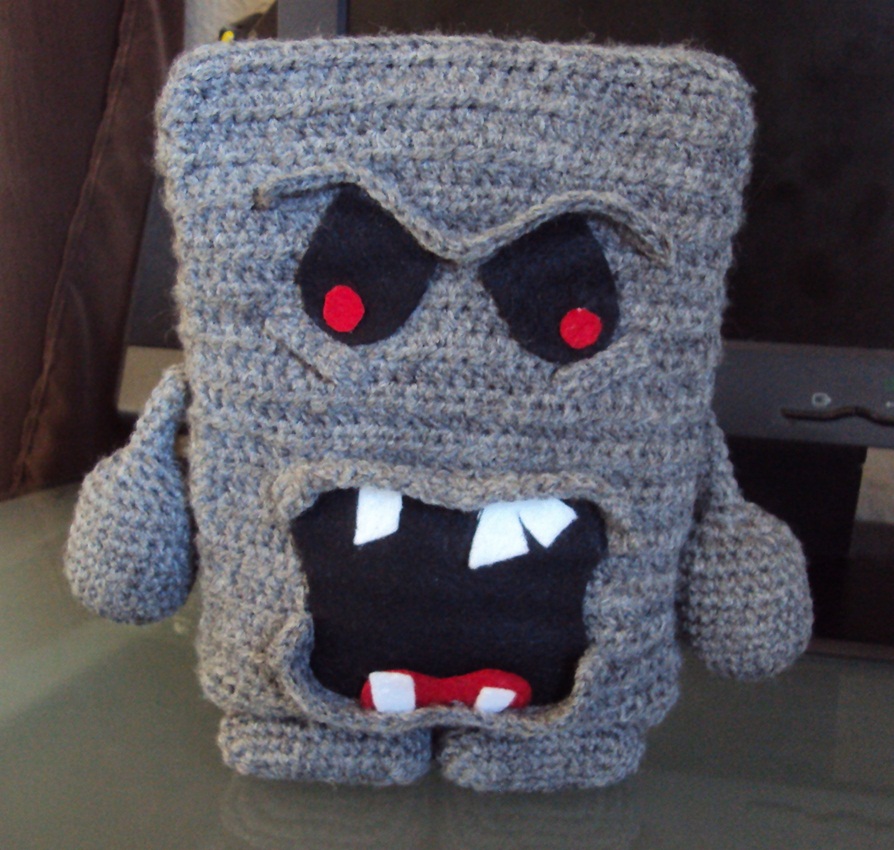
Whomp Plushie

By JC Designs


SIZE
Approx size: Height 7.5"

MATERIALS
*Crochet hook size 3mm
*DK weight yarn: Gray (213yds), Black (2yds)
*Felt in small amounts: black, white & red
*Yarn needle
*Sewing needle
*Gray thread
*Fiberfill
*Pinto Beans or any other type of bean


PATTERN NOTES
  Gauge isn't all that important, but your hook and yarn choices should result in a fairly tight stitch so that the stuffing won't show through.
  Numbers in ( ) at the end of each round or row indicate the total number of stitches for that round or row.


BODY (gray)
  Row 1: ch 30, hdc in 2nd ch from hook and hdc in each ch across , ch1, turn (29)
  Row 2-31: hdc in each hdc across, ch1, turn (29)
  Row 32: front loops only for this row hdc in each hdc across, ch1, turn (29)
  Row 33-35: hdc in each hdc across, ch1, turn (29)
  Row 36: front loops only for this row hdc in each hdc across, ch1, turn (29)
  Row 37-67: hdc in each hdc across, ch1, turn (29)
  Row 68: front loops only for this row hdc in each hdc across, ch1, turn (29)
  Row 69-71: hdc in each hdc across, ch1, turn (29)
  Row 72: Place the two ends together. We’re going to slip stitch the two ends together but on the back piece where going to slip stitch into the front loops only. Slit stitch all the way across.
F/O, secure and weave in ends.


Image 1: Closing the two ends of the body together.

SIDES for the body to close it (gray) make 2
  Row 1: ch 6, hdc in 2nd ch from hook and hdc in each ch across , ch1, turn (5)
  Row 2-31: hdc in each hdc across, ch1, turn (5)
F/O, secure and weave in ends.


Image 2: You want to sew the sides to the body with matching thread or use the whip stitch. (I use matching thread).

HAND/ARM (gray) make 2
  Rnd 1: 6 sc in Magic Ring (6)
  Rnd 2: 2sc in each sc around (12)
  Rnd 3: sc in next sc, 2sc in next sc around (18)
  Rnd 4: sc in next 2sc, 2sc in next sc around (24)
  Rnd 5-11: sc in each sc across (24)
  Rnd 12: sc in next 2sc, dec over next 2sc around (18)
  Rnd 13: sc in next sc, dec over next 2sc around (12)
  Rnd 14: dec over next 2sc around (6)
At this point you will want to stuff the hand moderately firm.
  Rnd 15-20: sc in each sc across (6)
F/O, secure and weave in ends. No need to close the opening.


FEET (gray) make 2
[Dec3 instructions: Instead of making a normal dec stitch, this is a decrease over 3 sc. In front loops only: insert yarn thru front loop of first sc, y/o pull through, insert through FL of second sc y/o pull through, insert through FL of third sc y/o pull thru, y/o pull through all loops on hook.]

  Rnd 1: 4sc in magic ring. join with sl st to first sc do not turn, continue as if for a ball (4)
  Rnd 2: ch 1, 3sc in same stitch as join, and in each sc around, join with sl st to first sc of round (12)
  Rnd 3: ch 1, sc in same stitch as join, *3sc next sc, sc in next 2sc* repeat from * to * around to last corner, end with 3sc in corner sc and sc in last sc, Join with sl st to first sc of round. (21)
  Rnd 4: ch 1, sc same st as join, sc in next sc, *3sc  next sc, sc in next 4sc* repeat from * to * around to last corner, end with 3sc in corner sc and sc in each of last 2sc, Join with sl st to first sc of round. (28)
  Rnd 5: ch 1, sc same st as join. sc in next 2 sc. *3sc next sc, sc in next 6sc* repeat from * to * to last corner, end with 3sc in corner sc and sc in each of last 3 sc, Join with sl st to first sc of round (36)
  Rnd 6: ch 1, sc same st as join, sc in next 3sc, *3sc next sc, sc in next 8sc* repeat from * to * to last corner, end with 3sc in corner sc and sc in each of last 4 sc. Join with sl st to first sc of round (44)
  Rnd 7: ch 1, sc in same stitch as join, sc in each sc around, sl st to the first sc of round(44)
  Rnd 8: ch 1, sc in same stitch as join, sc in next 6sc, dec over next 2sc 5times, sc in next 5sc, dec over next 2sc, sc in next 5sc, dec over next 2sc 5times, sc in next 5sc, sl st to the first sc of round. (33)
  Rnd 9: ch 1, sc in same stitch as join, sc in each sc around, sl st to the first sc of round(33)
  Rnd 10: ch 1, sc in same stitch as join, sc in next 4sc, dec over the next 3sc, dec over next 2sc, dec over next 3sc, sc in next 3, dec over next 2sc, sc in next 3sc, dec over the next 3sc, dec over next 2sc, dec over next 3sc, sc in next 4, sl st to the first sc of round (23)
  Rnd 11-12: ch 1, sc in same stitch as join, sc in each sc around, sl st to the first sc of round(33)
F/O, secure and weave in ends. No need to close the opening. Fill completely with just beans.


ASSEMBLY:
  I highly recommend pinning all the pieces together before sewing anything to make sure you have all the pieces done right and that you get them in the positions you like best before sewing. It seems like alot of extra work, but this will save you ALOT of hassle.
  See picture for placement for arm/hand and feet. Eyes, mouth, tongue, teeth are constructed from felt. Sew them in place or glue them.

  I didn’t put no instructions on how to make the crease for the mouth or eyes cause your cutouts might be slightly bigger or smaller than mine. But basically all you need to do is chain several chains, measure your chains to see if it’s a perfect size if not add more or take some off some, then sc in each ch across just once and pin them in place and sew them with matching thread.
  With black yarn, chain stitch stripes on Whomp’s back. You can either make it look like mine or you can change it up a little. Then you want place the band aids (constructed from yellow felt) in a X shape. You can either sew them or glue them in place.
Hope you enjoy your new plushie. ☺
- Janet Carrillo

Whomp and Mario Brothers are copyright Nintendo.
This pattern is an original pattern by Janet Carrillo "JC Designs" (August 2011). Please do not claim this pattern as your own. If you wish to share this pattern, you may link to this pattern but please do not reprint/repost it on your site. You may print and keep a copy for your own personal use but you may not sell or distribute it, or sell items may from this pattern.